
Logitech Flight Switch Panel User Manual

ABOUT
The Logitech Flight Switch Panel is a peripheral device designed for flight simulation enthusiasts. It is a part of the Logitech G Flight product line, which includes various controllers and panels specifically designed to enhance the flight simulation experience.
The Flight Switch Panel features a compact design with a set of realistic switches, buttons, and knobs that can be used to control different functions within flight simulator software. It is compatible with popular flight simulation software such as Microsoft Flight Simulator, X-Plane, and Prepar3D.
The panel includes a range of switches and buttons that can be assigned to various functions in your flight simulator. Some common functions include landing gear control, engine start/stop, autopilot engagement, lights control, and avionics master switch. The switches and buttons on the panel are backlit and can be customized to match the specific aircraft you are flying.
To use the Logitech Flight Switch Panel, you need to connect it to your computer via USB. It is compatible with both Windows and Mac operating systems. Once connected, you may need to install the Logitech drivers and software, which can be downloaded from the Logitech website.
Overall, the Logitech Flight Switch Panel is a dedicated peripheral device that adds an extra level of realism and control to flight simulation experiences. It allows users to have physical switches and buttons at their disposal, providing a more immersive and tactile experience while flying virtual aircraft.
INTRODUCTION
The Radio Panel interacts with Microsoft Flight Simulator X to control the cockpit radio stack communications and navigation frequencies.
INSTALLATION
Fix the Radio Panel to the supplied mounting bracket. Insert the screws through the holes at the corners of the Panel into the bracket behind and tighten. If you already own a Logitech G Flight Yoke System, you can mount the Radio Panel and bracket on top of the Yoke unit using the screws provided.

INSTALLATION FOR WINDOWS® 10, WINDOWS® 8.1 AND WINDOWS® 7
DRIVER INSTALLATION
- Visit logitech.com/support/yoke to download the latest drivers and software for your operating system.
- With the device disconnected, follow the onscreen instructions to complete the installation.
- At the Driver Setup screen, only when prompted, insert a USB cable into one of your computer’s USB ports, then click Next.
- At the Driver Setup screen, click Next to test your controller.
- Follow the on-screen prompts to test the controls and verify device operation. After the test, click OK.
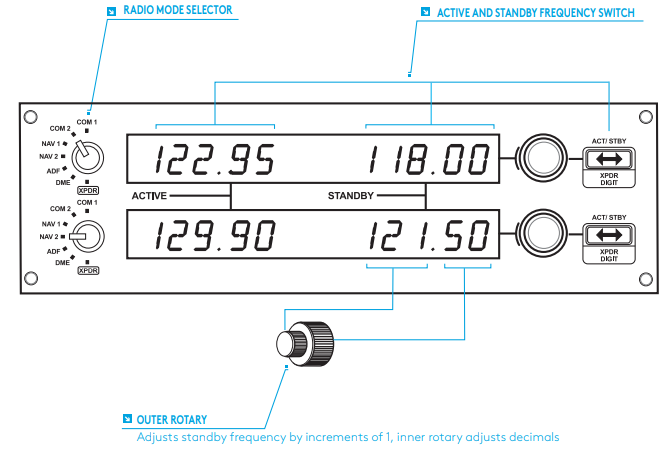
USING THE LOGITECH G FLIGHT RADIO PANEL
The Logitech G Flight Radio Panel allows you to adjust the communications and navigation frequencies on your aircraft’s radio stack for communicating with air traffic control or selecting VOR beacons or NDBs for navigation.
- Com1 and Com2 Communications channels 1 and 2
- Nav1 and Nav2 Navigation channels 1 and 2
- ADF Automatic Direction Frequency receiver
- DME Distance Measuring Equipment
- XPDR Transponder frequency code

To adjust the radio stack frequencies, first, select the radio mode using the radio mode selector knob on the left of the panel. Using the rotary controls to the right of the LED screen, adjust the values of the standby frequency on the right side of the screen. The outer rotary adjusts standby frequency by increments of 1 and the inner rotary adjusts decimals. Please note, you can only adjust the standby values and not the active values.
To make the standby values active, press the ACT/STBY switch to the right of the panel. The standby values you have input will now move from the standby section of the screen to the active section and vice versa.
ADF
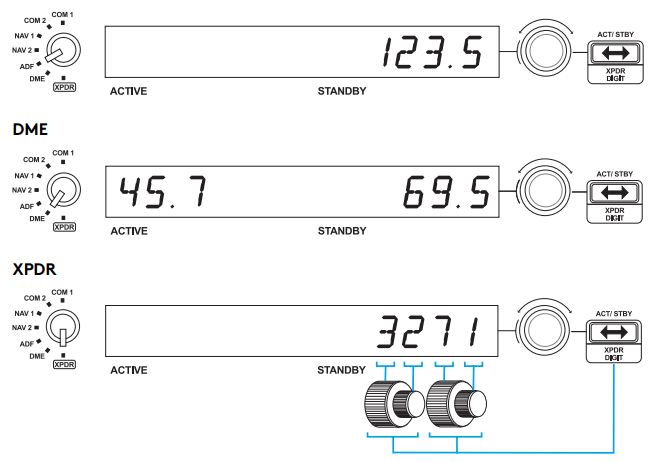
ADJUSTING THE XPDR CODE
To adjust the transponder squawk code, first, select XPDR on the radio mode selector knob on the left of the Radio Panel. Turn the outer rotary to adjust digit 1 and the inner rotary to adjust digit 2.
To adjust digits 3 and 4, press the ACT/STBY button to the right of the unit and adjust digit 3 by turning the outer rotary and digit 4 by turning the inner rotary.
TROUBLESHOOTING
Once you have installed the appropriate plug-in for Flight Simulator X (FSX), the next time you run FSX it will prompt you that it is attempting to load the Logitech G Panel(s) Plug-in for FSX – click Yes on this screen. After that you should see a Windows security warning asking you if you want to run LogiFlightSimX.exe – click Yes on that screen.
Finally, FSX will prompt you if you wish to make LogiFlightSimX.exe a trusted piece of software – click Yes. Once you have installed the Panel software, the Panel buttons and controls should be automatically configured to control their functions in FSX software. If your FSX software does not recognize the Panel, unplug the USB cable and plug it back in. For further help with other sims or any other questions, check the support page at http://www.logitech.com/support/radio-panel.
TECHNICAL SUPPORT
Online Support: support.logitech.com
REFERENCE LINK
https://www.logitechg.com/en-us/products/flight/flight-simulator-cockpit-radio-panel.html


 Afrikaans
 Albanian
 Amharic
 Arabic
 Armenian
 Azerbaijani
 Basque
 Belarusian
 Bengali
 Bosnian
 Bulgarian
 Catalan
 Cebuano
 Chichewa
 Chinese (Simplified)
 Chinese (Traditional)
 Corsican
 Croatian
 Czech
Czech Danish
 Dutch
Dutch English
 Esperanto
 Estonian
 Filipino
 Finnish
 French
 Frisian
 Galician
 Georgian
 German
 Greek
Greek Gujarati
 Haitian Creole
 Hausa
Hausa Hawaiian
 Hebrew
 Hindi
Hindi Hmong
Hmong Hungarian
 Icelandic
 Igbo
Igbo Indonesian
 Irish
Irish Italian
 Japanese
 Javanese
 Kannada
 Kazakh
 Khmer
Khmer Korean
 Kurdish (Kurmanji)
 Kyrgyz
 Lao
Lao Latin
Latin Latvian
 Lithuanian
 Luxembourgish
 Macedonian
 Malagasy
 Malay
Malay Malayalam
 Maltese
 Maori
Maori Marathi
 Mongolian
 Myanmar (Burmese)
 Nepali
 Norwegian
 Pashto
 Persian
 Polish
 Portuguese
 Punjabi
 Romanian
 Russian
 Samoan
 Scottish Gaelic
 Serbian
 Sesotho
 Shona
Shona Sindhi
 Sinhala
 Slovak
 Slovenian
 Somali
 Spanish
 Sundanese
 Swahili
 Swedish
 Tajik
Tajik Tamil
Tamil Telugu
 Thai
Thai Turkish
 Ukrainian
 Urdu
Urdu Uzbek
Uzbek Vietnamese
 Welsh
Welsh Xhosa
Xhosa Yiddish
 Yoruba
 Zulu
Zulu