

Black & Decker RTX 8V Max Rotary Tool With Accessory Kit Guide

SAVE THESE INSTRUCTIONS
WORK AREA
- Keep your work area clean and well-lit. Cluttered benches and dark areas invite accidents.
- Do not operate power tools in explosive atmospheres, such as in the presence of flammable liquids, gases, or dust. Power tools create sparks that may ignite the dust or fumes.
- Keep bystanders, children, and visitors away while operating a power tool. Distractions can cause you to lose control.
ELECTRICAL SAFETY
- Double Insulated tools are equipped with a polarized plug (one blade is wider than the other). This plug will fit in a polarized outlet only one way. If the plug does not fit fully in the outlet, reverse the plug. If it still does not fit, contact a qualified electrician to install a polarized outlet. Do not change the plug in any way. Double Insulation eliminates the need for the three-wire grounded power cord and grounded power supply system.
- Avoid body contact with grounded surfaces such as pipes, radiators, ranges, and refrigerators. There is an increased risk of eIectric shock if your body is grounded.
- Don’t expose power tools to rain or wet conditions. Water entering a power tool will increase the risk of electric shock.
- Do not abuse the cord. Never use the cord to carry the tools or pull the plug from an outlet. Keep the cord away from heat, oil, sharp edges, or moving parts. Replace damaged cords immediately. Damaged cords increase the risk of electric shock.
- When operating a power tool outside, use an outdoor extension cord marked “W-A” or “W”. These cords are rated for outdoor use and reduce the risk of electric shock.
PERSONAL SAFETY
- Stay alert, watch what you are doing, and use common sense when operating a power tool. Do not use tools while tired or under the influence of drugs, alcohol, or medication. A moment of inattention while operating power tools may result in serious personal injury.
- Dress properly. Do not wear loose clothing or jewelry. Contains long hair. Keep your hair, clothing, and gloves away from moving parts. Loose clothes, jewelry, or long hair can be caught in moving parts.
- Avoid accidental starting. Be sure the switch is off before plugging in. Carrying tools with your finger on the switch or plugging in tools that have the switch on invites accidents.
- Remove adjusting keys or wrenches before turning the tool on. A wrench or a key that is left attached to a rotating part of the tool may result in personal injury.
- Do not overreach. Keep proper footing and balance at all times. Proper footing and balance enable better control of the tool in unexpected situations.
- Use safety equipment. Always wear eye protection. Dust masks, non-skid safety shoes, hard hats, or hearing protection must be used for appropriate conditions.
TOOL USE AND CARE
- Use clamps or other practical ways to secure and support the workpiece to a stable platform. Holding the work by hand or against your body is unstable and may lead to loss of control.
- Do not force tools. Use the correct tool for your application. The correct tool will do the job better and safer at the rate for which it is designed.
- Do not use the tool if the switch does not turn it on or off. Any tool that cannot be controlled with the switch is dangerous and must be repaired.
- Disconnect the plug from the power source before making any adjustments, changing accessories, or storing the tool. Such preventive safety measures reduce the risk of starting the tool accidentally.
- Store idle tools out of reach of children and other untrained persons. Tools are dangerous in the hands of untrained users.
- Maintain tools with care. Keep cutting tools sharp and clean. Properly maintained tools with sharp cutting edges are less likely to bind and are easier to control.
- Check for misalignment or binding of moving parts, breakage of parts, and any other.
ADDITIONAL SAFETY RULES FOR ROTARY TOOLS
ALWAYS WEAR EYE PROTECTION WHEN USING THIS TOOL!
- If the accessory jams, turn the tool off and disconnect from the power supply before freeing the accessory from the jam.
- Hold the tool by insulated gripping surfaces when performing an operation where the cutting tool may contact hidden wiring or its own cord. Contact with a “live” wire will make exposed metal parts of the tool “live” and shock the operator.
- When using cutoff wheels always have the work securely clamped. Never attempt to hold the work with one hand while using any cutting accessory.
- Keep hands away from rotating accessories.
- Allow accessories and collets to cool before touching with bare hands. They will be hot after use.
- Ensure there are no foreign objects in the workpiece such as nails which if hit could cause loss of control of the unit.
- Always feed the cutter into the material in the same direction as the chips are being thrown. Feeding the tool in the wrong direction can cause Joss of control.
- Keep handles dry, clean, and free from oil and grease. This will enable better control of the tool.
- When cutting wood, extra care should be taken to avoid inhalation and minimize skin contact.
- Wear ear protection. Noise IeveI may be amplified when using tools in enclosed spaces.
- The RTX has an internal speed control, never use an external speed control on this unit.
- Do not use worn accessories.
- Do not use grinding wheels that have cracks.
- When turning the tool on, hold it away from your face, since a damaged accessory could come apart.
WARNING:
Some dust created by power sanding, sawing, grinding, drilling, and other construction activities contains chemicals known to cause cancer, birth defects, or other reproductive harm. Some examples of these chemicals are:
- lead from lead-based paints,
- crystalline silica from bricks and cement, and other masonry products, and
- arsenic and chromium from chemically treated lumber. (CCA)
Your risk from these exposures varies, depending on how often you do this type of work. To reduce your exposure to these chemicals: work in a well-ventilated area, and work with approved safety equipment, such as those dust masks that are specially designed to filter out microscopic particles.
USE OF EXTENSION CORDS
Make sure the extension cord is in good condition before using it. Always use the proper size extension cords with the tool – that is, proper wire size for various lengths of cord and heavy enough to carry the current the tool will draw. Use of an undersized cord will cause a drop in line voltage resulting in loss of power and overheating. For proper-size cords see the chart below.

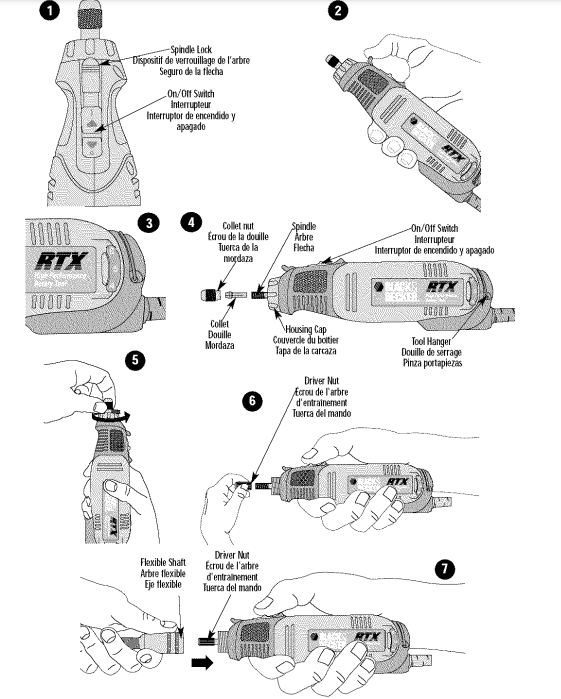
SPINDLE LOCK LEVER
TURN OFF AND UNPLUG THE TOOL FROM THE POWER SUPPLY. Fig.1 shows the ON/OFF switch and the spindle lock lever. To Iock the spindle for changing accessories, pull back on the spindle lock lever as shown in Figure 2. With the lever in the full-back position, the spindle will lock. Install or remove the accessories as directed in this manual. Release the spindle lock lever and you’re finished.
ON/OFF SWITCH
To turn the tool ON, slide the switch button forward. The tool will immediately run at the speed which is selected. Do not attempt to start the tool with the spindle lock engaged. It would not run.
SPEED SELECTION
To operate the tool, select the speed setting you wish with the speed wheel, shown in Fig 3, and slide the ON/OFF switch forward. The speed setting can be adjusted either with the tool on or off. ,_£AUTION: Because the RTX has a separate speed ‘wheel for setting the speed (8,000 – 30,000 RPM), the tool will start at the speed where the speed wheel is set.
Be sure the switch is fully OFF before plugging in. The numbered positions,1 through 6 inscribed on the switch speed wheel, do not indicate any precise speed but are good reference points. The higher the number, the higher the tool speed. Be sure to select the proper speed for your rotary toot operation. The following chart provides a speed guide for various operations. If in doubt about the proper speed for your operation, test the performance at low-speed settings and gradually increase until a comfortable speed is found.
- Cutting Metal ….. 5-6 Deburfing ……. 4-5
- Sanding Wood …. 5-6 Stripping Metal … 4-5
- Sharpening ……. 3-5 Engraving Metal .. 4-5
- Polishing …….. 1-2 Drilling Holes ….. 4-5
- Removing Rust …. 1-2
CHANGING ACCESSORIES
Accessories are held in place by a collet and collet nut as shown in Figure 4. To insert an accessory:
- Turn off the tool, allow it to come to a complete stop, and disconnect from the power supply.
- Pull back on the spindle lock lever (see Fig. 2) and grasp the collet nut.
- Turn the collet nut counter-clockwise as shown in Fig. 5 until it is loose.
- . insert the new accessory into the toilet as far as it will go.
- Tighten (clockwise) the collet nut securely. NOTE: The collet was designed to be hand tightened and Ioosened only. Accessories naturally self-tighten during use. A wrench is provided with the tool for loosening. You should never need to tighten the collet nut with the wrench. If a wrench is needed, use only the wrench provided. Do not use tools that will mar the finish and could break the coIIet. Always ensure there is some accessory in the collet before tightening. Tightening an empty collet can crack it.
- . Release the spindle lock lever and you’re finished.
- If an accessory causes vibration it can usually be improved by loosening the court nut or pushing.
CHANGING THE COLLET
Some accessories require different-sized collets. The two coliets used with Black & Decker accessories are 1/8″ (used for most accessories) and 3/32″. Ensure your content size matches your accessory:
- Turn off the tool, allow it to come to a complete stop, and disconnect from the power supply.
- Pull back on the spindle lock lever (see Fig. 2) and grasp the collet nut.
- Turn the collet nut counter-clockwise and remove the collet nut and the collet from the threaded spindle (see Fig. 4).
- insert the new collet into the spindle.
- Screw on the collet nut.
- Release the spindle lock.
USING THE ROTARY TOOL /_\WARNING:
Always wear eye protection. When operating the tool be sure to hold it securely. For detail work, grip the contoured area at the front of the tool, near the spindle. Before beginning a project, practice using the tool on some scrap material until you get the “fit of the tool. The rotary tool is small and easy to use but don’t be fooled; it’s a real power too and should be bandied carefully and properly as described in this manual. Don’t overload the tool. Performance is enhanced by letting the tool do the work.
FLEXIBLE SHAFT INSTALLATION INSTRUCTIONS
- Turn off the tool, allow it to come to a complete stop, and disconnect from the power supply.
- Remove the collet nut and collet from the tool by first pulling back on the spindle lock lever and grasping the collet nut (Fig.2).
- . Turn the collet nut counter-clockwise and remove the collet nut and the collet from the threaded spindle (see Fig. 4). Release the spindle lock.
- Remove the silver housing cap (Fig4) by turning counterclockwise.
- Locate the driver nut and thread it onto the motor shaft (Fig. 6).
- Screw the FLEXIBLESHAFTonto the rotary tool as shown in Fig. 7 ensuring that the rotating center core engages the square hole socket in the driver nut (Fig. 7). NOTE: Use caution when screwing the metal housing of the shaft onto the threaded portion of the rotary tool. Avoid cross-threading.
- The FLEXIBLE SHAFT is now ready for use. To insert an accessory, Turn off the toot, allow it to come to a complete stop, and disconnect from the power supply. Place the provided lock pin into the opening in the FLEXIBLESHAFThand piece and rotate the collet nut until the Iockpin engages the hole in the spindle (Fig. 8). With the shaft locked, turn the collet nut counter-clockwise to loosen. Insert the accessory completely into the court to avoid wobbling. Tighten the collet nut securely by hand. Remove the lock pin.
MAINTENANCE
Use only mild soap and a damp cloth to clean the tool. Never let any liquid get inside the tool; never immerse any part of the tool into a liquid. IMPORTANT: To assure product SAFETY and RELIABILITY, repairs, maintenance, and adjustments (other than those listed in this manual) should be performed by authorized service centers or other qualified service organizations, always using identical replacement parts. The unit contains no user-serviceable parts inside.
ACCESSORIES
Black & Decker offers a large selection of accessories available at your local dealer or authorized service center at extra cost. Only Black & Decker accessories are recommended for use in the RTX or B&D Flexible Shaft. If you need assistance regarding accessories, please call: 1-800-54-HOW TO (544-6986). )’_ CAUTION: Use only those accessories rated at 30,000 RPM or greater. Exception: Do not operate wire brushes, bristle brushes, diamond dome sander, or 1-1/4″ diamond wheels at speeds greater than 15,000 RPM (speed setting #2). Never exceed the speed rating of the accessory being used. z_ WARNING
SERVICE INFORMATION
Black & Decker offers a full network of company-owned and authorized service locations throughout North America. All Black & Decker Service Centers are staffed with trained personnel to provide customers with efficient and reliable power tool service. Whether you need technical advice, repair, or genuine factory replacement parts, contact the Black & Decker location nearest you. To find your local service location, refer to the yellow page directory under “Tools-Electric” or call: 1-800-54-HOW TO (544-6986)
FULL FIVE-YEAR HOME USE WARRANTY
Black & Decker (U.S.) Inc. warrants this product for five years against any defects in material or workmanship. The defective product will be replaced or repaired at no charge in either of two ways. The first, which will result in exchanges only, is to return the product to the retailer from whom it was purchased (provided that the store is a participating retailer). Returns should be made within the time period of the retailer’s policy for exchanges (usually 30 to 90 days after the sale).
Proof of purchase may be required. Please check with the retailer for their specific return policy regarding returns that are beyond the time set for exchanges. The second option is to take or send the product (prepaid) to a Black & Decker-owned or authorized Service Center for repair or replacement at our option. Proof of purchase may be required.
Black & Decker-owned and authorized Service Centers are listed under “Tools-Electric” in the Yellow Pages of the phone directory. This warranty does not apply to accessories. This warranty gives you specific legal rights and you may have other rights which vary from state to state. Should you have any questions, contact the manager of your nearest Black & Decker Service Center.
NOTE:
This too is designed, manufactured, and tested to meet or exceed the needs of the do-it-yourselfer in the execution of projects and repairs in and around the home. With proper use, it will provide the homeowner with years of service. However, if you use tools for a living and use this product or any of Black & Decker’s other Consumer Home Use tools ON THE JOBSlTE you should know that they CANNOT BE COVERED UNDER OUR WARRANTY.


