
Minelab CTX 3030 Advanced Multi-Frequency Metal Detector User Manual
Get Started
Important safety information
- Use of this appliance by children aged less than 8 years of age is prohibited.
- This appliance can be used by children aged from 8 years and above and persons with reduced physical, sensory or mental capabilities or lack of experience and knowledge if they are supervised or have been given instruction concerning use of the appliance in a safe way and understand the hazards involved. Children shall not play with the appliance. Cleaning and user maintenance shall not be performed by children without supervision.
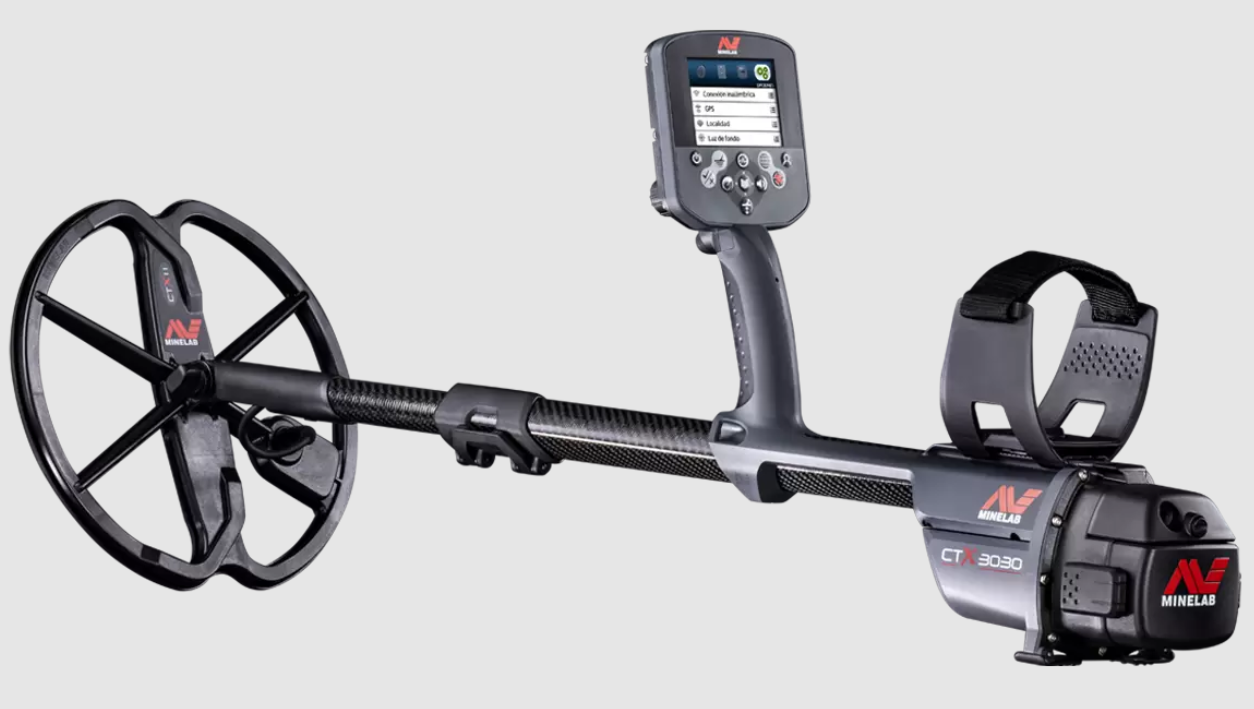
Main Detector Parts

Assembly
Attach Coil to Lower Shaft
- Plug the two rubber washers into the holes on either side of the lower shaft.
- Feed the coil cable up through the inside of the lower shaft.

- Place the coil on a flat surface and slide the lower shaft into the bracket on top of the coil. Ensure that the open side of the lower shaft faces the rear of the coil.

- Insert the bolt through the lower shaft and the bracket. Fasten with the nut provided

Attach Lower Shaft to Upper Shaft
- Release the cam lock on the upper shaft by pulling the lever away from the shaft.

- The lower shaft can only be inserted into the upper shaft in one orientation. Ensure that the key stop on the lower shaft is aligned to the upper shaft.
- Slide the lower shaft into the upper shaft until the coil cable and key stop appear at the top.
- Rotate the upper shaft 90° so that the control panel points upwards.

- Lock the cam lock by pushing the lever towards the shaft
WARNING
PINCH POINTS – CONTROL BOX. Take care when sliding the control box onto the chassis and when operating the control box latch.
Attach Control Box
- Slide the control box partly onto the upper shaft. When it reaches half way it will click into place to hold the control box while the connectors are fitted. Attach the coil and control panel cables to their respective connectors, and firmly tighten the retaining rings.

- Slide the control box further along the upper shaft until it locks into place.
- Fit the battery pack onto the control box and close the latches to secure it in place.
- Fit the headphone module onto the control box. Use a screwdriver or coin to gently tighten the bolt taking care not to damage the thread by over-tightening.

NOTE
The headphone module is NOT waterproof. Refer to the CTX 3030 Instruction Manual for further information on using the waterproof headphones.
Attach Armrest
- Lift the armrest lock until it is fully open. Slide the armrest onto the rail on top of the chassis. Ensure that the sloping sides of the armrest face toward the control panel.

- Slide the armrest along the rail so that it will be positioned comfortably just below your elbow when holding the detector.
- Push down the armrest lock to secure the armrest in position.

Adjust Armrest Strap
- Loosen the armrest strap by lifting the top edge.
- Tighten the strap until your arm is secure in the armrest, and fasten.
TIP
To fit a smaller arm, the strap can be fitted upside down and passed through the armrest three times.
Recharge Li-Ion Battery Pack with BC 10 Battery Charger
- Place the Li-Ion Battery Pack into the charger unit, ensuring that the pins line up

- Insert the plug pack (or car charger) connector into the socket on the charger unit.

- Plug the other end of the cable into the wall (or car socket) and turn on the switch. Leave the unit to recharge.
- The green indicator light will stop flashing when the battery is fully charged (up to 4 hours).
Control Panel

Adjust the Length of the Shafts

Adjust the Angle of the Coil

Turn On and Go
- Press the Power button to turn the detector on.
- The detector will begin with a startup screen and tune, after which the Detect screen will appear.
- If the detector is erratic due to electrical interference, press Noise Cancel and wait approximately 25 seconds. The CTX 3030 is ready to find treasure.
Sweeping the Coil
- Sweep the coil over the ground in a side-to-side motion while slowly walking forward at the end of each sweep. Slightly overlap the previous sweep to ensure full ground coverage.
- An average sweep speed is four seconds from left to right to left.

- For full details on using your CTX 3030, refer to the Instruction Manual on the CD supplied.
COMPLIANCE
Information to the User (FCC Part 15.105)
NOTE: Class B Devices
This equipment has been tested and found to comply with the limits for a Class B digital device, pursuant to part 15 of the FCC Rules. These limits are designed to provide reasonable protection against harmful interference in a residential installation. This equipment generates, uses and can radiate radio frequency energy and, if not installed and used in accordance with the instructions, may cause harmful interference to radio communications. However, there is no guarantee that interference will not occur in a particular installation. If this equipment does cause harmful interference to radio or television reception, which can be determined by turning the equipment of and on, the user is encouraged to try to correct the interference by one or more of the following measures:
- Reorient or relocate the receiving antenna
- Increase the separation between the equipment and receiver
- Connect the equipment into an outlet on a circuit different from that to which the receiver is connected
- Consult the dealer or an experienced radio/TV technician for help
DISCLAIMER
The Minelab metal detector discussed in this instruction manual has been expressly designed and manufactured as a quality hobbyist metal detector and is recommended for use in coin, treasure and general metal detection in nonhazardous environments. This metal detector has not been designed for use as a mine detector or as a live munitions detection tool.
PLEASE NOTE
Since there may be a variety of options available for this detector, equipment may vary according to the Model or items ordered with your detector. Certain descriptions and illustrations may also differ (in this manual) from the exact Model that you purchased. In addition, Minelab reserves the right to respond to ongoing technical progress by introducing changes in design, equipment and technical features at any time.
REFRENCE LINK
