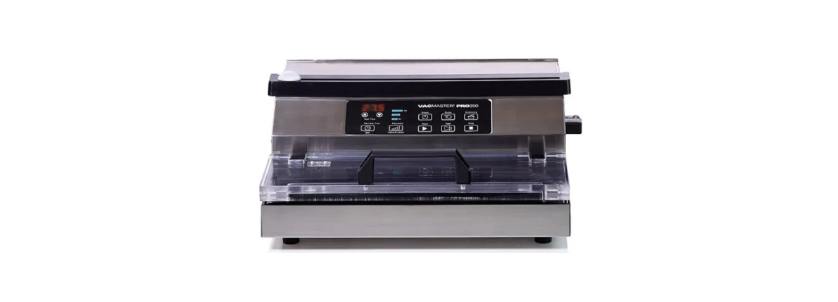
VACMASTER PRO350 Suction Sealer Vacuum User Guide
Important Safeguards
- Read this User’s Guide carefully for operating instructions. Read all instructions in this User’s Guide before use.
- Do not use the PRO350 on a wet or hot surface, or near a heat source.
- To protect against electrical shock, do not immerse any part of the vacuum sealer, power cord, or plug in water or any other liquid.
- Unplug the machine before cleaning or when not in use.
- To disconnect, unplug the power cord from the electrical outlet. Do not disconnect by pulling on the cord.
- Do not operate the PRO350 if it has a damaged cord or plug.
- Do not operate the PRO350 if it malfunctions or is damaged.
- Use the PRO350 only for its intended use.
- Closely supervise children when using any electrical appliance. Do not allow the PRO350 to be used as a toy.
- Do not use an extension cord.
FEATURES
Features of the VacMaster® PRO350

- Seal Pad: Provides pressure against the seal bar for a positive seal.
- Roll Cutter: Cuts rolls to the desired length.
- Control Panel: Controls machine functions.
- Seal Bar: Provides wide, positive seals on bags and rolls up to 12” wide.
- Vacuum Chamber: Area where the vacuum packaging process takes place and captures any overflow liquids.
- Gasket: Seals out air between the vacuum chamber and lid.
- Accessory Port: Use with the accessory hose to seal VacMaster® storage containers.
- Roll Storage Compartment: Stores VacMaster® rolls up to 12” x 50’.
- Built-in Cooling Fan: For cooler, more efficient operation.
- Handle: Use to open and close lid.
- Transparent Lid: Allows for easy bag placement
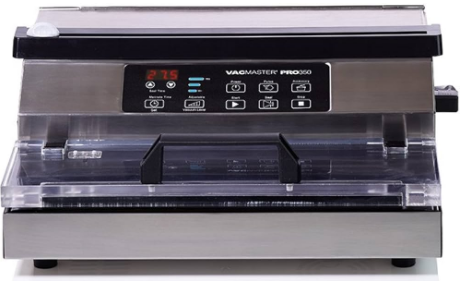
Control Panel
 Digital Display: Displays the function settings and progress of the working cycle.
- Arrow Buttons: Press up or down to adjust the “Vacuum Level”, “Seal Time” and “Marinate Time” functions.
- “Set” Button: Press to select desired function:
a. Seal Time – Adjust the length of seal time from 0.5 to 9.0. When value is adjusted to zero, the PRO350 will not seal. The last used seal time is stored in memory.
b. Marinate Time: Adjust the length of the marinating time from 9 to 99 minutes. - “Vacuum Level” Button: Press to set desired vacuum level.
a. 23hg: minimum vacuum setting.
b. 25hg: medium vacuum setting.
c. 27.5: maximum vacuum setting.
d. Adjustable: manually control the vacuum level from a minimum setting of 20hg to a maximum of 27.5hg. - “Power” Button: Turns the machine ON/OFF.
- “Start” Button: Begins the vacuum packaging process.
- “Pulse” Button: Use to prevent crushing delicate items. Press once, “P” will display. Press and hold to achieve desired vacuum.
- “Seal” Button: This button has two functions:
a. Press to interrupt the vaccum cycle and begin sealing the bag.
b. Press to create a seal on poly, other types of bags or rolls. - “Accessory” Button: Press to vacuum seal canisters. See “Vacuum Seal with Canisters” section.
- “Stop” Button: Press to cancel any function in process.
 Digital Display: Displays the function settings and progress of the working cycle.
Vacuum Package Precut Bags
Follow these steps when using precut vacuum packaging bags with your VacMaster® PRO350 Vacuum Sealer:
- Choose a suitable-sized vacuum packaging bag, and place the item(s) inside.
- Allow at least 3” of head space between the contents and the top of the bag.
- Using the handle, open the lid and place the open end of the bag across the seal bar, keeping the opening within the gasket area.
- To ensure a complete seal make sure the bag is flat across the seal bar, smoothing out any wrinkles.
- Close the lid.
- Press the “Start” button to begin the vacuum process. Press and hold down the lid until the vacuum engages.
- Once the the bag is sealed, the machine will beep letting you know that the process is complete.
- Open the lid.
- Take the bag out and inspect the seal. A successful seal will look clear. If seal is spotty, incomplete, wrinkled, white or milky, cut the seal and repeat the vacuum sealing process.
Package Delicate Items
Delicate items, such as baked goods, fresh fruits, etc., can be crushed during the vacuum packaging process. To prevent this from occurring, use the “Pulse” vacuum function. When packaging liquid rich items, you can also use this function to prevent liquid from being drawn into the machine.
- Follow instructions 1 – 4 under “How to: Vacuum Package Precut Bags”
- Press the “Pulse” button once to activate this function.
- Close and hold down the lid and press the “Pulse” button to begin the vacuum process. Watch the bag and release the “Pulse” button to stop the vacuum process before the contents are crushed or liquid is pulled into the machine.
- Press the “Seal” button to seal the bag.
- The machine will finish the cycle and then beep, indicating the sealing cycle is complete.
Vacuum Seal
Follow these steps when using storage canisters with your VacMaster® PRO350 Vacuum Sealer:
- Place the items to be sealed in the canister. Make sure the lid of the canister is dry and free of any food particles and debris. Do not overfill. Leave a minimum of 1” head space between the canister contents and the top of the canister.
- Place the lid on top of the canister. Turn the lid knob so the arrow points to “Vacuum”.
- Insert one end of the Accessory Hose into the lid port and insert the other end into the Accessory Port on the PRO350.
- Press the “Accessory” button.
- When the vacuum process is complete the machine will “beep”. Turn the lid knob to “Lock” position.
- Gently twist and remove the Accessory Hose from the canister and machine.
- To test the vacuum, tug on the canister lid. It should not move.
- Store the canister
Marinate Food with Canisters
Your PRO350 has a special marinating feature that allows foods to quickly achieve the optimum flavor infusion. While in the Marinate cycle, the PRO350 will alternate back and forth between a state of vacuum and state of rest.
- Place the food and marinade in the canister. Ensure the rim of the canister is clean and dry, and no food or liquid has been spilled on the lid.
- Turn the lid knob to “Open”.
- Insert one end of the Accessory Hose into the lid port and insert the other end of the Accessory Hose into the Accessory Port on the PRO350.
- Press the “Set” button to select Marinate Time.
- Using the arrow buttons to adjust Up or Down, set the marinating time (9 to 99 minutes).
- With the lid in the closed position, press the “Start” button. With the vacuum pump running, push down on the canister to ensure the vacuum is engaged.
- Your PRO350 will alternate between vacuuming and releasing air.
- When the Marinate cycle is complete, the machine will “beep” and release the vacuum.
- Gently twist and remove the Accessory Hose from the canister and the machine.
Troubleshooting
The PRO350 will not turn ON:
- Make sure the unit is plugged into a grounded outlet.
- Make sure the outlet is working.
- Check the power cord for any tears or frays.
- Check the fuse located in the power cord connecting outlet.
Error code in the Digital Display:
E01 – The PRO350 cannot achieve the preset vacuum level.
- Close and hold down the lid during the vacuum cycle.
- Ensure the open end of the bag is across the seal bar and within the gasket area.
- Make sure the bag is flat across the seal bar. Eliminate any wrinkles or folds.
- Make sure the foam gasket is clean and not damaged.
- When using the Accessory or Marinate feature, make sure the hose is securely attached, the lid knob is set to “Vacuum” and the lid is on the canister properly.
The bag is not sealing properly:
- Push and hold down the lid during the vacuum cycle.
- Increase or decrease the Seal Time. A positive seal will look clear. If the seal is spotty, incomplete, wrinkled, white or milky, cut the seal and restart the sealing process.
- When vacuum packaging moist / wet foods, create a second seal above the first seal to ensure a positive seal.
- For the best results, use VacMaster® bags and rolls.
Loss of vacuum from the bag:
- Check for any puncture holes in the bag. Cover any sharp item edges with a VacMaster® Bone Guard sheet and vacuum package in a new bag.
- Check the seal and adjust the placement and/or sealing time.
Cleaning and Care
- Disconnect the power cord from the electrical outlet by unplugging it. DO NOT disconnect by pulling on the cord.
- DO NOT immerse in water or spray directly with liquid.
- Check the Vacuum Chamber and Gasket making sure they are clean and free of debris. If needed use a clean cloth with mild soap.
- Wipe the vacuum chamber clean.
- Wipe the gasket clean.
- Wipe the seal area clean.
NOTE: Always leave the lid in resting position when storing. DO NOT stack items on top of the lid or machine. If the lid is closed or forced down, the gasket will become compressed and the PRO350 may not operate properly.
Vacuum Packaging Guidelines
- Follow all food safety regulations as outlined by the FDA at www.FDA.gov.
- Vacuum packaging is NOT a substitute for canning.
- Vacuum packaging cannot reverse the deterioration of foods.
- Vacuum packaging is NOT a substitute for refrigeration or freezing.
- Some fruits and vegetables may release gases, known as out gassing. When packaging these fruits and vegetables, out gassing can cause the vacuum to be gradually lost over time. Blanching or freezing before vacuum packaging helps prevent this from occuring.
- It is critical that food handling and storage are maintained at low temperatures. You can reduce the growth of microorganisms at temperatures of 40°F or less (4°C). Freezing at 0°F will not kill microorganisms, but reduces the chances of them growing. For long-term food storage, always freeze foods that have been vacuumed packaged.
Limited Warranty
ARY, Inc., a distributor and manufacturer of vacuum packaging and other machines (collectively, the “Goods”), extends to the purchaser of the Goods a Limited One Year Warranty, from the receipt of the Goods, under terms and conditions set out herein. All Goods sold by ARY, Inc. are warranted to be free from defects in material and workmanship at the time of delivery to purchaser. Defective material may be returned to ARY, Inc. after inspection by an agent of ARY, Inc. and upon receipt from ARY, Inc. of shipping instructions specific to the defective Goods authorized by ARY, Inc. to be returned. ARY, Inc. at its sole option, may either
- replace or repair any defective materials and workmanship (and return the Goods to purchaser
without charge) - refund the purchase price
- grant a reasonable allowance with the foregoing procedure.


