
Table of contents
show
JALL RGB Night Light Alarm Clock User Manual

Front

- Time Display – Show current time.
- AM/PM Indicator – The AM/PM Indicator is for a 12-hour system only.
- Alarm 1 / 2 Indicator – If you switch on alarm 1 / 2, it will be displayed.
- Alarm 1 / 2 Indicator – If you switch on alarm 1 / 2, it will be displayed.
- Sound-activated Mode Indicator – If you switch on sound–activated mode, it will be displayed.
Back

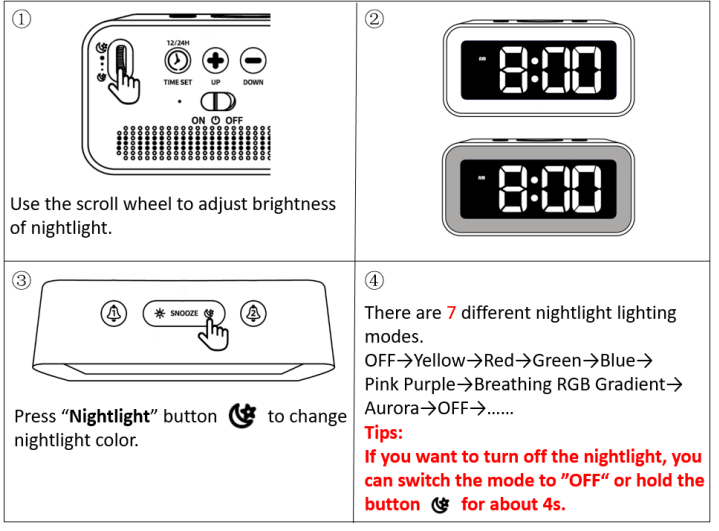
- Nightlight Brightness Control – Use the scroll wheel to adjust the brightness of the night light.
- Time Set and 12H/24H – Hold the “Time Set ” button for about 4s to set the current time. Press the “Time Set” button to switch between 12-hour and 24-hour display modes.
- Up & Down – Use these two buttons to adjust the value increase or decrease in various settings.
- Alarm Volume Adjust – Press the “Alarm Set” button to select the appropriate alarm volume. There are 3 levels of alarm volume to choose from.
- Alarm Mode Adjust – Hold the “Weekend” button for about 4s to set the working mode of alarm 1 and alarm 2.
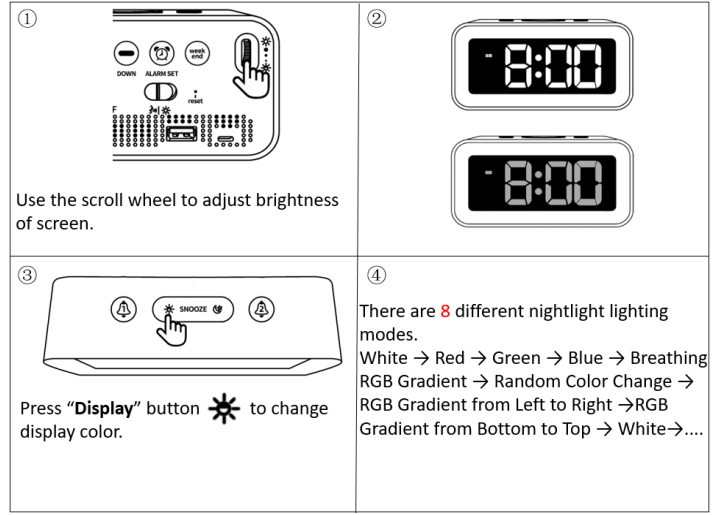
Note: 1 – 7: Monday – Sunday (7–day mode). 1 – 5: Monday – Friday (Weekday mode). 6 – 7: Saturday – Sunday (Weekend mode). - Screen Brightness Control – Use the scroll wheel to adjust the brightness of the screen.
- Power Switch – Use the switch to turn alarm clock on or off.
- Working Mode – Use “Working Mode” switch to select whether the alarm clock works in constant mode or sound-activated mode.
- USB Charging Port – Connecting a smartphone through a USB charging port can charge the smartphone.
- 5V Power Input – Please use the original power cord and adapter to power the alarm
Top

- Alarm 1 – Hold the “Alarm 1” button for about 4s to set alarm 1. Press the “Alarm 1” button to switch alarm 1 on/ off.
- Alarm 2 – Hold the “Alarm 2” button for about 4s to set the alarm. Press “Alarm 2” button to switch alarm 2 on/ off.
- Display color changing – Use the “display color changing” button to select the color of the display. There are a total of 8 display colors.
- Nightlight color changing – Use “nightlight color changing” button to select the color of the nightlight. There are a total of 7 nightlight colors
Package Includes:
- 1 x Digital Alarm Clock
- 1 x User Manual
- 1 x USB Cable
- 1 x 5V 1A Power Adapter
Setting:
Time Setting:

12 / 24 H Switch:

Alarm 1 Setting (Alarm 2 is the same as Alarm 1):

Quick Set Alarm Working mode:

Alarm Volume:

Nightlight Setting:
Display Setting:
Snooze:
- When the alarm goes off, press the “Snooze” button (
 ) once. The corresponding alarm indicator light will flash, giving you an extra 5 minutes of snooze time.
 - To turn off the snooze feature, simply press any button. This will stop the flashing of the alarm indicator light. The alarm will go off the next day
Reset:

Use a needle or little stick to push the “Reset” button inside the hole to finish a factory reset.
Product Features:
- Input Voltage: AC110v-240V, 50/60HZ.
- Output Voltage: DC5V / 500MA-2100MA
Trouble Shooting:
- Any questions about the clock, please contact us on Amazon or by email.
- If the alarm clock cannot be turned on after connecting to the power supply, please check the Power Switch at the back to make sure it is in the “ON” position.
- If the alarm clock always turns off automatically, please check the “Working Mode” switch at the back. Make sure the switch is in the “Constant Mode” position.
- Please use the original power cord and adapter to work. If it’s broken, please use a 5V 1A or 5V 2A power adapter as an alternative.
- If you find that the alarm clock is malfunctioning, please try unplugging and reconnecting the power cord. Then press the “RESET” button at the back of the alarm clock. If the issue persists, please contact us for a warranty.

 Afrikaans
 Albanian
 Amharic
 Arabic
 Armenian
 Azerbaijani
 Basque
 Belarusian
 Bengali
 Bosnian
 Bulgarian
 Catalan
 Cebuano
 Chichewa
 Chinese (Simplified)
 Chinese (Traditional)
 Corsican
 Croatian
 Czech
Czech Danish
 Dutch
Dutch English
 Esperanto
 Estonian
 Filipino
 Finnish
 French
 Frisian
 Galician
 Georgian
 German
 Greek
Greek Gujarati
 Haitian Creole
 Hausa
Hausa Hawaiian
 Hebrew
 Hindi
Hindi Hmong
Hmong Hungarian
 Icelandic
 Igbo
Igbo Indonesian
 Irish
Irish Italian
 Japanese
 Javanese
 Kannada
 Kazakh
 Khmer
Khmer Korean
 Kurdish (Kurmanji)
 Kyrgyz
 Lao
Lao Latin
Latin Latvian
 Lithuanian
 Luxembourgish
 Macedonian
 Malagasy
 Malay
Malay Malayalam
 Maltese
 Maori
Maori Marathi
 Mongolian
 Myanmar (Burmese)
 Nepali
 Norwegian
 Pashto
 Persian
 Polish
 Portuguese
 Punjabi
 Romanian
 Russian
 Samoan
 Scottish Gaelic
 Serbian
 Sesotho
 Shona
Shona Sindhi
 Sinhala
 Slovak
 Slovenian
 Somali
 Spanish
 Sundanese
 Swahili
 Swedish
 Tajik
Tajik Tamil
Tamil Telugu
 Thai
Thai Turkish
 Ukrainian
 Urdu
Urdu Uzbek
Uzbek Vietnamese
 Welsh
Welsh Xhosa
Xhosa Yiddish
 Yoruba
 Zulu
Zulu