BEURER EM34 Knee and Elbow TENS Unit manual
IMPORTANT SAFETY NOTES
Signs and symbols
READ THIS ENTIRE MANUAL, THE SAFETY SECTION AND ALL INSTRUCTIONS AND WARNINGS COMPLETE-LY AND CAREFULLY BEFORE USING THIS PRODUCT. FOLLOW ALL SAFETY INSTRUCTIONS AND WARNINGS TO AVOID HAZARDOUS SITUATIONS AND TO MAKE CORRECT USE OF THIS PRODUCT.
WARNING
To reduce the risk of fire, electric shock, or serious personal injury:
- This device is for external use on human knees and elbows only. Do not use this device in the following situations:
- If you have implanted electrical devices (e.g. a pace-maker).
- If you have metal implants.
- If you use an insulin pump.
- In combination with electronic life-sustaining devices, such as an artificial heart or lung.
- If you have a fever above 102° F (39° C).
- If you have cardiac arrhythmia or disorders of the heart’s impulse and conduction system.
- After an operation, if muscle contractions could affect the healing process.
- After consuming alcohol.
- If you suffer from a seizure disorder (e.g. epilepsy).
- If you are pregnant.
- If you have cancer.
- If you suffer from metabolic arthritis.
Battery Handling Safety Precautions
- Use only the size and type of batteries specified.
- Be sure to follow the correct polarity when installing the batteries. Reversed batteries may cause damage to the device.
- Do not mix different types of batteries together (e.g. Alkaline and Carbon-zinc or rechargeable batteries) or old batteries with fresh ones. Always replace batteries as a simultaneous set.
- If the batteries in the device are depleted or the device will not be used for a long period of time, remove the batteries to prevent damage or injury from possible battery leakage.
- Do not try to recharge batteries not intended to be re-charged; they can overheat and rupture (follow battery manufacturer’s directions).
- Do not dispose of batteries in fire, batteries may explode or leak.
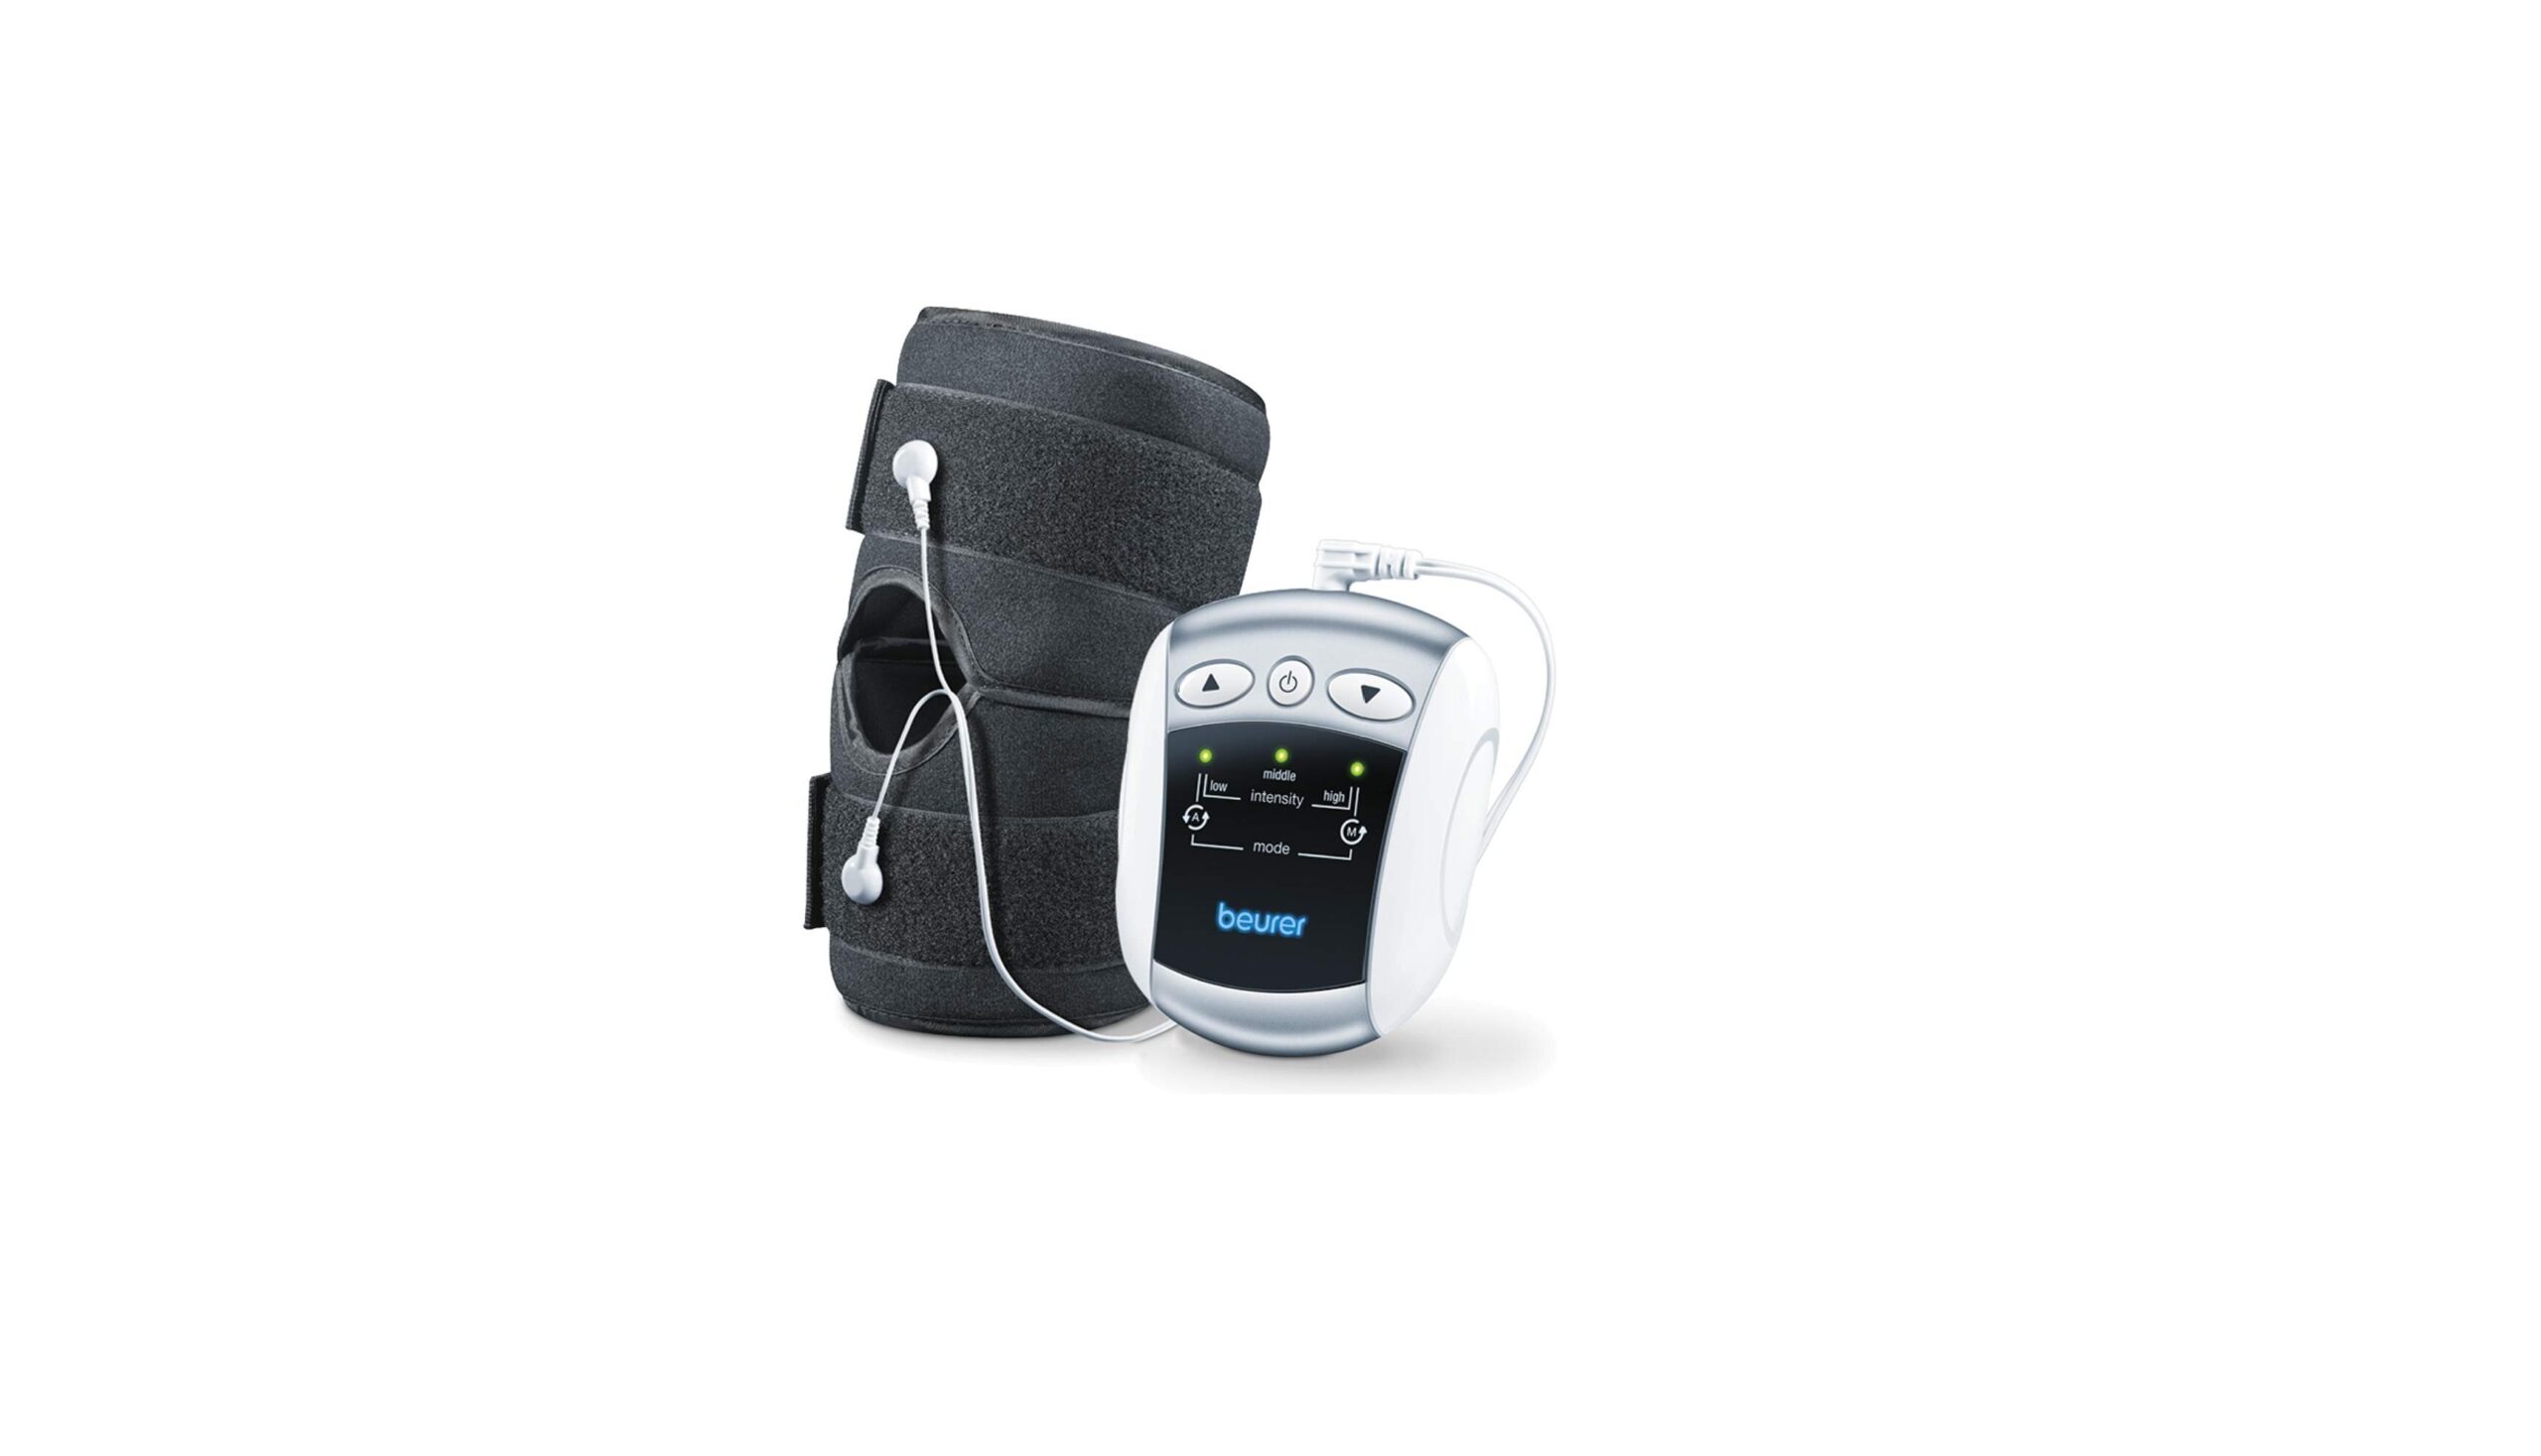
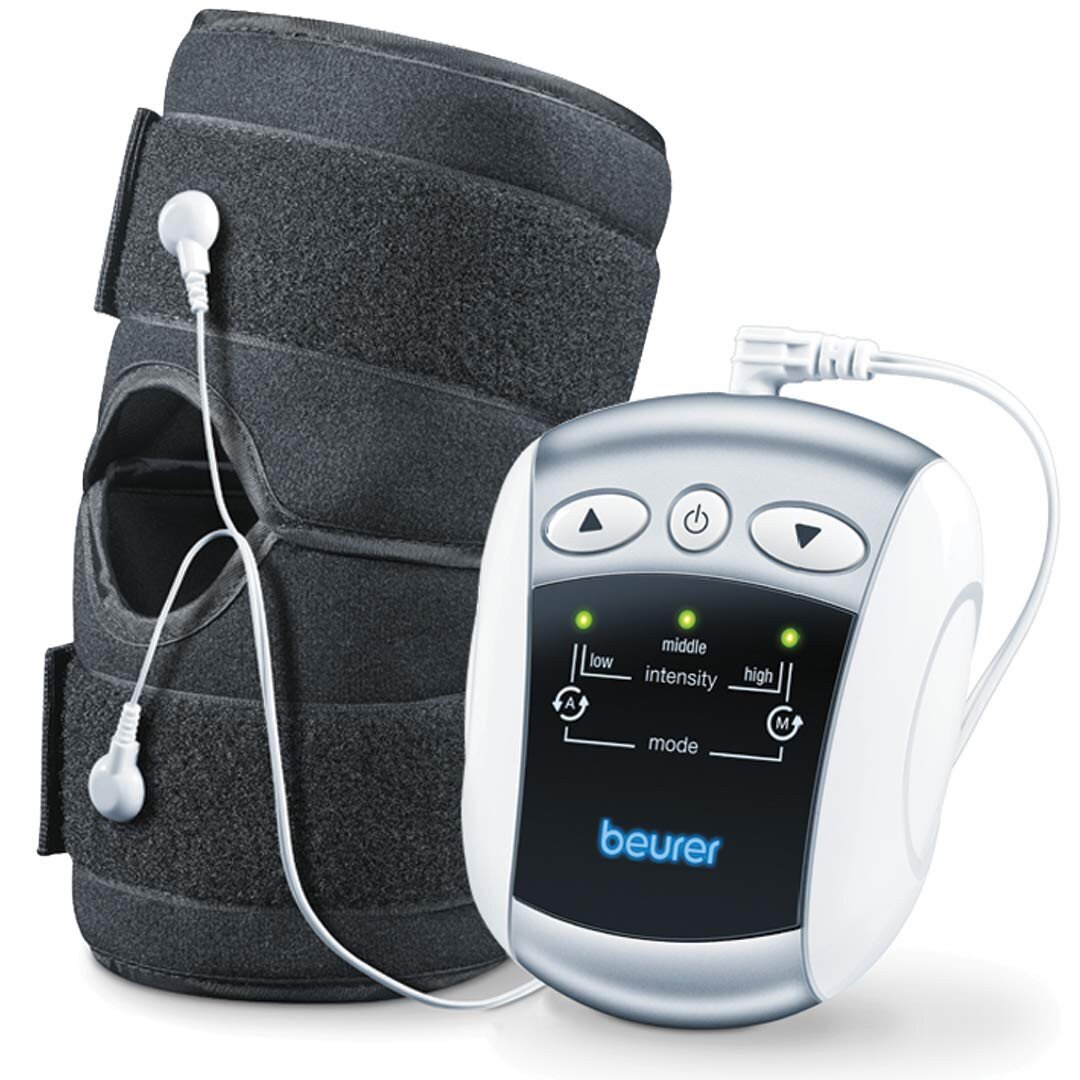
Parts and Controls
- Hook and Loop Strap
- Rubber Electrode
- Rubber Electrode Covers
- Power Wire Connectors
- Power Wire
- ▲ Button (increases intensity)
- Power Wire Jack
- On/Off Button
- ▼ Button (decreases intensity)
- Intensity Level Indicators
- Illuminated Logo
- Clip
- Battery Compartment Cover
Introduction
The Knee and elbow TENS is a single-channel TENS de-vice and falls into the category of electrostimulation units. Gentle electrical pulses are sent via water contact electrodes through the skin to the nerve fibers. The innovative Knee and elbow TENS provides temporary pain relief in the knee and elbow area.
The device is designed to be used for temporary relief for sore and aching muscles in the upper extremities (arms) and lower extremities (legs) due to strain from exercise or normal household and working activities.
Package Contents
- 1 x knee and elbow universal cuff
- 1 x control unit
- 1 x connection cable
- 3 x 1.5 V AAA battery LR03
To Use
Battery Installation/Replacement
- Remove the Battery Compartment Cover from the bot-tom of the control unit.
Insert three AAA size alkaline batteries (included), observing the correct polarity as indicated inside the bat-tery compartment. - Reattach the Battery Compartment Cover.
Connecting Components
- Snap the ends of the power wire onto the power wire connectors on the cuff. The two ends are inter-changeable and do not have a specific left or right.
- Moisten the rubber electrode covers with water, as well as the area on your body to be treated.
- Place the cuff around your knee or elbow, as desired. Ensure the rubber electrode covers are properly positioned over the desired treatment area and the opening in the cuff is over your knee/elbow.
- Tighten and secure the hook and loop straps.
- Insert the power wire plug into the power wire jack on the control unit.
Care and Maintenance
Cleaning the Cuff
Clean the cuff in warm soapy water and then rinse well, making sure all soap is washed out. Pat cuff dry with a towel and then let air dry completely before use.
Storage
To store the device, first ensure it is switched off. Disconnect the power wire from the control unit and from the cuff. Place all parts back into their original packaging and store in a cool, dry place out of the reach of children.
Troubleshooting Guide
| Problem | Possible cause | Solution |
| The device does not switch on | Batteries are depleted | Replace the bat- teries |
| Batteries are not inserted correctly | Reinsert the bat- teries according to the polarity indica- tors inside the bat- tery compartment | |
| The elec- trical pulses are weak | Cuff is not con- tacting skin prop- erly | Reposition the cuff to ensure it con- tacts the skin suf- ficiently |
| Electrodes are not wet enough | Shut off the de- vice and remoisten electrodes |
| Treatment is uncomfort- able | Power wire is worn or malfunc- tioning | Replace the power wire |
| Electrodes are worn or malfunc- tioning | Replace the cuff | |
| Intensity level set too high | Lower intensity level | |
| Electrodes are not wet enough | Shut off the de- vice and remoisten electrodes | |
| Irregular stimulation | Power wire mal- functioning | Lower intensity level and rotate the power wire plug 90°. If problem persists, replace the power wire |
| Stimulation is ineffective | Electrodes positioned incorrectly | Remove electrodes and reposition, ensuring cuff has sufficient skin contact |
| The skin turns red and/or a stabbing pain occurs | The universal cuff is not positioned correctly on the skin | Ensure that the universal cuff sits comfortably on the skin and cannot move |
| The universal cuff is dirty | Clean the universal cuff as described in these instructions for use | |
| One of the water contact electrodes has a scratch | Replace the universal cuff | |
| Water contact electrodes are not sufficiently moist | Switch off the de- vice. Moisten elec-trodes |
Frequently Asked Questions
When should I use this device?
Apply the cuff as soon as you feel pain in your knees/elbows. If you begin using this device immediately, you can alleviate or even avoid chronic pain. The earlier you begin using the device, the higher the probability that pain can be alleviated.
How often should I use the device?
Do not use the device on a particular area more than three sessions per day, 30 minutes per session. Start the first treatment at low intensity until you are familiar with the de-vice. Stop treatment as soon as the pain has receded or disappeared. If, after using the device, you experience pain due to overexertion, stop use for two days. If you experience further pain due to overexertion, lower the intensity level during subsequent uses and reduce the treatment time.
Specifications
- Output waveform Biphasic rectangular pulse
- Pulse length 300 μs
- Pulse frequency 2-60Hz or 2/100Hz
- Output voltage max. 90 Vpp (500 ohms)
- Output current max. 180 mApp (500 ohms)
- Power supply 3 x 1.5 V AAA batteries LR03
- Intensity Levels 0 to 25
- Operating conditions 41 ° – 104 °F (5 °– 40 °C)
- at a relative humidity of 30– 75%
- Storage conditions 14 °– 131 °F (-10 °– 55 °C)
- at a relative humidity of 10– 90%
- Dimensions 3.3 x 2.8 x 1.2 in
- (85 x 72 x 31 mm)
- Weight Control unit: 2.96 oz (84 g)
- including batteries
- Cuff: 4 oz (113 g)
FCC Compliance Statement
This device complies with Part 15 of the FCC Rules. Operation is subject to the following two conditions: (1) this device may not cause harmful interference; and (2) this device must accept any interference received, including interference that may cause undesirable operation.
- Reorient or relocate the receiving antenna.
- Increase the separation between the equipment and receiver.
- Connect the equipment into an outlet on a circuit different from that to which the receiver is connected.
- Consult the dealer or an experienced radio/TV technician for help.
Changes or modifications not expressly approved by the party responsible for compliance could void the user’s authority to operate the equipment.
REFRENCESS LINK
https://www.tejar.pk/beurer-em-34-knee-and-ellbow-tens


