
HP ENVY Photo 7800 All-in-One series User Manual

SETUP GUIED
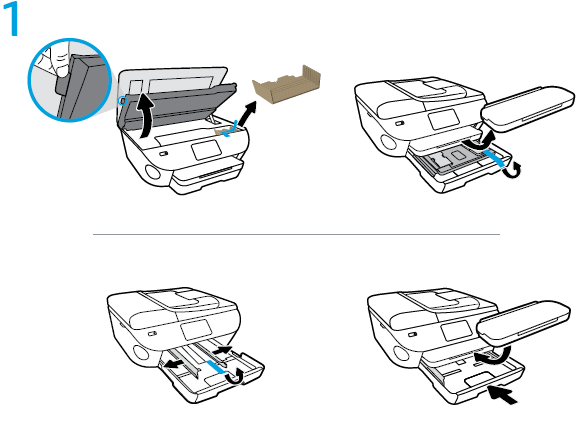


Download HP ENVY Photo 7800 All-in-One series Smart software to complete printer setup.
OVERVIEW
Need help? www.hp.com/support/ENVY7800

- Power button: Turns the printer on or off.
- Back button: Returns to the previous screen.
- Help button: Opens the Help menu for the current operation.
On Home screen, touch Help button and then touch How to Videos to view help videos such as loading paper and replacing cartridges. - Home button: Returns to the Home screen, the screen that is displayed when you first turn on the printer.
- Control panel display: Touch the screen to select menu options, or scroll through the menu items.
- Dashboard tab: To open the Dashboard, touch or swipe down the tab at the top of the screen.
- Wireless light: Indicates the status of the printer wireless connection.
- Solid blue light indicates that wireless connection has been established and you can print.
- Slow blinking light indicates that wireless is on, but the printer is not connected to a network. Make sure your printer is within the range of wireless signal
- Fast blinking light indicates wireless error. Refer to the message on the printer display.
- No light indicates that wireless is off.
Scan: Use the HP Smart app or printer software to scan. Find more information about scanning at www.hp.com/support/ENVY7800.
Wireless setup help for HP ENVY Photo 7800 All-in-One series
Go to 123.hp.com to download and install the HP Smart app or printer software. Both the app and software will help you connect to your wireless network (2.4GHz and 5GHz supported). For more information, visit
www.hp.com/go/wirelessprinting.
Note for Windows® users: You may also order a printer software CD. Please visit www.support.hp.com.
Tip: If you are unable to connect the printer to the wireless network, restore the printer network setting and reinstall from 123.hp.com. Open the dashboard, touch (Wireless), touch (Settings), and then touch Restore Network Settings.
Unable to connect the printer to your network at 123.hp.com?
Learn more: www.hp.com/go/wificonnect
Convert from a USB connection to wireless connection
Learn more: www.hp.com/go/usbtowifi.
Set up fax
- You can setup fax using the HP printer software (recommended) or printer control panel.
- Windows: Use the Fax Wizard during software installation. To set up after software installation, open the printer software by double-clicking the icon with the printer name on the desktop, go to the Fax tab, and then select Fax Setup Wizard.
- OS X and macOS: After software installation, from the HP Utility, use Basic Fax Settings.
- Control panel: Touch Fax on the Home screen, swipe to scroll down the menu, and then touch Setup.
For more information, visit www.hp.com/support/ENVY7800.
Basic troubleshooting
- Make sure you have installed the latest HP Smart app or printer software from 123.hp.com.
- If you are using a USB cable, make sure the cable is securely connected and the printer is set as the default printing device.
- If your computer is connected to the printer with a wireless connection, make sure the printer is connected to the same network as the device you are printing from. Visit www.hp.com/go/wifihelp for more information.
Note for Windows® users: Visit HP Diagnostic Tools at www.hp.com/go/tools to fix common printer problems.
Learn more
Get additional help and find notices, environmental, and regulatory information, including the European Union Regulatory Notice, North America EMC, Wireless and Telecom statements, and other compliance statements, in the “Technical Information” section of the User Guide: www.hp.com/support/ENVY7800. Printer registration:
www.register.hp.com. Declaration of Conformity: www.hp.eu/certificates. Ink usage: www.hp.com/go/inkusage.

- Product support
www.hp.com/support/ojp7740 - HP mobile printing
www.hp.com/go/mobileprinting
HP printer limited warranty statement
| HP Product | Limited Warranty Period |
| Printer | 1 year hardware warranty |
| Print or Ink cartridges | Until the HP ink is depleted or the “end of warranty” date printed on the cartridge has been reached, whichever occurs first. This warranty does not cover HP ink products that have been refilled, re-manufactured, refurbished, misused, or tampered with. |
| Printheads (only applies to products with customer replaceable printheads) | 1 year |
| Accessories | 1 year unless otherwise stated |
Extent of limited warranty for HP ENVY Photo 7800 All-in-One series
- This HP Limited Warranty applies only to HP branded products sold or leased a) from HP Inc., its subsidiaries, affiliates, authorized resellers, authorized distributors, or country distributors; b) with this HP Limited Warranty.
- HP Inc. (HP) warrants to the enduser customer that the HP products specified above will be free from defects in materials and workmanship for the duration specified above (the “Limited Warranty Period”), which Limited Warranty Period begins on the date when the HP Hardware Product is first detected during its initial boot, which date is known as the “first start date.” Alternatively, if the HP Hardware Product is not detected at that time, the Limited Warranty Period shall start on the latter of the date of purchase or lease from HP or from the HP or, if applicable, the HP authorized service provider completes installation.
 Afrikaans
 Albanian
 Amharic
 Arabic
 Armenian
 Azerbaijani
 Basque
 Belarusian
 Bengali
 Bosnian
 Bulgarian
 Catalan
 Cebuano
 Chichewa
 Chinese (Simplified)
 Chinese (Traditional)
 Corsican
 Croatian
 Czech
Czech Danish
 Dutch
Dutch English
 Esperanto
 Estonian
 Filipino
 Finnish
 French
 Frisian
 Galician
 Georgian
 German
 Greek
Greek Gujarati
 Haitian Creole
 Hausa
Hausa Hawaiian
 Hebrew
 Hindi
Hindi Hmong
Hmong Hungarian
 Icelandic
 Igbo
Igbo Indonesian
 Irish
Irish Italian
 Japanese
 Javanese
 Kannada
 Kazakh
 Khmer
Khmer Korean
 Kurdish (Kurmanji)
 Kyrgyz
 Lao
Lao Latin
Latin Latvian
 Lithuanian
 Luxembourgish
 Macedonian
 Malagasy
 Malay
Malay Malayalam
 Maltese
 Maori
Maori Marathi
 Mongolian
 Myanmar (Burmese)
 Nepali
 Norwegian
 Pashto
 Persian
 Polish
 Portuguese
 Punjabi
 Romanian
 Russian
 Samoan
 Scottish Gaelic
 Serbian
 Sesotho
 Shona
Shona Sindhi
 Sinhala
 Slovak
 Slovenian
 Somali
 Spanish
 Sundanese
 Swahili
 Swedish
 Tajik
Tajik Tamil
Tamil Telugu
 Thai
Thai Turkish
 Ukrainian
 Urdu
Urdu Uzbek
Uzbek Vietnamese
 Welsh
Welsh Xhosa
Xhosa Yiddish
 Yoruba
 Zulu
Zulu