Majority SB200 Freesat Box Recorder User Manual

WHAT’S IN THE BOX
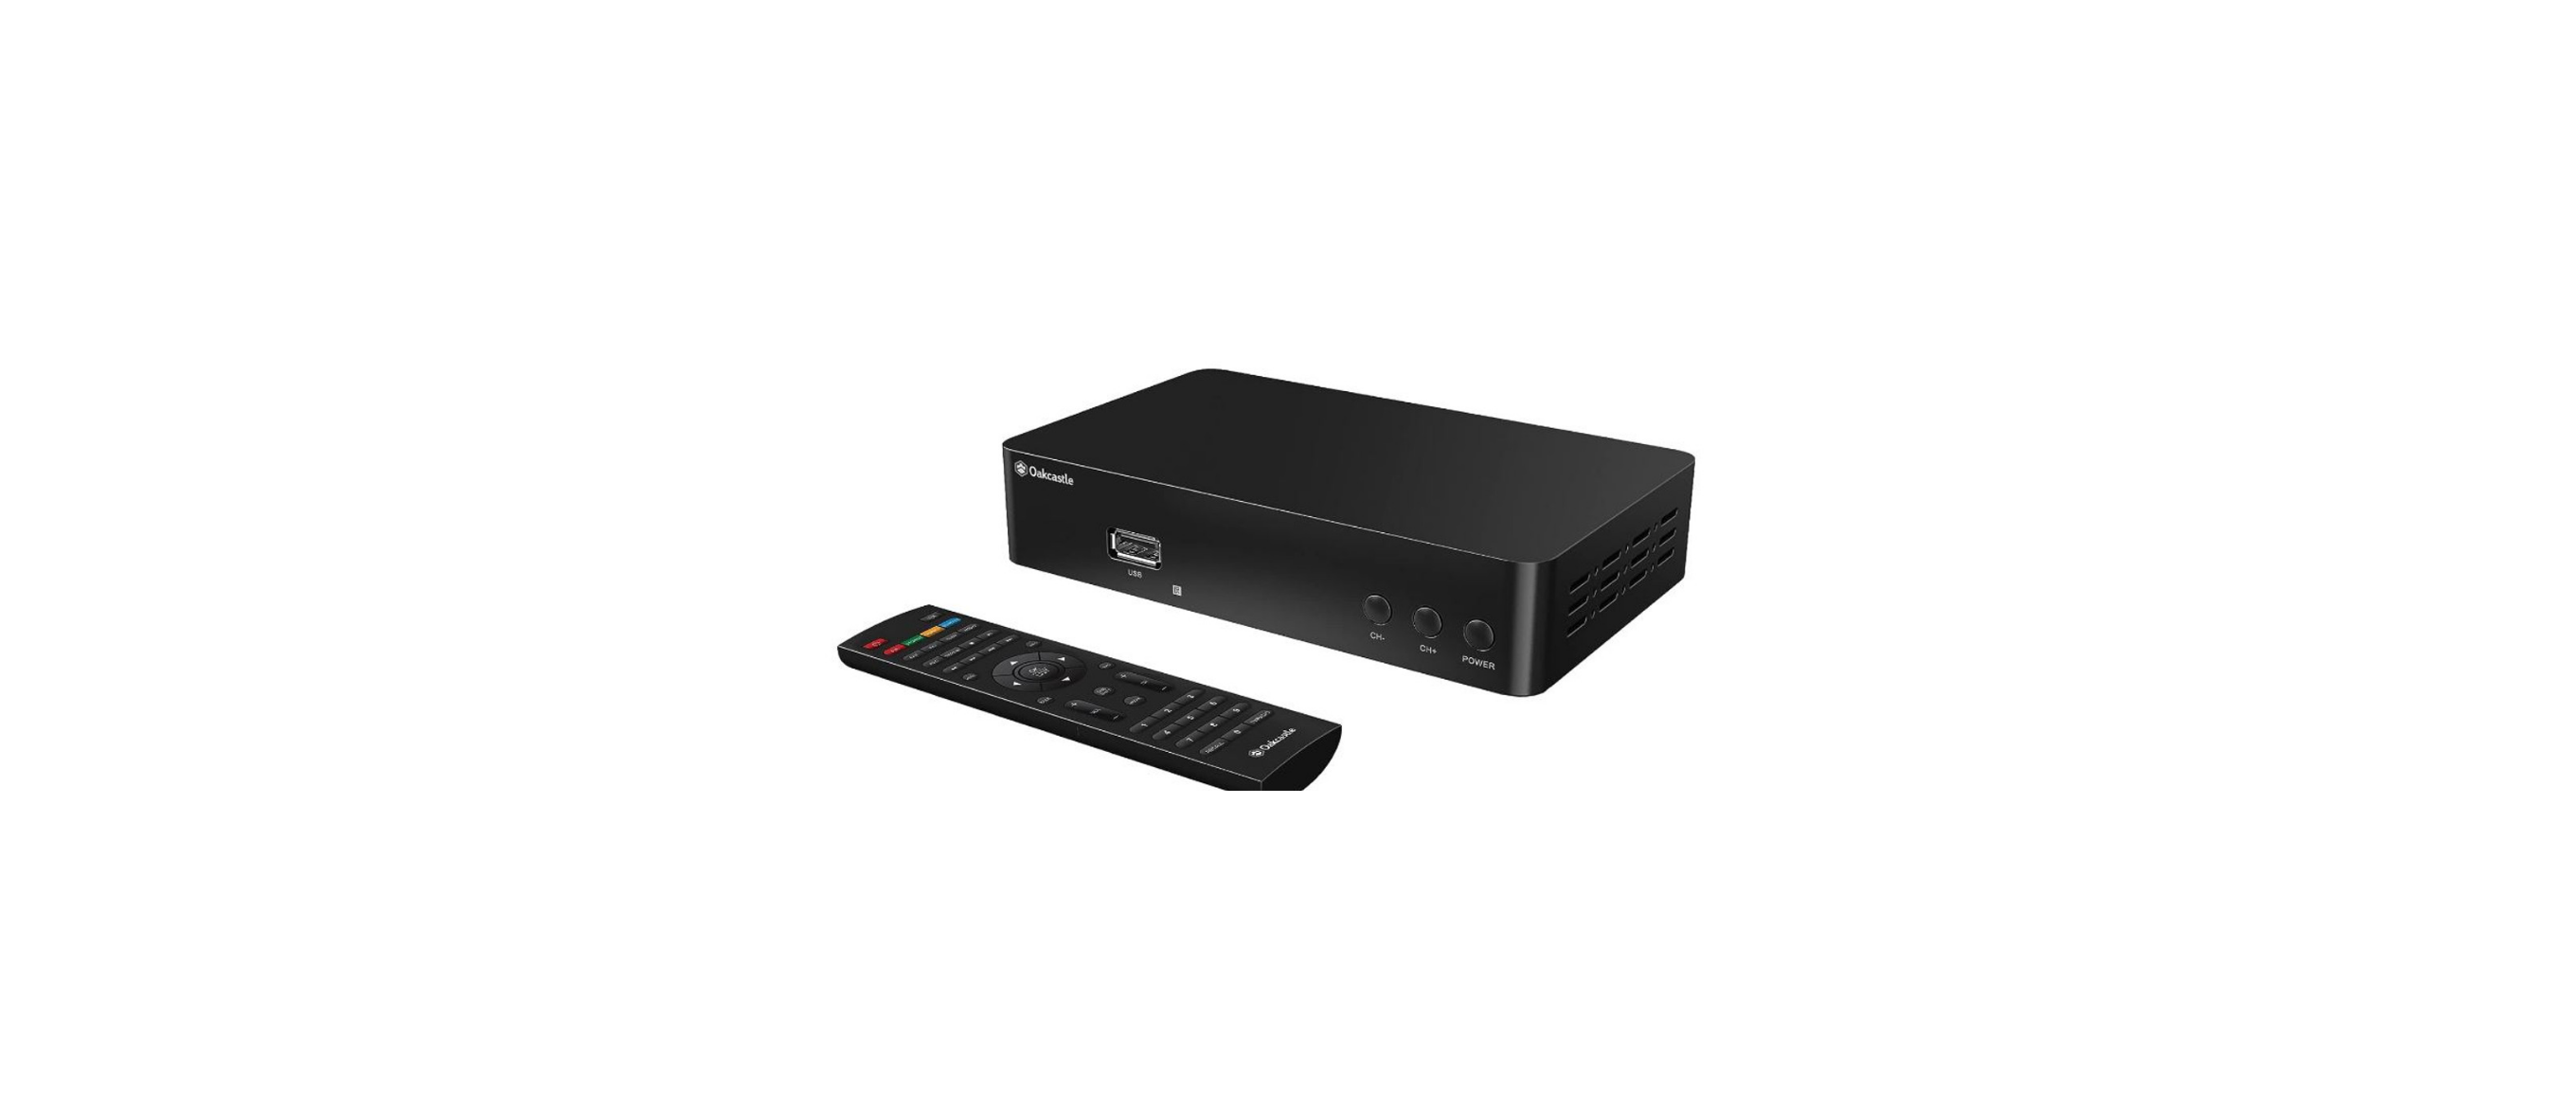
- A. Oakcastle SB200 HD Freesat Recorder
- B. Instructions Guide
- C. Remote Control (and 2 x AAA batteries)

REMOTE CONTROL

- Power on/off
- PVR button (access PVR menu)
- V-Format: change TV resolution
- Exit: Exit to the top menu
- Fav: Add favorites
- Rec: Start recording (Press Menu to stop)
- Repeat: Repeat the USB file
- Rewind
- Fast forward
- Menu: Display/return to menu
- Up
- Left
- OK/Select
- Down
- Back: Go back
- Time Shift: pause live TV (requires USB stick with sufficient storage)
- Volume +
- Volume –
- Media: press to access USB content
- Number keypad
- Recall: Go to the previous channel
- Mute/Unmute
- Schedule: Schedule recording
- Aspect: Change the aspect ratio
- Audio: Change audio settings
- Subt: Subtitles on/off
- Pause/play
- Stop
- Skip forwards: Go to the end of the film/ music file or show the next photo
- Skip backward: Back to the previous file/start of film or music file
- Info: show program info
- Right
- EPG: Electronic Program Guide
- CH+: Next channel
- CH-: Previous channel
- TV/Radio: Switch modes
CONTROL BUTTONS

- USB Port
- Standby Light
- CH- (prev. channel)
- CH+ (next channel)
- Power on/off
- LNB IN
- LNB OUT
- HDMI port
- Ethernet Port
- Scart Connection
- Power Supply

HOW TO CONNECT

Connection
Refer to the diagram above for the connection of your Freesat box to your satellite and TV using the HDMI slot.
- Step 1: Connect your antenna lead to the TV LNB IN port (Ref.42).
- Step 2: Choose an installation method (HDMI (Ref.44) or SCART (Ref.46)) and follow the steps below.
HDMI – connect an HDMI cable between your TV and the device. HDMI incorporates both audio and video so there is no requirement to make separate connections for audio. SCART – if your TV does not have an HDMI slot, you can connect using the SCART connection (Ref.46).
GETTING STARTED
Steps for getting started with your Freesat Box
Turn on your TV.
Plug the STB (Set Top Box) device into the mains. Connect the STB to your TV using an HDMI cable or SCART cable (See page 7 for details). Select the correct source/video or AV input channel for the HDMI input. This can be done by pressing the TV/AV or VIDEO button on your TV remote control. (Refer to your TV user’s manual for instructions). The welcome screen will appear, followed by a message asking if you would like to automatically search for channels and stations.
To automatically search for available channels and stations, press OK on the remote control (Ref.13). The auto search window will apear and searching begins. If you want to search for channels and stations yourself, see ‘Manual Searching’ on page 17 for instructions and follow the steps described. Once the search is complete, the device will automatically begin playing one of the TV channels found.
BASIC OPERATIONS
Selecting a channel
Follow one of the methods below to switch channels. Press up or down on the navigation controls (Ref.11/Ref.14) to move to the next or previous channel. If you already know the channel number, enter the number using the number keypad (Ref.20) and then press OK (Ref.13) or wait for 2 seconds. Press OK (Ref.13) on the remote control.
This will display the channel/radio station list. Press up or down until the channel you want is highlighted, and then press OK (Ref.13). Press the EPG button (Ref.33), select the channel you want from the list, and press EPG (Ref.33) again. NOTE: Press the RECALL button (Ref.21) to return to the last channel or station played.
Selecting a radio station
Press TV/RADIO (Ref.36) to enter radio mode, then enter the number. (For example, 201 is the number for ABC Jazz). Press OK (Ref.13) to display the station list. Press up or down until the channel you want is highlighted, and then press OK (Ref.13). NOTE: The STB uses the Logical Channel Numbering system (LCN) by default. Secondary channels can be selected by pressing the primary number followed by another number. (For example, pressing 2 gives you ABC1, and pressing 22 gives you ABC2).
Adjusting the volume
Press up or down on the remote control (Ref.17/Ref.18) to increase or decrease the volume. Press the mute button (Ref.22) to mute or unmute the sound.
Getting channel information
Press the info button (Ref.31) to view program information including the current and next program. The banner will stay displayed for a few seconds. To hide it, press exit (Ref.4) on the remote control.
Subtitles
To switch on subtitles, if they are available for the program you are watching, press SUBT on the remote control (Ref.26), then select the desired language and press OK (Ref.13)
Picture freeze/pause live TV
Press Timeshift (Ref.16) to pause live TV. Press again to resume. Note: this function requires USB storage space of at least 1GB by default (you can change this by navigating to PVR configure, Record Device, and then change the default storage size).
Favorites
To add a channel to your favorites list, press Menu on the remote control (Ref.10) to bring up the main menu. From here, select the ‘Program’ section from the main header. Then select ‘Program Edit’ by pressing down on the remote control (Ref.14) and press OK (Ref.13). Insert the password (default password is 000000).
Select the channel you want to save as a favourite, press the FAV button (Ref.5) to bring up the favourites menu, then choose a favourite type to add it to the list. Press EXIT (Ref.4) to exit the menu and save your changes. To select favourites while watching TV, press FAV (Ref.5).
ORGANISING CHANNELS & STATIONS
Channel Manager
The channel manager allows you to organize channels and stations. To access the channel manager, press Menu (Ref.10) on the remote control. Select ‘Program Edit’ from the menu, and press OK (Ref.13). The default password is 000000. In the Channel Manager you can select from the following options:
Move
Channels are automatically stored in numerical order. To move the order of channels and stations around, under ‘Program Edit’ in the menu, select the channel you want to move. Press the PVR button/red button (Ref.2) to select and move the channel to your desired position using the arrow buttons, and press the red button (Ref.2) again to select and save your changes.
Lock
To lock a channel or station, press up or down (Ref.11/Ref.14) until the channel or station you want to lock is highlighted. Press the Aspect/yellow button (Ref.24) to lock or unlock a station. The default password is 000000.
Delete
Press up or down until the channel or station you want to delete is highlighted. Press the Schedule/blue button (Ref.23). To delete, press OK (Ref.13). To cancel, press EXIT (Ref.4). To reinstate a channel you have deleted, you will need to rescan for channels.
USB/MULTIMEDIA & RECORDING
USB Multimedia and recording
The USB function can be used to record a program, play, or view files from USB. Please see page 24 for details of the types of compatible USB files.
Multimedia – Music, Photos, and Films from USB
To access the Multimedia menu section, press Menu (Ref.10). Press previous or next (Ref.12/Ref.32) until ‘USB’ is highlighted (this is the icon at the far right of the menu list).
To play music, view photos, or watch films or recordings from USB, simply select ‘Music’, ‘Photo’, ‘Movie’, or ‘PVR’ in the menu system, and then navigate to the file(s) you would like to play/view using the navigation controls (Ref.11/Ref.32/ Ref.14/Ref.12) on the remote control. Note: Do not remove your USB device from the STB while it is in use during any USB multimedia function.
Record a program
To record, please follow one of the methods below. Please note that the DVR (recording) function requires any attached storage devices to be formatted as FAT32.
Method 1 – REC button
To record a TV program you are currently viewing press the REC button (Ref.6) to start recording. To stop recording, press STOP (Ref.28) on the remote. The recording will be accessible under ‘Multimedia’, and ‘PVR’ in the menu.
Method 2 – REC button
(from EPG menu) To set a future program to record from the EPG (Program Guide) list, highlight the program in the list, then press the ‘REC’ button (Ref.6). This will automatically fill the program details into the schedule/recording menu. From here, confirm the recording schedule. The recorded file will be accessible under ‘Multimedia’, and ‘PVR’ in the menu.
Method 3 – Blue button
You can set up to eight timers on the device. Setting a timer will set the device to start and stop recording at specific times. If the device is switched off when a recording is scheduled, it will switch on to begin recording. Press the Blue SCHEDULE button (Ref.23) to schedule a recording. Press the Red ‘PVR’ button (Ref.2). From here, select the appropriate channel, date, and time and press OK to confirm (Ref.13). To edit the recording settings, press the green button (Ref.3).
To cancel a scheduled recording, ensure you are on the Schedule menu (press the Schedule/Blue button (Ref.23) if not) press the yellow/ASPECT button (Ref.24) then press OK to confirm (Ref.13). Alternatively, press the EPG button (Ref.33) and press the Blue SCHEDULE button (Ref.23) from here. To cancel a recording, press the yellow ASPECT button (Ref.24).
Notes on recording
Note: During recording, only certain operations are functional (for example SUBT (Ref.26), FAV (Ref.5), Ch+ and Ch- (Ref.34/Ref.35), Vol+ and Vol- (Ref.17/ Ref.18), RECALL (Ref.21) will still function). Changing channels and volume will still function. While one channel is being recorded, it is still possible to watch a program on a different channel. You can also set the timer to repeat recording Once, Daily or Weekly to record shows on repeat.
To do this, scroll down to ‘Repeat’ and use the arrows (Ref.11/ Ref.12/Ref.14/Ref.32) to select your chosen option. Press OK to confirm (Ref.13). Please note that times must be entered using the 24-hour clock format. For example, 8 a.m. is entered as 0800, while 8 p.m. is entered as 2000.
ELECTRONIC PROGRAM GUIDE
Some providers broadcast information about their programs. This information is available on-screen via an electronic program guide, displayed by pressing EPG (Ref.33) on the remote control. You can navigate through the EPG and view information about channels and programs (explained in the next section) or press EPG (Ref.33) or EXIT (Ref.4) to close the guide.
Displaying program information
The information displayed when you press EPG (Ref.33) relates to the channel that is showing at the time. At the right of the screen is information about the current channel list, and at the left of the screen is a list of upcoming programs. To display information about the programs on another channel, press right or left (Ref.32/Ref.12) until the channel you want information about is highlighted at the left of the screen.
Selecting a channel to watch from the EPG
With the channel name panel selected, press left or right (Ref.12/Ref.32) until the channel you want to watch is selected.
Scheduling a recording via EPG
To record a program from the EPG, first press the EPG button (Ref.33). Then press the blue button (Ref.23) to schedule a recording.
SCANNING & RESCANNING
The Channel Search option on the main menu enables you to scan for and detect digital TV and radio stations available in your area. You will need to perform a rescan if:
- New channels or stations become available
- If you want to reinstate a channel or station you have deleted, or:
- If you move to a new location.
- You can either perform an automatic scan to automatically scan for and detect new stations, or a manual scan to search for a specific channel or all channels from a specific broadcaster.
Automatic Search
- Press MENU (Ref.10) on the remote control.
- Scroll down to ‘Auto Search’ and press OK (Ref.13). The device will begin automatic channel search. Please wait a few minutes for the device to scan for channels. Once the scan is complete, the first available channel will begin playing.
Manual Searching
Note: Automatic searching (described above) is suitable in most cases. You might use the manual search option if you have deleted a channel and now want to access it again. In this case, you would just search for that particular channel.
- Press MENU (Ref.10) on the remote control.
- Scroll down to ‘Manual Search’ and press OK (Ref.13). Select the frequency channel you wish to search for, and the frequency and bandwidth will be automatically selected. Press OK (Ref.13) to begin scanning. When the search is finished, the channel will begin playing if it has been found; otherwise, the previous channel will reappear.
PARENT CONTROLS & AUTO-POWER ON
Parent Control
The STB is shipped with a default personal identification number (PIN). The default PIN is 000000. The PIN is required if you have enabled the parental lock. To enable Parent Control:
- Press MENU (Ref.10) on the remote control. The main menu will appear.
- Scroll across until ‘System’ is highlighted.
- Scroll down to ‘Parental Guidance’. Select this option, and when prompted input the password as 000000, unless you have previously changed the PIN to a different number.
- From here, you can change the age limit for programs. Once you have selected an age limit, watching any channel that is marked beyond this will require the PIN.
Automatic Power On/Off and Sleep
Follow this procedure to set the STB to switch on and off at specified times
- Press MENU (Ref.10) on the remote control. The main menu will appear.
- Scroll across to select ‘Time’. Select Power On/Off. From here, you can set the STB to switch on and switch off at specified times. To do this, select ‘Enable’ or ‘Disable’ for ‘Power On’ and ‘Power Off’ according to your preference. Select your preferred Power On and/or Power Off time(s) by highlighting the time and typing in your selected time using the number keypad (Ref.20).
You can also set the STB to sleep after a certain amount of time (between 1 and 12 hours) by selecting ‘Sleep’ under ‘Time’.
FACTORY RESET & SOFTWARE UPDATE
Clearing and resetting data
You can reset the STB by restoring the unit to the default settings it had when it left the factory (please see the following section for instructions). This clears all channels, stations, preferences, and other user settings. You will need to rescan for channels and stations before you can continue watching digital TV or listening to digital radio.
WARNING:
This procedure returns the STB to its default factory settings. All data (such as time zones, channels, stations, and timers) will be lost.
- Press MENU (Ref.10) on the remote control to see the Main Menu.
- Scroll across to ‘System’ on the menu, then press up or down (Ref.11/Ref.14) until you have selected ‘Restore Factory Default’. Press OK (Ref.13).
- A warning message will appear, asking you if you are sure you want to clear all services and reset all settings. To continue, press OK (Ref.13). To cancel, press EXIT (Ref.4).
Software Update
To update the software, please select ‘FTP Download’ under ‘USB’, and ‘Network Apps’ in the menu. However, if required to update the software manually, you can download the software to your PC and then transfer it to your STB. You will need a USB memory stick (not supplied with the STB).
- Once you have obtained an upgrade file, transfer it to a USB memory stick. You need to place the file at the root (or top) level on the memory stick, not inside a folder or directory.
- Insert the stick in the USB port. Press MENU (Ref.10) on the remote control, and select Software Update from the System section
NETWORK SETTINGS & APPS
Network Settings
The network settings are automatically adjusted to the DHCP function. Under the Network Settings menu, you can switch the Link Type between LAN and WiFi, and change IP Settings if required
Network Apps
- FTP Download Check for software updates and update the device.
- Weather Displays the local and international weather forecast for the next 10 days.
- RSS Display of RSS feeds from major news channels such as BBC News.
- YouTube YouTube app for video viewing.
- IPTV Playback of preselected web content. You can add your own web tv link or web radio stations. In order to receive online content, the receiver should be connected to the internet through the DSL router.
TROUBLESHOOTING
| Symptoms | Possible causes | Solutions |
| Indicators on front panel do not light up | AC power cord is not connected | Check that the power cord is plugged into the wall socket. Make sure the power switch is on. |
|
No picture or sound | The cables connecting the TV and the receiver are not properly connected | Make sure that the correct cable is con- nected between the TV and the receiver, and that the antenna is connected. |
| The TV mode is not correct | Check that the correct video or AV input has been selected on your TV. | |
|
Incorrect video definition | If you have a Composite or S-Video connection to your TV, video definition must be set to 576i. Press EXIT and then V-FORMAT on the remote control until you see a picture. | |
|
Picture and/or audio glitch | Insufficient signal strength | Check that the antenna cable is securely plugged in and that the signal is ade- quate. |
| Electrical interference | Check that all antenna cabling is quad-shielded. | |
|
No sound | The receiver or TV is in mute mode | Press the MUTE button on the remote control and on the TV. |
| Initial volume level has not been set on your TV | Select the desired TV volume level using the TV remote control. | |
|
Remote control is not working | Batteries not inserted | Insert batteries |
| Batteries are flat | Change the batteries in the remote control. | |
| Remote control is outside the range of operation | Aim the remote control directly at the receiver. | |
| Music files on a USB memory stick don’t appear | Files are in wrong format | Check that the format is MP3. |
| Files are not at the root or top level. | Move the files out of folders or directories. |
SPEC & WARRANTY
| MPEG Transport Stream | MPEG.4 MP@L4.0 1920 x 1080 @ 50MHz, Rate 64MHz |
| Maximum USB storage supported | 1TB |
| Video Decoding | Profile level MPEG.4 MP @ L4.0 1920 x 1080 @ 50MHz, Rate 64Mbps, Input rate 80Mbps, Aspect Ratio 4:3/Letter Box/16:9/Pan & Scan, Video Resolution 1080i/p, 720p, 576p, 576i |
| Audio Decoding | Standard: MPEG Layer 1,2,3: Dolby AC-3, 12S S/PDIF, Channels: Single, Dual Mono, Stereo, Joint Stereo, Dolby Digital bit-streams |
| Main System | Main Processor: MSD 7S02E, Memory: 64Mb Flash; DDR3 1GB |
| USB files supported | TS, TRP, DAT, MPG, MPEG, AVI, MKV, MOV, MP4, VOB, 3PG, MP3, WMA, ACC, AC-3, E-AC-3, AAC, DTS, WAV, BMP, JPG, PNG, H.264, VC-1, DIV4/5/6 |
| Audio & Video In/ Out | HDMI: HDMI 1.4 connector (with HDCP copy protection, SCART: CVBS, RGB, S/PDIF: Coaxial Digital Audio Output, USB: USB 2.0 |
| Power Supply | Input Voltage: 100-240V AC, Power Consumption: 18W maximum, ERP Compliant. Protection: Separate internal fuse, Switch-mode |
| Dimensions + Weight | W144mm x H30mm x D85 mm, weight 0.25kg, Optimum operating temperature 0-50 degrees celsius |
WARRANTY
All products come with a standard 12-month warranty. All items must be registered on www.oakcastle.co.uk for the warranty to be valid. Once on the web page, use the menu to find “register your product”. You will also be given the chance to extend your warranty for an additional 24 months, free of charge
SAFETY INFORMATION
- Read these instructions.
- Keep these instructions. Instructions are also available for download at www.majority.co.uk
- Heed all Warnings
- Follow all instructions
- Do not clean the apparatus near or with water
- Do not block any ventilation openings. Install following the manufacturer’s instructions
- Do not install near any heat sources such as radiators, heat registers, stoves, or other apparatus (including amplifiers) that produce heat.
- Protect the power from being walked on or pinched particularly at plugs, convenience receptacles, and the point where they exit from the apparatus.
- Only use attachments/accessories specified by the manufacturer.
- Unplug this apparatus during light storms or when unused for long periods.
- Refer all servicing to qualified service personnel. Servicing is required when the apparatus has been damaged in a way, such as a power-supply cord or plug is damaged, liquid has been spilled or objects have fallen into the apparatus, the apparatus has been exposed to rain or moisture, does not operate normally, or has been dropped.
- No naked flame sources, such as lit candles, should be placed on the apparatus.
- Dispose of used electrical products and batteries safely according to your local authority and regulations.
ADDITIONAL WARNINGS
The apparatus shall not be exposed to dripping or splashing and no objects filled with liquid, such as vases, shall be placed on the apparatus. The main plug is used to disconnect the device and it should remain readily operable during intended use. To disconnect the apparatus from the main mains completely, the mains plug should be disconnected from the main socket outlet completely. The battery shall not be exposed to excessive heat such as sunshine, fire, or the like.
RECYCLING ELECTRICAL PRODUCTS
You should now recycle your waste electrical goods and in doing so help the environment. This symbol means an electrical product should not be disposed of with normal household waste. Please ensure it is taken to a suitable facility for disposal when finished.
IMPORTANT:
Please read all instructions carefully before use and keep them for future reference.
REFERENCE LINK
https://www.majority.co.uk/oakcastle-set-top-boxes/sb200/


