
Instant Solo Coffee Maker User Manual

Welcome
Welcome to your new Instant Solo Coffee Maker!
Whether it’s a Keurig K-Cup®* pod or your favorite ground coffee, you can brew a delicious cup of café-quality coffee quickly and in your own home! This device complies with Part 15 of the FCC Rules. Operation is subject to the following two conditions: (1) this device may not cause harmful interference, and (2) this device must accept any interference received, including interference that may cause undesired operation. Changes or modifications not expressly approved by the part responsible for compliance could void the user’s authority to operate the equipment.
NOTE:
This equipment generates, uses, and can radiate radio frequency energy and, if not installed and used in accordance with the instructions, may cause harmful interference to radio communications. However, there is no guarantee that interference will not occur in a particular installation.
- Reorient or relocate the receiving antenna.
- Increase the separation between the equipment and the receiver.
- Connect the equipment to an outlet on a circuit different from that to which the receiver is connected.
- Consult the dealer or an experienced radio/TV technician for help.
SAFETY WARNINGS
Read all instructions before using and only use this appliance as directed. Failure to follow these Important Safeguards may result in injury and/or property damage and will void your warranty. When using electrical appliances, basic safety precautions should always be followed to reduce the risk of fire, electric shock, and injury to persons.
- DO operate the appliance on a stable, non-combustible, level surface.
- DO NOT place the appliance on or near a hot gas or electric burner, or in a heated oven.
- DO NOT use this coffee maker outdoors.
- DO NOT fill the water tank with mineral water, milk, or other liquids. Only fill the water tank with clean, cold water.
- DO NOT let the coffee maker operate without water.
- DO NOT use the appliance for anything then its intended use. Not for commercial use. For household use only.
- DO regularly inspect the appliance and power cord.
- DO only fill the water tank with clean, cold water.
- DO NOT fill the water tank with mineral water, milk, or other liquids.
- DO NOT leave the appliance exposed to sun, wind, and/or snow.
- DO operate and store the appliance above 32°F / 0°C
- DO NOT leave the appliance unattended when in use.
What’s in the box?
Instant Solo Single-Serve Coffee Maker
Plug-in and time-out
Once you plug in your Instant Solo Coffee Maker, you’ll hear a beep. Press the power button (located above Bold) to turn on your Solo — the LED buttons should light up. After 30 minutes of inactivity, your coffee maker will enter standby mode. The LED control panel will dim. After another 2 hours of inactivity, the LED panel will shut off.
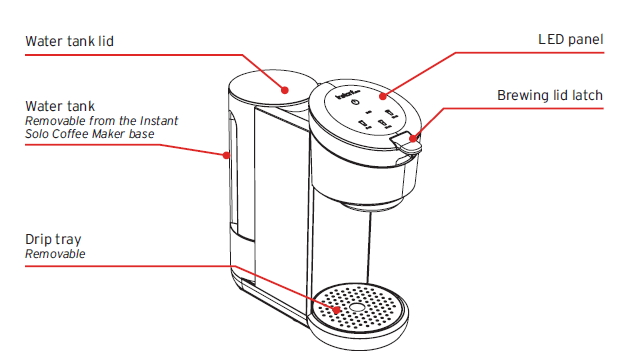
Your Instant Solo Coffee Maker
Remember to recycle!
We designed our packaging with sustainability in mind. Be sure to recycle at a recycling center in your area.
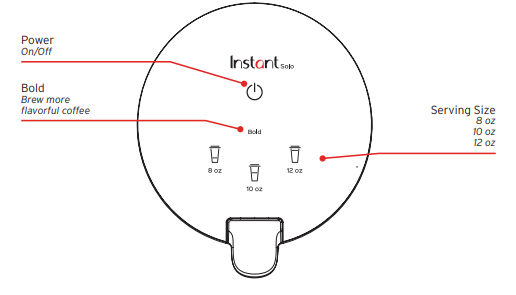
Control panel
Here’s a look at the simple-to-use, easy-to-read Instant Solo Coffee Maker control panel.
Plug-in and time-out
Once you plug in your Instant Solo Coffee Maker, you’ll hear a beep. Press the power button (located above Bold) to turn on your Solo — the LED buttons should light up. After 30 minutes of inactivity, your coffee maker will enter standby mode. The LED control panel will dim. After another 2 hours of inactivity, the LED panel will shut off.
Sound Settings
You can turn button-pressing sounds and reminder beeps on or off.
- Make sure your Instant Solo is on.
- Press and hold the 8 oz and 12 oz buttons at the same time for 3 seconds.
- Wait for the 8 oz and 12 oz buttons to blink twice.
Altitude Mode
If you’re using the Instant Solo Coffee Maker at +5,000 feet sea level, enable Altitude Mode before you brew. To turn Altitude Mode on
- Make sure your Instant Solo is on.
- Press and hold the 8 oz and 10 oz buttons for 3 seconds.
- Wait until the 8 oz and 10 oz buttons blink twice.
To turn Altitude Mode off
- Make sure your Instant Solo is on.
- Press and hold the 8 oz and 10 oz buttons for 3 seconds.
- Wait until the 8 oz and 10 oz buttons blink three times.
Water Empty Alert
Your Instant Solo will let you know when the water tank is empty or nearly out of water. When this happens, you’ll hear a beep, brewing will stop, and the LED control panel will flash. At this point, refill the water tank and exit the alert mode by pressing any button.
Initial set up
- Pull the Instant Solo coffee maker and all accessories out of the box.
- Remove all packaging materials from within and around the Instant Solo Coffee Maker.
- Place your Solo on a dry, stable, and level surface.
- Lift the water tank up and remove the foam cushion from underneath the water tank.
- Place the water tank back on the coffee maker base.
- Plug in your Instant Solo Coffee Maker.
Clean before use
- Lift the water tank up to remove it from Instant Solo Coffee Maker.
- Handwash the water tank and reusable coffee pod with warm water and dish soap. Rinse with warm, clear water.
- Wipe the water tank and accessories with a clean, dry cloth.
- With a damp cloth, wipe down the coffee maker base and control panel.
Initial Cleaning
Before you brew your first cup of coffee, clean your Instant Solo Coffee Maker. Run the following cleaning program without a coffee pod or the reusable coffee pod.
- Lift the water tank from the back of the coffee maker and remove the water tank lid.
- Fill the water tank with cold water to the MAX fill line as indicated on the water tank.
- Put the lid back onto the water tank and place the water tank back onto the coffee maker.
- Place a large mug that can hold at least 10 oz of liquid beneath the brew spout and onto the drip tray.
- Ensure the brewing lid is closed and securely latched. Press the 8 oz button. The key flashes as the water heats.
- The 8 oz button will illuminate. The coffee maker begins a brewing cycle and hot water will pour from the brew spot. After the brewing cycle ends or is canceled and the water stops dripping from the spout, discard the water in the mug. To stop brewing at any time, touch 8 oz again.
- Place the mug back on the drip tray.
- Touch 10 oz. The button flashes as the water heats.
- The 10 oz. the button will illuminate. The coffee maker begins a brewing cycle and hot water will pour from the brew spot. After the brewing cycle ends or is canceled and the water stops dripping from the spout, discard the water in the mug. To stop brewing at any time, touch 10 oz again.
Brewing Coffee
Once you’ve cleaned your Instant Solo Coffee Maker and water tank, and you’ve first run cleaning program, you can begin brewing a delicious cup of coffee.
Bold
This program lets you brew a more flavorful cup of coffee by increasing brewing time, allowing the water to extract more flavor from your coffee grounds or coffee pod.
Altitude Mode
If you live at higher altitudes (over 5000 feet above sea level), be sure you follow the instructions on page 10 so your coffee maker works properly.
Reusable Coffee Pod and Coffee Pods
With the Instant Solo Coffee Maker, you can brew coffee with a K-Cup* pod, or grind your favorite coffee beans and use the included reusable coffee pod. Scoop about 2 tablespoons of medium to medium-fine ground coffee into the reusable coffee pod.
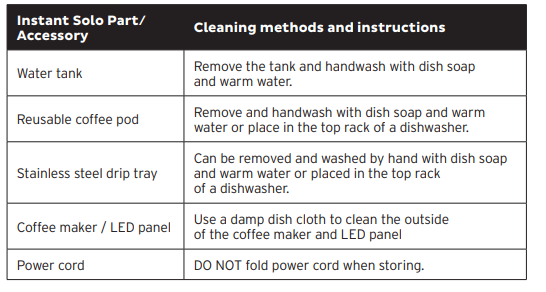
Care, Cleaning, Storage
Clean your Instant Solo Coffee Maker regularly to ensure the best possible flavor and to prevent mineral deposits from building up in the coffee maker. Always unplug the coffee maker and let it cool to room temperature before cleaning. Never use metal scouring pads, abrasive powders, or harsh chemical detergents on any of the coffee maker’s parts. Let all parts dry thoroughly before use, and before storage.
Descaling / Removing Mineral Deposits
With regular use, minerals may accumulate in the coffee maker, which can affect the temperature and strength of your brew. To make sure your coffee maker stays in tip-top shape, descale it regularly to keep mineral deposits from building up. After 300 cycles, the 10 oz and 12 oz keys flash to remind you to clean and descale your coffee maker.
Descaling Solution Ratio
- Combine cleaner and water as shown in the table above.
- Make sure the reusable pod is in the brewing housing unit
- Fill the water tank to the MAX line with the cleaning mixture
- Place a large container beneath the drop nozzle. Ensure the brewing lid is securely latched before continuing to step 5.
- Touch and hold the 10 oz and 12 oz keys for 3 seconds. The cleaning mixture runs through the appliance until the water tank is empty.
- Discard the cleaning mixture from the container and place the emptied container beneath the drip nozzle.
- Rinse the water tank and fill the MAX line with cool, clean water.
- Touch and hold the 10 oz and 12 oz keys for 3 seconds. The cleaning mixture runs through the appliance until the water tank is empty.
- Discard water produced from the coffee maker.
Warranty
Limited Warranty
This Limited Warranty is issued by Corelle Brands (Australia) Pty Ltd (Corelle Brands Australia) and is effective for one year from the date of the original consumer purchase. Proof of the original purchase date and return of your appliance is required to obtain service under this Limited. Return of your appliance to us will be done in accordance with our instructions only.
Provided that this appliance is operated and maintained in accordance with written operating instructions attached to or furnished with the appliance or published operating instructions on www.instantpot.com.au, Corelle Brands Australia will, in its sole and exclusive discretion, either: (i) repair defects in materials or workmanship; or (ii) replace the appliance. In the event that your appliance is replaced, the Limited Warranty on the replacement appliance will expire 12 months from the date of the original consumer purchase. We remind you the appliance you purchased is for personal use only (not commercial use).
Any modification/alteration or attempted modification/alteration to your appliance will void this Limited Warranty unless such modification/alteration or attempted modification/alteration was expressly authorized by a Corelle Brands Australia Representative in writing. This Limited Warranty only covers Corelle Brands Australia’s appliances/products and is not extended to any other appliances, products, equipment, components, or devices that you use or may use in conjunction with Corelle Brands Australia’s appliances. To claim under this Limited Warranty:
- Contact Corelle Brands Australia at: 9C Commercial Road, Kingsgrove, NSW, 2208 Email: sales.australia@corellebrands.com
- Provide a description of the appliance you believe has malfunctioned due to defective parts or workmanship.
Limitation and Exclusions
To the maximum extent permitted by law, the maximum liability of Corelle Brands Australia, if any, for any allegedly defective appliance or part shall in no circumstances exceed the purchase price of a comparable replacement appliance or part of the same age.
This Limited Warranty does not cover
- Damage resulting from accident, modification/alteration (unless expressly authorized by a Corelle Brands Australia Representative in writing), misuse, abuse, neglect, unreasonable use, use contrary to the written operating instructions attached to or furnished with the appliance or published operating instructions on www.instantpot.com.au, normal wear, and tear, commercial use, improper assembly by you or anyone, disassembly by you or anyone, repair by you or anyone, failure to provide reasonable and necessary maintenance, force majeure event including but not limited to fire, flood, acts of God;
- Repairs where your appliance is used for other than normal, personal use or when it is used in a manner that is contrary to the written operating instructions attached to or furnished with the appliance or published operating instructions on www.instantpot.com.au; or
- Use of unauthorized parts and accessories, or repairs to parts and systems resulting from unauthorized repairs or modifications/alterations made to your appliance.
REFERENCE LINK
https://www.instanthome.com/product/instant-appliances/solo-single-serve-coffee-maker-gray


 Afrikaans
 Albanian
 Amharic
 Arabic
 Armenian
 Azerbaijani
 Basque
 Belarusian
 Bengali
 Bosnian
 Bulgarian
 Catalan
 Cebuano
 Chichewa
 Chinese (Simplified)
 Chinese (Traditional)
 Corsican
 Croatian
 Czech
Czech Danish
 Dutch
Dutch English
 Esperanto
 Estonian
 Filipino
 Finnish
 French
 Frisian
 Galician
 Georgian
 German
 Greek
Greek Gujarati
 Haitian Creole
 Hausa
Hausa Hawaiian
 Hebrew
 Hindi
Hindi Hmong
Hmong Hungarian
 Icelandic
 Igbo
Igbo Indonesian
 Irish
Irish Italian
 Japanese
 Javanese
 Kannada
 Kazakh
 Khmer
Khmer Korean
 Kurdish (Kurmanji)
 Kyrgyz
 Lao
Lao Latin
Latin Latvian
 Lithuanian
 Luxembourgish
 Macedonian
 Malagasy
 Malay
Malay Malayalam
 Maltese
 Maori
Maori Marathi
 Mongolian
 Myanmar (Burmese)
 Nepali
 Norwegian
 Pashto
 Persian
 Polish
 Portuguese
 Punjabi
 Romanian
 Russian
 Samoan
 Scottish Gaelic
 Serbian
 Sesotho
 Shona
Shona Sindhi
 Sinhala
 Slovak
 Slovenian
 Somali
 Spanish
 Sundanese
 Swahili
 Swedish
 Tajik
Tajik Tamil
Tamil Telugu
 Thai
Thai Turkish
 Ukrainian
 Urdu
Urdu Uzbek
Uzbek Vietnamese
 Welsh
Welsh Xhosa
Xhosa Yiddish
 Yoruba
 Zulu
Zulu