COBRA DASH2208 Drive HD User Manual

INTRODUCTION
Congratulations! You’ve made a smart choice by purchasing a Drive HD Dash Cam from Cobra. Drive HD DASH Series cameras provide peace of mind by continuously recording the road in beautiful 1296P Super HD video. With cutting edge features, phenomenal video quality, and an industry-leading focus on user experience, Drive HD Dash Cams are the best solution to Record
Your Ride. This User Manual covers the following Drive HD models which share a common video platform but include varying add-on features:
- DASH2208 – Drive HD® Super HD Dash Cam
- DASH2308 – Drive HD® Super HD Dash Cam with iRadar®
- DASH2216D – Drive HD® Dual View Dash Cam System
- DASH2316D – Drive HD® Dual View Dash Cam with iRadar®
- CCDC4500 – Drive HD® Dual View Dash Cam with iRadar® Costco Club Pack
- CCDC4500AUS – Drive HD® Dual View Dash Cam with iRadar® Costco Australia Club Pack
DRIVE HD DASH CAM FEATURES
- 1296P Super HD – All Drive HD DASH Series cameras record the road ahead in 1296P Super HD featuring excellent image quality, nighttime performance, and advanced dynamic range
- 2.0” LCD Screen – Large LCD Display with video playback directly on the device as well as on your TV or computer
- 160° Viewing Angle – Ultra wide-angle view gives you a full view of the road and your peripherals while at the same time minimizing edge distortion.
- Continuous Loop Recording – Footage is stored in 3, 5, or 10 minute clips. When the memory card fills up, the camera automatically deletes the oldest segment to make room for new ones.
- Emergency Recording – Automatic or Manual – If you don’t want a clip to be overwritten, simply click the Emergency Recording button and the clip will be protected. Clips are automatically protected if an impact is detected.
- G-Sensor – 3-axis accelerometer senses sudden accelerations, stops, and collisions and automatically protects footage surrounding the incident.
- Parking Mode – While in Parking Mode, Drive HD cameras will only record video when motion is detected. This feature is helpful for vehicles that have an always-on accessory port or units that are hardwired to power.
Supports 9 Languages
- English
- Spanish
- French
- German
- Dutch
- Portuguese
- Russian
- Simplified Chinese
- Traditional Chinese
PRODUCT SERVICE AND SUPPORT
For any questions about operating or installing this new Cobra product, PLEASE CONTACT COBRA FIRST…do not return this product to the retail store. The contact information for Cobra will vary depending on the country in which you purchased and utilize the product. latest contact information, please go to www.cobra.com/support. For products purchased in the U.S.A. you may also call 1-800-262-7212 (1-800-COBRA-12).
products purchased in the U.S.A., if your product should require factory service, please go to www.cobra.com/support and follow the instructions for returning your product to the Cobra Factory Service Department.
purchased in Australia, you may call (03) 96867866, email to wr.consumer@causa.com or visit www.who-rae.com.au
Europe, you may call 0333 1212252 or visit www.snooperneo.co.uk
WHAT’S IN THE BOX
All Models
- Dash Cam
- MicroSD Card (size varies by model)
- dhesive Windshield Mount
- 12V Vehicle Power Adapter
- 10ft Micro USB Cable (for power only)
- 1.5ft Micro USB Cable (for connection to computer)
Dual View Models Only
- CAM2 2nd Camera
- 13ft Extender Cable for CAM2
- Y-Splitter Cable
OPTIONAL ACCESSORIES
available at www.cobra.com
- Low Profile Adhesive Mount: CA-Mount-001 – Great for discreet and semi-permanent installations.
- Suction Cup Mount: CA-Mount-005 – Removeable windshield mount that you can take on-the-go.
- GPS Mount: CA-Mount-002 – Enables dash cams to embed GPS location, speed, Gsensor, and compass information into videos.
- Hardwire Kit: CA-MicroUSB-001 – Wires your dash cam directly into the fuse box for a quick and clean installation without any dangling wires
- Extended USB Cable: CA-MicroUSB-002 (for power only) – 20ft USB->Micro USB cable helps with hiding wire and/or mounting further from a power source.
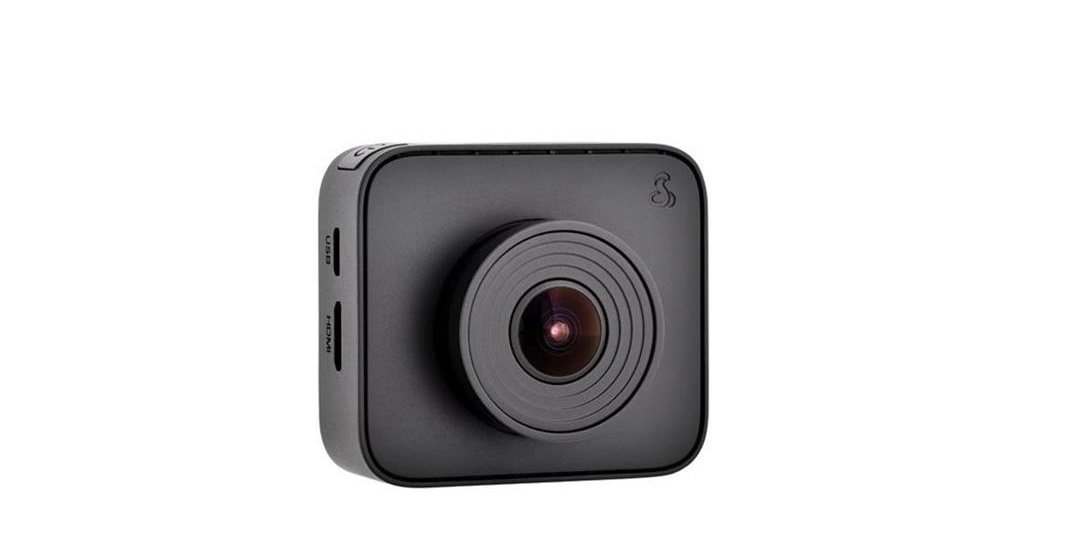
CONTROLS AND CONNECTIONS

SINGLE CAM INSTALLATION
MOUNT
To install the Adhesive Windshield Mount, slide the dash cam onto the mount and twist to tighten the cam in desired location. Find the spot on your windshield where you would like to mount the camera and confirm the placement. Reminder, this is an adhesive mount so it is important to mount correctly the first time. Next, peel the plastic film off the 3M adhesive and press the mount FIRMLY onto the windshield.
POWER
Plug one end of the supplied 12V Vehicle Power Adapter into your vehicle’s cigarette lighter, and the other end into the micro USB port. The unit will automatically turn on and start recording. To manually power on the device PRESS AND HOLD the Power button until the display activates. When the power button is used to power on the unit recording must be started manually.
Note: A Hardwire Kit (CA-MicroUSB-001) is available at www.cobra.com for a more permanent installation that allows for discrete routing of the power cable.
DRIVE!
Drive HD Dash Cams are designed to set and forget. After initial setup the unit will turn on and start recording as soon as power is applied. When the Micro SD Card is full the oldest footage will be deleted to make way for the new. If you witness something that you don’t want to be deleted simply press the Emergency Record button and it will be saved forever.
DUAL CAM INSTALLATION

MOUNT
- CAM 1 – Slide the dash cam onto the adhesive mount and twist to tighten the cam in desired location. Find the spot on your windshield where you would like to mount the camera and confirm the placement. Reminder, this is an adhesive mount so it is important to mount correctly the first time. Next, peel the plastic film off the 3M adhesive and press the mount FIRMLY
onto the windshield. - CAM 2 – Attach CAM 2 to the windshield using the adhesive tape. CAM 2 is most commonly installed facing out the rear on the top center of the rear windshield. It can also be mounted on the front windshield to record the interior of the vehicle.
POWER
Plug one end of the supplied 12V Vehicle Power Adapter into your vehicle’s cigarette lighter, and the other end into the micro USB port. The unit will automatically turn on and start recording. To manually power on the device PRESS AND HOLD the Power button until the display activates. When the power button is used to power on the unit recording must be started manually.
Note: A Hardwire Kit (CA-MicroUSB-001) is available at www.cobra.com for a more permanent installation that allows for discrete routing of the power cable.
LED FUNCTIONALITY
The LED Indicator, located near the top left of the screen, communicates power and recording status even if the screen is off. LED operation is detailed in the table below:
Camera State LED
- Unit ON/ Recording
Blinking Red/Green Alternating (1s on-1s off) - Unit ON/Not Recording
Solid Red - Unit OFF/Power Connected
Solid Green - Unit OFF/ Power Disconnected
No LED
TROUBLESHOOTING
If your unit does not appear to be operating properly, please follow these troubleshooting steps:
- Make sure the power cord is properly connected.
- Make sure the socket of your vehicle’s cigarette lighter is clean and free of corrosion.
- Make sure the power cord’s cigarette lighter adapter is firmly seated in your cigarette lighter, and the Status LED is on.
REFRENCESS LINK
https://eu.cobra.com/collections/dash-cam
DOWNLOAD PDF


