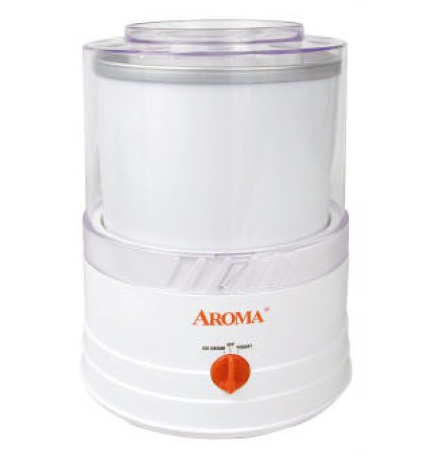
Aroma AIC-115 ICE CREAM MAKER Manual

Congratulations on your purchase of Aroma’s Ice Cream Maker. It allows you to make your own rich and creamy homemade ice cream or frozen yogurt with the flip of a switch. You can also make your own favorite, healthy and delicious sherbet, sorbet, ice, and frozen drinks in about 30 minutes. Enjoy your new Ice Cream Maker. It is easy and fun!
About
Electric Ice Cream Maker makes up to 4 liters of homemade ice cream Solid wood exterior; Aluminum mixing bowl for quick freezing Choice of conventional handwheel or electric crank Removable surface for cleaning; Includes manual and describes products that comply with North American electrical standards
IMPORTANT SAFEGUARDS
Basic safety precautions should always be followed when using electrical appliances, including the following:
- Read all Instructions before using the appliance.
- To protect against electrical hazards, do not immerse the main body-the motor base or other electrical cord in water or other liquid.
- Close supervision is necessary when any appliance is used by or near children.
- Unplug the appliance from the outlet when not in use, before putting on or taking off parts, and before cleaning.
- Avoid contacting moving parts. Keep fingers, hair, clothing, as well as spatulas, and other utensils away during the operation.
- Do not operate any appliance with a damaged cord or plug or after the appliance malfunctions or is dropped or has been damaged in any manner. Return the appliance to the nearest authorized service facility for examination, repair, or adjustment.
- The use of accessory attachments not recommended by the appliance manufacturer may cause hazards.
- Do not use outdoors.
- Do not let the cord hang over the edge of the table or counter or touch hot surfaces.
- Keep fingers, utensils, and other foreign objects out of the freezer canister while in use to reduce the risk of injury to persons or to the appliance itself. DO NOT USE SHARP OBJECTS OR UTENSILS INSIDE THE FREEZER CANISTER. Sharp objects will scratch and damage the inside of the freezer canister. A rubber spatula or wooden spoon may be used when the appliance is turned off.
- Use only on appropriate voltage AC outlets. (See the rating plate on the bottom of the appliance.)
- Do not use the appliance for other than intended use.
SHORT CORD INSTRUCTIONS
- A short power-supply cord is provided to reduce the risks resulting from becoming entangled in or tripping over a longer cord.
- Longer extension cords are available and may be used if care is exercised in their use.
- If a longer extension cord is used:
- a.) The marked electrical rating of the extension cord should be at least as great as the electrical rating of the appliance.
- b.) The longer cord should be arranged so that it will not drape over the countertop or tabletop where it can be pulled by children or tripped over unintentionally.
Parts Identification

- No. 1–Cover with Filling Opening The filling opening in the middle of the cover allows you to add ingredients without stopping the machine.
- No. 2–Mixing Paddle The paddle is used to churn the frozen dessert and keep the mixture frozen evenly. It remains stationary as the freezer canister rotates around it.
- No. 3–Freezer Canister The double-insulated canister body provides frozen temperature throughout the entire mixing process and it freezes quickly in your freezer.
- No. 4–Motor Base The motor base has a two-speed switch control for a hard and soft consistency.
Before Using for the First Time
- Remove all packaging materials from the box, check all the items carefully, and make sure they are all received in good condition.
- Wash the cover, mixing paddle, and freezer canister in warm soapy water.
- Rinse and dry all parts thoroughly.
- Wipe the motor base with a damp cloth.
REMEMBER:
- Do not use abrasive cleaners or hard implements to clean.
- Do not immerse the motor base in any liquid.
How to Use
- Freezing the Freezer Canister– Wash and dry the freezer canister. To protect against freezer burn, wrap the canister in a plastic bag first, and then place it upright in the back of your freezer where the compartment is coldest. (Usually, it is the inner space of the top shelf of the freezer.) It approximately takes 24 to 48 hours or more to freeze your freezer canister before it is ready for you to make ice cream. It is suggested that you keep the freezer canister in your freezer two days before you make the ice cream.
- Follow recipes to prepare and process ingredients.
- Take out the freezer canister from the freezer, remove the plastic bag, and place it on the motor base. The freezer canister should be used immediately after removing it from the freezer since it begins to thaw once it is taken out.
- Place the mixing paddle inside the freezer canister with ringside on the top.
- Pour ingredients into the freezer canister. Keep the mixture below 1/2″ of the canister, as the mixture will expand during the freezing process.
- Place the cover over and lock properly onto the motor base.
- Plug the power cord into the proper wall outlet. Turn the switch to the left for a “HARD” consistency (ICE CREAM), and to the right for a “SOFT” consistency (YOGURT, SHERBET, ETC.)
- Turn the unit off. Take out the mixing paddle from the freezer canister. Use plastic or wooden utensils to serve.
Description
Add fun to your barbecue, birthday, party, or other fun gathering with the electric ice cream maker. Combining traditional ingredients with modern technology, this unit quickly and easily produces up to 4 liters of homemade confectionery at a time. Make a batch of creamy chocolate, vanilla, or strawberry, or combine your favorite ingredients to create special flavors. This ice maker has a beautiful pine exterior and an aluminum tank for quick freezing. Work with a conventional hand crank as before, or let the machine do the work with an electric crank. The removable parts are clean and the recipe book and manual are also included. The electric ice cream maker measures 12-2/5 x 12-2/5 x 16-3/10 inches.
Helpful Tips
- Always put the mixed ice cream mixture back in the freezer for more than 2 hours before serving to get hard texture ice cream.
- For ice cream recipes that require pre-cooking, making the mixture a day ahead is recommended. The mixture will then be able to cool completely and expand. Pre-chilling any ice cream mixture is suggested for the best results.
- The ingredient mixtures that do not require cooking are made best with an electric mixer or a blender, which lets the mixture become smooth and increase in its volume.
- The richer the cream you use, the richer flavor the ice cream will be. Whipped heavy cream is suggested for creamier, smoother ice cream.
- Please note that when using vanilla extract in making ice cream, it will be the last thing to add to the mixture. Since the alcohol in vanilla extract will create heat and hinder the speed of hardening the ice cream, you should add vanilla extract to the mixture after the ice cream maker has spun for 20 minutes.
How to Clean
- Wash the cover, mixing paddle, and freezer canister in warm soapy water using a sponge or dishcloth.
- Rinse and dry all parts thoroughly.
- Wipe the motor base with a damp cloth.
IMPORTANT:
- DO NOT IMMERSE THE MOTOR BASE IN WATER OR OTHER LIQUID.
- DO NOT CLEAN WITH ABRASIVE CLEANERS OR HARD IMPLEMENTS.
- DO NOT FREEZE THE FREEZER CANISTER IF IT IS STILL WET.
LIMITED WARRANTY
Aroma Housewares Company warrants this product free from defects in material and workmanship for one year from the provable date of purchase. Within this warranty period, Aroma Housewares Company will repair or replace, at its option, defective parts at no charge, provided the product is returned, freight prepaid with proof of purchase, and U.S. $6.00 for shipping and handling charges to Aroma Housewares Company. Please call the toll-free number below for the return authorization number. Allow 2- 4 weeks for return shipping. This warranty does not cover improper installation, misuse, abuse, or neglect on the part of the owner. Warranty is also invalid in any case that the product is taken apart or serviced by an unauthorized service station.
REFERENCE LINK
https://www.aromaco.com/product/aic-115-parts-manual/


