
Aroma ABM-250 Digital Bread Maker User Manual

IMPORTANT SAFEGUARDS
Basic safety precautions should always be followed when using electrical appliances, including the following:
- Important: Read all instructions carefully before first use.
- Do not touch hot surfaces. Use the handles or knobs.
- Use only on a level, dry and heat-resistant surface.
- Thoroughly clean all surfaces in contact with food before use. To protect against electrical shock, do not immerse the cord, plug, or appliance in water or any other liquid. See instructions for cleaning.
- Close supervision is necessary when the appliance is used by or near children.
- Unplug from the outlet when not in use and before cleaning. Allow the unit to cool before putting on or taking off parts and before cleaning the appliance.
- Always make sure the outside of the baking pan is dry prior to use. If the baking pan is placed in the baking cavity when wet, it may damage or cause the product to malfunction.
- Do not operate any appliance with a damaged cord or plug or after the appliance malfunctions or has been damaged in any manner. Contact Aroma® customer service for examination, repair, or adjustment.
- Always unplug from the plug gripping area. Never pull on the cord.
- Do not let the cord touch hot surfaces or hang over the edge of a counter or table.
- Use only a 120V AC power outlet.
- The bread maker should be operated on a separate electrical circuit from other operating appliances. If the electrical circuit is overloaded with other appliances, the bread maker may not operate properly.
- The use of accessory attachments not recommended by Aroma® Housewares may result in fire, electrical shock, or injury.
Short Cord Instructions
- A short power-supply cord is provided to reduce the risks resulting from becoming entangled in or tripping over a longer cord.
- Longer extension cords are available and may be used if care is exercised in their use.
- If a longer extension cord is used:
- a. The marked electrical rating of the extension cord should be at least as great as the electrical rating of the appliance.
- b. The longer cord should be arranged so that it will not drape over the countertop or tabletop where it can be pulled by children or tripped over unintentionally.


POLARIZED PLUG
This appliance follows the instructions below: To reduce the risk of electric shock, this plug is intended to fit into a polarized outlet only one way. If the plug does not fit fully into the outlet, reverse the plug. If it still does not fit, contact a qualified electrician. Do not attempt to modify the plug in any way. If the supply cord is damaged, it must be replaced by the manufacturer, its service agent, or a similarly qualified person in order to avoid a hazard.
Control Panel Identification

Controls/Functions
Time (+) or (-)
Adjusts the total operation time or baking time for certain functions
Menu
Selects desired baking function. Each button press cycles down the provided function list.
Start | Stop
Once baking selections have been made, press once to start. If pressed during operation, the bread maker will pause until pressed again. To cancel, hold the button down until the unit beeps.
Accessories Identification
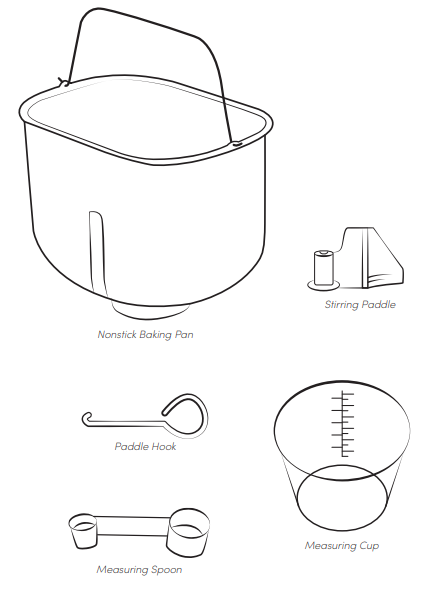
Guidelines for Use
Nonstick Baking Pan
To place inside the baking cavity, hold by the handle and slightly rotate the baking pan counterclockwise until it settles into place. Rotate the handle clockwise until snug. To remove, hold the handle and turn counterclockwise to release, then pull straight up. Paddle Hook The stirring paddle will often become stuck inside the bread at the end of the baking process. To make removal easier, insert the paddle hook into the small opening on the underside of the stirring paddle. Pull gently to release the stirring paddle.
Stirring Paddle
Before inserting into the baking pan, ensure that there is no leftover bread residue inside the paddle hole, or on the drive shaft at the bottom of the baking pan. To insert, align the “D” shaped paddle hole with the corresponding drive shaft at the bottom of the baking pan and push down firmly. To remove from bread after baking, see instructions for using the paddle hook accessory.
Paddle Hook
The stirring paddle will often become stuck inside the bread at the end of the baking process. To make removal easier, insert the paddle hook into the small opening on the underside of the stirring paddle. Pull gently to release the stirring paddle.
Before First Use
Due to the manufacturing process, slight smoke and odor may be emitted during the first use, which is normal. We recommend following steps 7-11 below prior to first use in order to eliminate the smoke and odor
- Read all instructions and important safeguards.
- Remove all packaging materials and check that all items have been received in good condition.
- Tear up all plastic bags and dispose of them properly as they can pose a risk to children.
- Remove the baking pan from the baking cavity and clean it with warm, soapy water. Rinse and dry thoroughly.
- Wash the stirring paddle and all other accessories in warm, soapy water. Rinse and dry thoroughly.
- Wipe the exterior of the stainless steel body clean with a damp cloth, then wipe dry.
- Place the clean, empty baking pan and stirring paddle securely into the bread maker.
- Using the Menu button, set the bread maker to Bake (Function 12), and set it for 10 minutes using the Time buttons.
- Press Start|Stop and allow the bread maker to cook.
- When finished, allow the bread maker to cool, then re-wash the baking pan and stirring paddle to remove any residue.
- Dry and reassemble all parts. The bread maker is now ready for use.
Helpful Hints:
To place the baking pan inside the baking cavity, hold it by the handle and slightly rotate the baking pan counterclockwise until it settles into place. Rotate the handle clockwise until snug. To remove, hold the handle and turn counterclockwise to release, then pull up. For more information on the proper use of the accessories.
Note:
If washing in the dishwasher, a slight discoloration of the baking pan and accessories may occur. This is cosmetic only and will not affect performance. · Any other servicing should be performed by Aroma® Housewares.
Quick Start
Can’t wait to start baking? Make sure to read “Important Safeguards” on page 3, then follow the instructions below to make one 1.5 lb loaf of white bread:
- Follow the instructions in “Before First Use” (above) to clean and prepare your bread maker and accessories.
- Remove the baking pan from the baking cavity and secure the stirring paddle in place. See “Helpful Hints” in the side panel for the correct baking pan removal.
- Plug the power cord into an available 120V AC wall outlet.
- Add all ingredients to the baking pan. Be sure to add them in the exact order listed (it is important to add the yeast last so that it does not get wet).
- Place the baking pan into the baking cavity and close the lid. See “Helpful Hints” on the side panel for the correct baking pan placement.
- Press the Start|Stop button to begin baking (the bread maker should already be programmed to its default settings: “1.5 lb” loaf size, “medium” crust color, and function 1 ).
- The bread maker will beep to indicate that the cooking process has begun, and the digital display will count down from the preset time.
Caution:
To avoid spilling ingredients onto the bread maker’s heating element, always remove the baking pan from the baking cavity before filling. Make sure the baking pan is securely locked in place before pressing the Start|Stop button
Quick Tips
- When measuring dry ingredients, gently shake the cup from side to side until the ingredients are level with the top of the cup. Be sure to not shake the cup excessively to avoid compacting the ingredients and overuse of the ingredients.
- Always add wet ingredients into the baking pan first, followed by the dry ingredients. Yeast should always be added last.
- For best results, always use bread flour when baking bread.
- Check your bread maker after 5 minutes of mixing. The dough should not be too dry or too runny, but well combined into a solid mass. If the dough is too dry, add more liquid (one teaspoon at a time). If too runny, add more flour (one teaspoon at a time).
Ingredient guide
Flours
Bread Flour High-gluten wheat flour produces a light, springy loaf. Bread flour is excellent at holding its shape and rises well with yeast, which makes it the best choice for bread and pizza dough. All-Purpose Flour Basic wheat flour with moderate gluten levels. While it can be used for breadmaking, it does not rise as well as bread flour.
All-purpose flour is best suited for low-rising baked goods like cakes, muffins, and cookies. Whole Wheat Flour Wheat flour is made using the entire wheat kernel. Very high in fiber, this flour can be used in a variety of baked goods but will yield smaller and more dense results with a nuttier taste.
Whole wheat flour can also be mixed with bread flour or all-purpose to dilute its characteristics. Rye Flour A low-gluten flour milled from rye grains/berries. Recommended for rye, pumpernickel, and even sourdough bread. Due to low-gluten levels, it is recommended to mix rye flour with bread flour to assist in proper rising.
Gluten-Free Flour Made from a variety of gluten-free grains and nuts like rice, millet, oats, almonds, and even coconut. Gluten-free breads tend to be more dense and smaller than traditional wheat breads. If possible, we recommend choosing a gluten-free flour specifically formulated for breadmaking.
Fats
Unsalted Butter Adds flavor, moisture, and texture to the bread. Unsalted butter is highly recommended, as using salted butter can make the dough too salty and prevent proper rising. For best results, bring butter to room temperature and cut it into small slices before adding it to the baking pan. Oil Vegetable oils, like canola or corn, can be used in place of butter for breadmaking. Consider the flavor of the oil before using it, as it will affect the taste of the bread. Flavored oils (walnut, garlic, etc) can also be added for a unique taste. Shortening Made from hydrogenated vegetable oils, shortening can be used in place of butter or oil with similar results. However, the flavor will not be as rich as bread baked with butter.
Sugars
Sugars provide food for the yeast, allowing the dough to rise properly. While white sugar is recommended, other sugars like brown sugar, honey, molasses, and syrup may be used for unique flavors. For best results when using liquid sugars, reduce the amount of water/milk in the recipe to avoid runny dough.
Egg
Eggs assist with rising, and add flavor and texture to the bread. Ensure that eggs are fresh and at room temperature before adding to the baking pan. Powdered egg alternatives and liquid substitutes may also be used.
Milk/Water
Milk, water, and other liquids add moisture and affect the bread’s texture. Bread made with milk will have extra sweetness, and have a tendency to brown more on the top. For this reason, we recommend using the “light” crust color setting when using milk. Powdered milk also works well, and is recommended for any recipe using a delayed start time. For proper rising, ensure that all liquids used are at room temperature before adding them to the baking pan.
Salt
Salt is a must-have for bread making. It adds flavor to the bread, helps bring out the flavor of other ingredients used, and promotes proper rising. Any type of salt can be used, as long as it is accurately measured. The wrong amount of salt can greatly affect your results.
Yeast
Yeast allows the dough to rise and gives bread its characteristic spongy, airy texture. Growing yeast is a delicate process, and all ingredients must be at room temperature before adding to the baking pan to ensure that your dough rises properly. Yeast must always be added last, on top of the other dry ingredients.
Add-ins
Further customize a bread recipe by adding fruits, nuts, or other desired toppings. The bread maker will beep 10 times to signal when toppings can be added. Additional toppings can also be sprinkled on top of the bread before the “Bake” phase. Nuts & Seeds Any nuts or seeds can be added at the signaled time or before baking. . Fruit Any dried fruit can be added at the signaled time or before baking. Chop if needed, and be sure to separate any sticky pieces so they will properly dispense into the bread.
Seasonings Use sugar, cinnamon, rosemary, flaked salt, garlic, and more as additions to your dough or toppings for your bread. Add desired seasonings to your dough before starting, during the signaled time, or before baking. Other Cheeses, like feta, parmesan, and cheddar make great add-ins to your dough, as do meats and vegetables like bacon and jalapeños. Make sure all add-ins are well separated for proper distribution, and add them at the signaled time, or before baking.
Note:
- Using too much fat in your recipe can slow down yeast fermentation and keep the dough from rising properly.
- Do not use perishable ingredients when setting a delayed start for your bread, as the ingredients may spoil. Instead, use powdered alternatives.
- Be sure to precisely measure your ingredients, as this will greatly affect the outcome of your bread.
Caution:
To avoid spills, burning, and/or damage to your bread maker, never overfill the baking pan. Follow the recipe measurements provided in “Recipe Charts” on pages 18-24. To avoid burning, carefully monitor any toppings on the surface of the bread while baking.
To Clean
It is recommended to clean the bread maker after each use. See “Before First Use” on page 10 for important initial cleaning guidelines:
- Unplug the power cord. Allow the bread maker and all accessories to completely cool before disassembling and cleaning.
- Remove the baking pan and stirring paddle from the baking cavity and clean with warm, soapy water. Rinse and dry thoroughly. Soak the stirring paddle in warm water for 10 to 15 minutes if you cannot remove it from the baking pan.
- Check if any ingredients spilled inside the baking cavity. Gently clean with a soft, damp cloth if needed, then wipe dry.
- Wash all accessories in warm, soapy water. Rinse and dry thoroughly.
- Wipe the exterior of the stainless steel body clean with a damp cloth, then wipe dry.
- Place the clean, empty baking pan and stirring paddle securely into the bread maker.
- Dry and reassemble all parts.
- To store your bread maker, make sure the lid is closed, and place all accessories inside the baking pan. Do not place heavy objects on top of the bread maker.
Caution:
Do not immerse the stainless steel body in water or place it in a dishwasher. To avoid damaging the machine, do not use scrubbing brushes or chemical cleaners on the bread maker or accessories. Instead, use only a mild, nonabrasive cleaner. Take care to prevent water or cleaning fluids from seeping under the digital controls or digital display. Never apply cleaner directly to the surface of the bread maker. Always apply to a cloth or sponge first. Do not use abrasive cleansers, metal scouring pads, or metal utensils on the nonstick surface of the baking pan, as they may damage the finish.
Troubleshooting
The bread maker fails to work/mix flour
- Check if the power cord is plugged into a 120V AC wall outlet.
- If “:” is flashing on the digital panel with a countdown timer, there is a delay timer in place. Press Start|Stop to cancel the delay timer and start the bread maker.
- Make sure the baking pan and stirring paddle are properly installed in the machine. · Your bread maker components may be damaged. Contact customer service.
The bread did not rise enough
- There are several possible solutions. Try using less flour (1 tsp less at a time), more yeast (1/4 tsp more at a time, or less water (1 tsp less at a time). · You may have forgotten to add salt.
- Check that the yeast is not expired, and is fresh and properly stored (sealed, in a cool, dark place).
- Liquid ingredients may have either been too hot (this will kill the yeast) or too cold (yeast will not activate). Liquids should be between 75°F-90°F for best results.
- The ingredients were in the baking pan in an improper order. If the ingredients are placed improperly, this can cause the yeast to get wet and not activate.
Can I use egg powder or dry milk?
Yes, egg powders, dried buttermilk, or dry milk can be used. These products allow you to use the Delay Start feature– however, always be sure to add the water to the baking pan first, then add the dried substitution after the flour to keep them separate. Similarly, fresh milk and eggs can be substituted for dry milk and egg powders, but the baked bread will have a heavier texture. If you still choose to use fresh milk, decrease the same measurement of other liquid in the recipe to avoid runny dough. Do not use the delay start feature with perishable ingredients.
What if the power goes out during the baking process?
- If the power goes out for 10 minutes or less while the bread maker is working, the bread maker’s power-off memory will resume the baking process once power returns.
- If the power outage lasts longer than 10 minutes, the bread maker will not be able to resume the baking process. If this happens, hold down the Start|Stop button for 3 seconds when the power returns.
Limited Warranty
Aroma Housewares Company warrants its products against defects in material and workmanship for one year from the provable date of purchase in the United States. Within this warranty period, Aroma Housewares Company will repair or replace, at its discretion, defective parts at no charge, provided the product is returned, freight prepaid with proof of purchase, and U.S. $25.00 for shipping and handling charges payable to Aroma Housewares Company.
Before returning an item, please call the toll-free number below for a return authorization number. Allow 2-4 weeks for return shipping. This warranty does not apply if the warranty period expired; the products have been modified by any unauthorized service center or personnel; the defect was subject to abuse, improper use not conforming to product manual instructions, or environment conditions more severe than those specified in the manual and specification, neglect of the owner or improper installation;
the defect was subject to Force Majeure such as flood, lightning, earthquake, other natural calamities, war, vandalism, theft, brownouts, or sags (damage due to low voltage disturbances). This warranty gives you specific legal rights, which may vary from state to state, and does not cover areas outside the United States.
Service & Support
In the event of a warranty claim, or if service is required for this product, please contact Aroma® customer service toll-free at:
- 1-800-276-6286
- M-F, 8:30 am-4:30 pm, Pacific Time
- Or we can be reached online at:
- CustomerService@AromaCo.com
REFERENCE LINK
https://www.aromaco.com/product/digital-bread-maker-abm-250/


