

Black & Decker S600 Scum Buster User Manual

Overview


Intended use
Your Black & Decker Scumbuster® has been designed for wet and dry cleaning purposes. This product is intended for household use only.
Safety instructions
- Warning! When using battery-powered appliances, basic safety precautions, including the following, should always be followed to reduce the risk of fire, leaking batteries, personal injury, and material damage.
- Read all of this manual carefully before using the appliance.
- The intended use is described in this manual. The use of any accessory or attachment or the performance of any operation with this appliance other than those recommended in this instruction manual may present a risk of personal injury.
- Retain this manual for future reference.
Using your appliance
- Keep children and animals at a safe distance when using this appliance.
- Never use the appliance near flammable fumes or liquids.
- Do not immerse the appliance in water.
After use
- Unplug the charger after use and before cleaning it.
- When not in use, the appliance should be stored indoors, in a dry place. Children should not have access to stored appliances.
Additional safety instructions for Australia and New Zealand
- This appliance is not intended for use by young or infirm persons without supervision. Children must be supervised to ensure they do not play with the appliance.
- If the supply cord is damaged, it must be replaced by the manufacturer or an authorized Black & Decker Service Centre in order to avoid a hazard.
Inspection and repairs
- Before use, check the appliance for damaged or defective parts. Check for breakage of parts, damage to switches, and any other conditions that may affect its operation.
- Do not use the appliance if any part is damaged or defective.
- Have any damaged or defective parts repaired or replaced by an authorized repair agent?
- Regularly check the charger plug for damage. Replace the charger if the plug is damaged or defective.
- Never attempt to remove or replace any parts other than those specified in this manual.
Additional safety instructions for batteries and chargers
Batteries
- Never attempt to open for any reason.
- Do not expose the battery to water.
- Do not store in locations where the temperature may exceed 40 °C.
- Charge only at ambient temperatures between 4 °C and 40 °C.
- Charge only using the charger provided with the tool.
- When disposing of batteries, follow the instructions given in the section “Protecting the environment”.
- Under extreme conditions, battery leakage may occur. When you notice liquid on the battery, proceed as follows:
- Carefully wipe the liquid off using a cloth. Avoid skin contact.
- In case of skin or eye contact, follow the instructions below.
Warning!
The battery fluid, a 25-30% solution of potassium hydroxide, can be harmful. In case of skin contact, immediately rinse with water. Neutralise with a mild acid such as lemon juice or vinegar. In case of eye contact, rinse abundantly with clean water for at least 10 minutes. Consult a physician.
- Do not incinerate the battery.
- Do not attempt to charge damaged batteries.
Chargers
- Use your Black & Decker charger only to charge the battery in the tool with which it was supplied. Other batteries could burst, causing personal injury and damage.
- Never attempt to charge non-rechargeable batteries.
- Have defective cords replaced immediately?
- Do not expose the charger to water.
- Do not open the charger.
- Do not probe the charger.
The charger is intended for indoor use only.
Electrical safety
Your charger has been designed for a specific mains voltage. Always check that the mains voltage corresponds to the voltage on the rating plate. Your charger is double insulated; therefore no earth wire is required.
Features
- On/off switch
- Dispense button
- Nozzle
- Scrub pad & disc
- Liquid reservoir
- Charger connector
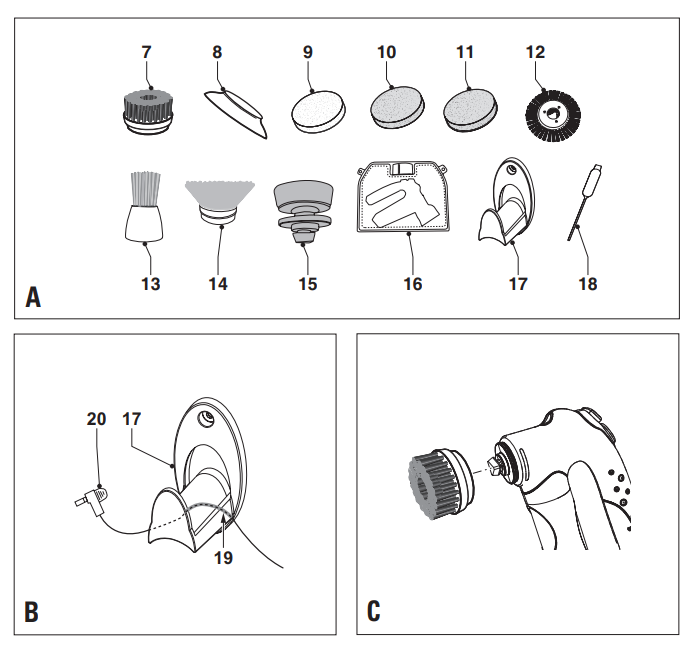
Accessories (fig. A)
This product is supplied with the following accessories: - Wide area bristle brush: for aggressive area cleaning on ceramic tile walls and floors, fiberglass and hard plastic surfaces
- Pad disc: for use with pads
- Mild scrub pad (white): for milder scrubbing of large areas, such as ceramic tile walls and floors or outdoor furniture
- Coarse scrub pad (light blue): for aggressive scrubbing of larger surfaces, such as ceramic tile walls and floors or bathtubs and sinks (porcelain or enamel)
- Heavy scrub pad (green): for aggressive scrubbing on large surfaces, such as barbecue grill grates
- Radial brush: for tile grout cleaning
- Narrow brush: for cleaning of corners and hard-to-reach places
- Carpet brush: for carpet cleaning
- Flexible attachment: for use of brushes and scrub pads in curved places 16. Carrying caddy: for portable and convenient storage of the unit and accessories
- Wall mount: for storage of the unit during charging
- Cleaning stick: for unclogging of the dispensing system
Installation
Mounting the wall mount to the wall (fig. B)
The wall mount can be fitted to the wall to provide a convenient storage and charging point for the appliance.
- Locate the wall mount (17) within reach of a mains supply. Fit the wall mount using the appropriate hardware.
- Plug in the charger.
- Insert the cord of the charger into the groove (19) at the bottom of the wall mount. Allow sufficient length of cord to connect the charger plug (20) to the appliance when placed in the wall mount.
Warning!
Do not fit the wall mount directly over a mains supply. Ensure the cord has a loop when the charger is connected to the mains.
Assembly
Warning! Before assembly, switch off the tool.
Fitting and removing an accessory (fig. C)
Fitting
- When using a pad, fit the pad onto the pad disc.
- Align the triangular notch on the accessory with the shaft on the motor unit.
- Place the accessory onto the shaft. Snap and twist the accessory quickly in the clockwise direction.
Removing
Snap and twist the accessory quickly in the counterclockwise direction and pull it off the motor unit.
Fitting flexible attachment (fig. D)
The flexible attachment (15) must be fitted between the motor unit and the accessory.
- Fit the flexible attachment onto the appliance as described above.
- Fit the accessory onto the appliance’s flexible attachment.
Warning!
Never use the flexible attachment without a brush or scrub pad in place. Do not use the flexible attachment for carpet cleaning.
Use
- Before first use, the battery must be charged for at least 16 hours.
- Place the appliance in the wall mount whenever it is not in use.
- Leave the appliance connected to the charger whenever it is not in use.
Charging the battery (fig. E)
- Before charging, make sure that the appliance is switched off.
- Place the appliance in the wall mount (17) as shown.
- Insert the charger plug (20) into the charger connector (6) at the rear of the appliance.
- Plug in the charger. Switch on at the mains.
The indicator light on the charger will be lit and will stay lit as long as the battery is connected to the charger. Leave the appliance to charge for at least 16 hours. Whilst charging, the charger may become warm. This is normal and does not indicate a problem. The appliance can be left connected to the charger indefinitely. After disconnecting the appliance from the charger, replace the charging plug.
Warning!
Do not charge the battery at ambient temperatures below 4 °C or above 40 °C.
Filling the liquid reservoir (fig. F)
Fill the appliance only with water-like household cleaning agents. Do not fill the appliance with gels or soft scrubs as they will clog the dispensing system.
- Hold the appliance over a sink with the nozzle (3) facing down as shown.
- Loosen the liquid reservoir cap (21) and remove it.
- Fill the reservoir (5) with the required cleaning agent up to the “max” line.
- Re-fit the cap, making sure it is tightened securely.
Switching on and off (fig. G)
- To switch the appliance on at low speed, set the on/off switch to position 1.
- To switch the appliance on at high speed, set the on/off switch to position 2.
- To switch the appliance off, set the on/off switch to position 0.
Hints for optimum use
The appliance can be used with a variety of cleaning agents, including bathroom, automotive, patio furniture, carpet, and other common household cleaners. Always read and follow the manufacturer’s instructions on the cleaning agent you use. Do not use the appliance with abrasive cleaning agents. Warning! Wear gloves and eye protection when using aggressive chemical cleaners.
- Before cleaning carpets, thoroughly vacuum the surface.
- For soiled carpets, dip the shampoo brush in a cleaning solution and shampoo the soiled area. Move the appliance in a circular pattern. Do not hold the appliance in one place while running. Once the foam has disappeared, let it dry, then vacuum the carpet.
- If you are unsure about using this appliance on a particular surface, test it first on a small inconspicuous patch.
Cleaning and maintenance
- Regularly clean the motor unit using a damp cloth. Do not use any abrasive or solvent-based cleaner.
- After every use, clean the accessories in soapy water.
- Clean the liquid dispensing system after every use and before storage.
Cleaning the liquid reservoir (fig. F)
- Remove the liquid reservoir cap (21).
- Empty the liquid reservoir (5) as necessary.
- Wipe the inside of the liquid reservoir with a soft damp cloth and flush with water.
Cleaning the nozzle (fig. H)
- Loosen the nozzle (3) and remove it using the cleaning tool (18).
- Immerse the nozzle for a half hour in clear warm water.
- Clean the grooves in the nozzle using a fine synthetic brush.
- Re-fit the nozzle. Be careful not to overtighten.
- Fill the reservoir (5) with clear water.
- Dispense the liquid until the reservoir is empty.
- Repeat this procedure 1 or 2 times with clear water.
Cleaning the dispensing system (fig. H)
- Loosen the nozzle (3) and remove it using the cleaning tool (18).
- Fill the reservoir (5) with warm water.
- Dispense the liquid until the reservoir is empty.
- Repeat this procedure 1 or 2 times with warm water.
- Re-fit the nozzle. Be careful not to overtighten.
Unclogging the dispensing system (fig. H & I)
- Fill the reservoir (5) with clear warm water up to the “max” line.
- Loosen the nozzle (3) and remove it using the cleaning tool (18).
- Press the dispense button (2) while inserting the front end of the cleaning tool (18) into the dispense tube (22) repeatedly until the dispensing system is unclogged.
The dispensing system is unclogged when the sound of pressure release is heard, followed by water exiting the nozzle.
- Remove the cleaning tool. Dispense the liquid until the reservoir is empty.
- Repeat this procedure 1 or 2 times as necessary to restore the full flow.
- Re-fit the nozzle. Be careful not to overtighten.
Protecting the environment
Separate collection. This product must not be disposed of with normal household waste. Should you find one day that your Black & Decker product needs replacement, or if it is of no further use to you, do not dispose of it with household waste. Make this product available for a separate collection.
A separate collection of used products and packaging allows materials to be recycled and used again. Re-use of recycled materials helps prevent environmental pollution and reduces the demand for raw materials. Local regulations may provide for a separate collection of electrical products from the household, at municipal waste sites, or by the retailer when you purchase a new product.
Black & Decker provides a facility for the collection and recycling of Black & Decker products once they have reached the end of their working life. To take advantage of this service please return your product to any authorized repair agent who will collect them on our behalf. You can check the location of your nearest authorized repair agent by contacting your local Black & Decker office at the address indicated in this manual. Alternatively, a list of authorized Black & Decker repair agents and full details of our after-sales service and contacts are available on the Internet at: www.2helpU.com
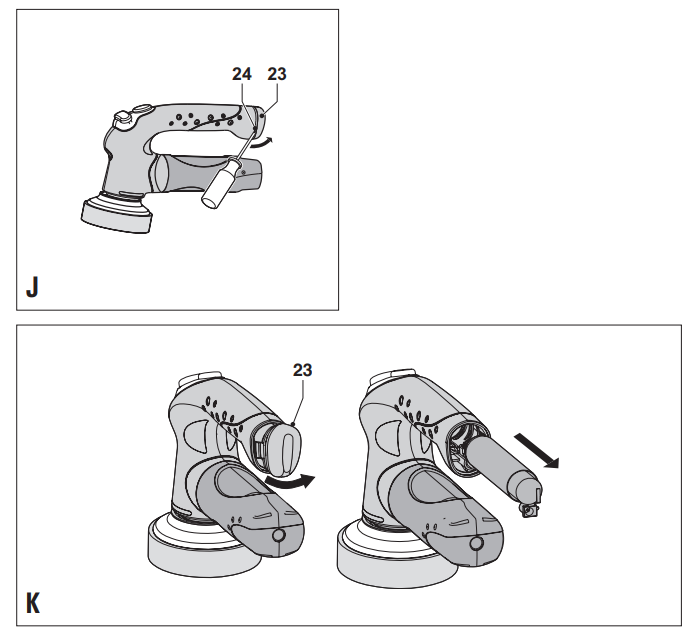
Battery (fig. J & K)
At the end of their useful life, discard batteries with due care for our environment.
- Preferably discharge the battery by operating the appliance until the motor stops.
- Using a flat-blade screwdriver, push the battery cover (23) in at the notch (24) to the side of the cover, so that it unclips and can be removed.
- Take hold of the battery casing to pull the battery out of the appliance.
- Place the battery in suitable packaging to ensure that the terminals cannot be short-circuited.
- Take the battery to your service agent or a local recycling station.
Guarantee
Black & Decker is confident of the quality of its products and offers an outstanding guarantee. This guarantee statement is in addition to and in no way prejudices your statutory rights. The guarantee is valid within the territories of the Member States of the European Union and the European Free Trade Area. If a Black & Decker product becomes defective due to faulty materials, workmanship or lack of conformity, within 24 months from the date of purchase, Black & Decker guarantees to replace defective parts, repair products subjected to fair wear and tear, or replace such products to ensure minimum inconvenience to the customer unless:
- The product has been used for trade, professional, or hire purposes;
- The product has been subjected to misuse or neglect;
- The product has sustained damage through foreign objects, substances, or accidents;
- Repairs have been attempted by persons other than authorized repair agents or Black & Decker service staff.
To claim the guarantee, you will need to submit proof of purchase to the seller or an authorized repair agent. You can check the location of your nearest authorized repair agent by contacting your local Black & Decker office at the address indicated in this manual. Alternatively, a list of authorized Black & Decker repair agents and full details of our after-sales service and contacts are available on the Internet at: www.2helpU.com
Please visit our website www.blackanddecker.co.uk to register your new Black & Decker product and to be kept up to date on new products and special offers. Further information on the Black & Decker brand and our range of products is available at www.blackanddecker.co.uk


