
Infant Optics Booklet Dxr-6 Video Monitoring System User Manual
Safety Instructions

WARNING:
- STRANGULATION HAZARD – Children have STRANGLED in cords. Keep this cord out of the reach of children (more than 3 ft (1m) away).
- NEVER PLACE THE CAMERA OR CORD IN OR NEAR CRIB OR PLAYPEN. Secure the cord at least three feet away from the crib or playpen.
- CHOKING HAZARD – This product contains small parts that may cause choking, including the Optical Lens and Lens Hood.
- SHOCK WARNING – To prevent electric shock, NEVER use the transmitter or receiver near water, including near a bathtub, sink, laundry tub, wet basement, etc.
- CAUTION – Only insert a battery pack of the same type. Risk of explosion if the battery is replaced with an incorrect type.
- Use only the AC adapters provided.
- Adult assembly is required. Keep small parts away from children when assembling.
- This product is not a toy. Do not allow children to play with it.
- This product is NOT intended to replace proper adult supervision of children.
- You MUST check your child’s activity regularly, as this product will not alert parents to the silent activities of a child.
- Before using this product, read and follow all instructions and warnings contained in this booklet.
- This product is intended for indoor use only.
- This product is not intended for use as a medical monitor and its use should not replace adult supervision.
- Test monitor before use and after changing camera location. Check reception regularly. Obstacles, such as concrete walls, may shorten the wireless signal transfer range.
- Always unplug AC adapters from wall outlets and power sources during periods of non-use.
- Do not touch the plug contacts with sharp or metal objects.
Overview
What’s Included

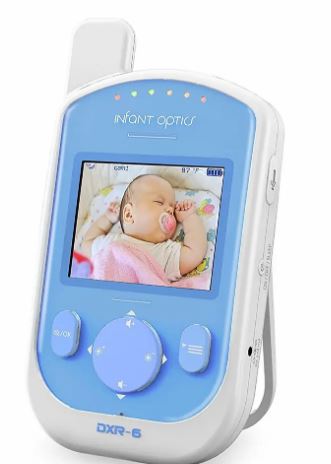
Product Overview

- Power ON/OFF/SLEEP Button
- MENU Button
- + Volume Button (UP Button in Menu)
- + Brightness Button (LEFT Button in Menu)
- – Volume Button (DOWN Button in Menu)
- – Brightness Button (RIGHT Button in Menu)
- ZOOM/OK Button
- Charging LED Indicator
- Power LED Indicator
- TALK Button
- Microphone
- Sound Level LED Bar Indicator
- Antenna
- Speaker
- Power Adapter Inlet Port
- Flip Stand
- Battery Compartment

- ON/OFF Switch
- Microphone
- Power LED
- Infrared LEDs
- Light Sensor (For Night Vision Mode)
- Temperature Sensor
- Power Adapter Inlet Port
- Speaker
- PAIR Key
Menu Options
Status Indication Overview (Upper Screen Bar)

Menu Options Overview (Lower Screen Bar)

Getting Started
Powering Camera Unit

- Connect the Camera Power Adapter to the Camera Unit.
- Slide the ON/OFF Switch to the On position. The Power LED light on the Camera Unit will illuminate green.
- Position your Camera Unit no less than 3 feet away from your baby’s crib. Ensure the the power cord is not within reach of your baby.
NOTE Only use the enclosed Camera Power Adapter (5.9V, 550mA).
Wall Mounting Camera Unit
Before installation, check the reception and camera positioning of the location you intend to mount the camera by holding it to the wall. Ensure the desired location is no less than 3 feet away from your baby’s crib.
- Pre-drill a hole in the wall using a 1/5 inch (6mm) drill bit.
- Insert wall anchor into the wall and tap gently with a hammer until the anchor is flush with the wall.
- Insert screw into the wall anchor and tighten until the screw only sticks out by about 1/3 inch.
- Connect the Camera Power Adapter to the Camera Unit.
- Locate the hole on the bottom of the Camera Unit and slide the hole over the screw sticking out of the wall.
- Check to see that the Camera Unit is secure. If it is loose, you may need to tighten the screw more.
- Use wall clips (not included) to secure the power cord away from the crib or baby’s reach.
Monitor Unit Battery Installation

- Insert the Rechargeable Li-ion Battery into the Battery Compartment as shown above.
- Insert the wire tab of the Rechargeable Li-ion Battery into the contact slots as shown above.
- Replace the battery cover over the compartment.
Charging and Powering the Monitor Unit

For best results, charge the Monitor Unit before use. After the initial charge, recharge normally as required. The Monitor Unit can be operated normally with power adapter plugged into the unit with the battery installed.
- Connect the Monitor Power Adapter to the Monitor Unit. An extra USB Power Cable can be used for powering the Monitor Unit from a USB outlet such as a laptop or computer.
- Press and hold the
 POWER ON/OFF/SLEEP button for 2 seconds to turn ON the Monitor Unit. The POWER LED indicator will illuminate green to indicate the unit is ON.
 - Once both the Camera and Monitor Units are switched on, the display on the Monitor Unit will show the video captured by the Camera Unit.
- If there is no connection or you are out of range, the video display will go off and the screen WARNING: Out of signal coverage will be shown on the LCD display. The unit will also beep every 30 seconds. Move the Monitor Unit closer to the Camera Unit until the link is re-established.
- Press and hold the POWER ON/OFF/SLEEP button, until the progress bar finishes scrolling, to turn OFF the Monitor Unit.
NOTE
The ![]() battery icon turns red on the LCD screen to indicate that the battery is low, and it gives a beep periodically. The battery needs to be recharged. Fully charging the battery takes about 7 hours.
battery icon turns red on the LCD screen to indicate that the battery is low, and it gives a beep periodically. The battery needs to be recharged. Fully charging the battery takes about 7 hours.
When Charging
- During power OFF, when the adapter is plugged in, an adapter logo will display on the screen and the Charging LED Indicator will illuminate red to indicate charging, then turn blue to indicate that the battery is fully charged.
- During power ON, when the adapter is plugged in, the
 battery icon on the screen’s top right corner will show that the battery is charging. The Charging LED Indicator will also illuminate red to indicate charging, then turn blue to indicate that the battery is fully charged.
Registration (Pairing)
The Camera Unit is pre-registered to your Monitor Unit. You do not need to register it again unless the Camera Unit loses its link with the Monitor Unit. To re-register your Camera Unit, or register a new Camera Unit’ follow the procedure below:
- Press the MENU button on the Monitor Unit and the menu bar will pop up.
- Press the
 LEFT button or
  RIGHT button until the
 Cam icon is highlighted,
 - Press the
 UP button or DOWN
 button until ADD icon is highlighted and press the OK button.
 - Press the UP button or DOWN button to select the desired CAM and press the OK button to start searching for a Camera Unit.
- Press and hold the PAIR key underneath the Camera Unit for at least 3 seconds. The power LED light (green LED light, located directly below the camera lens aperture) should flash green to indicate the Camera Unit is in pairing mode. If it does not flash, press and hold the PAIR key until the LED light flashes.
- If unsuccessful, delete the camera channel as per 5.6.1 on page 13, and attempt to pair again.
Temperature Scale Display Setting
The temperature reading from the temperature sensor at the back of the Camera Unit will be displayed on the top of the screen. To toggle between °C and °F:
- Press and hold the SHORT-CUT button for more than 3 seconds.
- Check that the temperature display reading on the screen has changed to your desired scale. If not, repeat step 1.
Using the Infant Optics DXR-6 Monitor.
Set Up Place the Camera Unit in a convenient location (e.g. on a table or a shelf and point the camera lens toward the area you want to monitor.
NOTE
Do not place the Monitor Unit within the baby’s reach. If there is interference with the picture or sound, try moving the units to different locations, and ensure they are not close to other electrical equipment.
Pan and Tilt
The Camera Unit can be remotely controlled from the Monitor Unit.
- Press the UP button or DOWNbutton to tilt upward or downward.
- Press theLEFT button orRIGHT button to pan left or right.
Night Vision Mode
The Camera Unit has 8 high-intensity infrared LEDs for picking up clear images in the dark. When the built-in photo sensor detects a low level of ambient light, the LEDs will automatically activate and the screen on the Monitor Unit will display in black and white. The![]() icon will be displayed on the screen.
icon will be displayed on the screen.
Talk Mode
Press and hold the![]() TALK button on the Monitor Unit to talk to your baby through the Camera Unit’s loudspeaker.A
TALK button on the Monitor Unit to talk to your baby through the Camera Unit’s loudspeaker.A![]() icon will be displayed at the top of the LCD screen.
icon will be displayed at the top of the LCD screen.
Sleep Mode (Video OFF with Audio ON)
Short press the ![]() POWER ON/OFF/SLEEP button to turn the LCD screen OFF while keeping the audio ON. This mode conserves power. Short press the
POWER ON/OFF/SLEEP button to turn the LCD screen OFF while keeping the audio ON. This mode conserves power. Short press the ![]() POWER ON/OFF/SLEEP button to turn the screen back on.
POWER ON/OFF/SLEEP button to turn the screen back on.
DXR-6 Monitor Unit Menu Options
Volume
- Press the
 button or the
 button to adjust volume.
 - Volume can also be adjusted in the menu bar under the option. 2.1 press the
 MENU button and the menu bar will pop up. 2.2 Press theLEFT button or RIGHT button until the Volume icon is highlighted. 2.3 Press the UP button or DOWNbutton to select the desired volume level from levels 1 ~ 8 (the default volume level setting is level 4). Level 0 is mute. There is no need to confirm a setting. Once you’ve selected that option with a red cursor, you may exit the menu options or scroll left or right for other menu options. This applies to every feature 5.1 – 5.7
Brightness
- Press the
 button or the
 button to adjust brightness.
 - Brightness can also be adjusted in the menu bar under the
 option. 2.1 Press the MENU button and the menu bar will pop up. 2.2 Press theLEFT button or RIGHT button until the Brightness icon is highlighted. 2.3 Press the UP button or DOWNbutton to select the desired brightness level from level 1 ~ 8 (the default brightness level setting is level 4)
Troubleshooting
| Product does not switch on | * Check that you are pressing and holding the power button long enough to force unit to switch on. * The battery may be depleted; recharge or replace battery. * Confirm that power adapters are properly connected. |
| Reception interference (static) | * The Camera and Monitor Unit may be too far apart. * The battery power may be too low. * Other electronic devices may be interfering with the signal. * The Camera or Monitor Unit may be in close proximity to large metallic objects causing interference. * Use of other 2.4GHz products, such as wireless networks (WiFi routers), Bluetooth systems, or microwave ovens, may cause interference with this product. Keep Camera and Monitor Unit at least 5ft (1.5m) away from these items, or turn them off if they appear to cause interference. |
| Camera Unit loses link with the Monitor Unit | * If the Camera Unit is too far away with low reception, move the Camera Unit closer to the Monitor Unit. * Reset both units by disconnecting them from battery and electrical power. Wait about 15 seconds, then reconnect. * Large metallic objects, including doors, refrigerators, mirrors, filing cabinets, and also reinforced concrete, may block the radio signal if between the Camera and Monitor Unit. * The signal strength may be reduced when in close proximity to radio or electrical equipment, such as TVs, computers, cordless or mobile phones, fluorescent lights or dimmer switches. * Use of other 2.4GHz products, such as wireless networks (WiFi routers), Bluetooth systems, or microwave ovens, may cause interference with this product. Keep Camera and Monitor Unit at least 5ft (1.5m) away from these items, or turn them off if they appear to cause interference. * Pair the Camera Unit under a different channel. (refer to page 13, chapter 5.6.2) |
| No picture from a Camera Unit | * Check all connections to the camera. Confirm that the adapter is plugged in. * Try recharging or replacing the battery pack. * Confirm that all cameras and monitors are both ON. |
| Make sure that the Camera Unit is within range of the monitor. Confirm that the Camera and Monitor Unit are paired. Adjust the monitor antenna to vertical position. | |
| No sound from Monitor Unit | Volume setting may be too low. Adjust to a higher setting. |
| Picture is black and white | Night vision LED may be ON. Night vision mode operates in black and white. Turn on room lights to force monitor out of night vision mode. |
| The picture playback is not smooth (choppy video with low frame rate) | Try moving the Camera Unit closer to the Monitor Unit. Remove obstructions between the Camera and Monitor Unit. Adjust the monitor antenna to vertical position. Use of other 2.4GHz products, such as wireless networks (WiFi routers), Bluetooth systems, or microwave ovens, may cause interference with this product. Keep Camera and Monitor Unit at least 5ft (1.5m) away from these items, or turn them off if they appear to cause interference. |
| Camera Unit power LED changes brightness | This is normal. The Power LED indicator is set to dim when in the dark, and brighten when ambient light is detected. |
| Noise (static, beeping) | * Battery power may be too low; recharge or replace battery. * Possible alarm ring alert. * Possible out of signal alert. |
| Noise interference on your Monitor Unit | Volume may be set too high on the Monitor Unit. Lower volume. The Camera and Monitor Units may be too close. Move them further apart. The Camera Unit may be too far away and out of range. Move the Camera Unit closer to the Monitor Unit. Make sure the Camera and Monitor Units are placed away from other electrical equipment, such as a television, computer or cordless/mobile telephone. |
| The rechargeable battery will not charge or no charge light | The monitor power adapter may not be properly connected. Remove battery pack from the Monitor Unit and let it cool down for 5 minutes. This will reset the system logic of the battery. Replace battery back into Monitor Unit. Battery pack may not be properly connected inside the battery compartment |
| Pairing failed | Make sure that the Power Adapter is connected to the Camera Unit. Confirm that the Camera Unit is turned ON (Power LED indicator shows green light). Check Camera Unit Power LED shows flashing green light after pressing the PAIR button. This means the camera unit is now in PAIRING mode. Try pairing to another CAM channel. |
If the above troubleshooting guide did not help you solve your problem, contact customer service. Our toll-free number and customer service email address are located in the back of this User Manual.
Specifications
Systems General
- RF Frequency: 2400 Mhz ~ 2483.5 Mhz
- Type of Modulation: GFSK
- Type of Spread Spectrum: FHSS
- Selectable Camera Channels: 4
- Data Rate: 3 Mbps
- Channel Bandwidth: 3.375 MHz
- Transmission Range: up to 700 feet (line of sight, no obstruction)
Camera Unit
- Input Voltage: 100-240VAC @ 50/60H
- Operating Voltage: 5.9V, 1000mA
- IR/Night Vision: 8 IR LEDs, 1 Low light sensor
- Picture sensor: GC0308 1/6.5′ Color CMOS
- Built-Lens: f2.5mm, F 2.8
- Operating Temperature: 0° C (+32° F) to +50° C (122° F)
- Power Adapter: Input: 100-240VAC, 50/60Hz 200mA; Output: 5.9V, 1000mA
- Exposure Control: Auto
- White Balance Control: Auto
- Vertical Turning Angle: 95° UP, 25° DOWN
- Horizontal Turning Angle: 135° both left and right
FCC Regulations
This equipment has been tested and found to comply with the limits for a Class B digital device, pursuant to Part 15 of FCC Rules. These limits are designed to provide reasonable protection against harmful interference in a residential installation. This equipment generates, uses, and can radiate radio frequency energy, and if not installed and used in accordance with the instructions, may cause harmful interference to radio communications.
However, there is no guarantee that interference will not occur in a particular installation. If this equipment does cause harmful interference to radio or television reception, which can be determined by turning the equipment off and on, the user is encouraged to try to correct the interference by one or more of the following measures:
- Reorient or relocate the receiving antenna.
- Increase the separation between the equipment and the receiver.
- Connect the equipment to an outlet on a circuit different from that to which the receiver is connected.
- Consult the dealer or an experienced radio/TV technician for help.
Changes or modifications
not expressly approved by the party responsible could void the user’s authority to operate this device. This device complies with part 15 of the FCC Rules. Operation is subject to the following two conditions: 1. This device may not cause harmful interference, and 2. This device must accept any interference received, including interference that may cause undesired operation. This equipment complies with FCC radiation exposure limits set forth for an uncontrolled environment. The end user must follow the specific operating instructions to satisfy RF exposure compliance.
This transmitter must not be co-located or operating in conjunction with any other antenna or transmitter. The mobile device is designed to meet the requirements for exposure to radio waves established by the Federal Communications Commission (USA). These requirements set a SAR limit of 1.6 W/kg averaged over one gram of tissue. The highest SAR value reported under this standard during product certification for use when properly worn on the body is 0.221 W/kg.
For body operation, this device has been tested and meets FCC RF exposure guidelines when used with any accessory that contains no metal and that positions a minimum of 5mm from the body. Use of other accessories may not ensure compliance with FCC RF exposure guidelines. This equipment complies with FCC radiation exposure limits set forth for an uncontrolled environment. This equipment should be installed and operated with a minimum distance of 20cm between the radiator & your body. This transmitter must not be co-located or operating in conjunction with any other antenna or transmitter.
Warranty Information
We warrant to the original user that this product shall be free from all defects in material or workmanship for one year from the date of purchase. This warranty does not apply to any product that has been subject to abuse, misuse, negligence or accident, nor does it apply to any batteries that may be supplied with the product. Defects caused by tampering, unauthorized alterations or repairs are not covered by this warranty.
We may elect to replace the entire unit, at no extra cost to you, with the same model or a similar model rather than repair it. If a defect covered by this warranty should occur, email us with a scanned copy of your original receipt and a brief explanation of the problem, failing which Infant Optics will not perform any of its obligations under this warranty. Our service representative will provide you with the address of our closest office/warehouse to where you live, together with a return authorization number. To return the item, you must use the original packaging or the equivalent, and you must pay postage. This limited warranty is valid only in the United States and applies only when this product is used in the United States.
OUTSIDE U.S.: This warranty does NOT apply to, and Infant Optics is not responsible for, any warranty claims made on products sold or used outside the United States. TOLL-FREE CUSTOMER SUPPORT 1-800-291-0195 DEDICATED CUSTOMER SUPPORT EMAIL info@infantoptics.com We will respond to all inquiries within 24 hours. This warranty gives you specific legal rights, and you may have other legal rights that vary from state to state. 2019 Infant Optics All rights reserved.
REFERENCE LINK
https://infantoptics.com/wp-content/uploads/2018/09/DXR-6-User-Manual.pdf


