
![]()
Infant Optics DXR-8 PRO Digital Video Monitoring System Guide

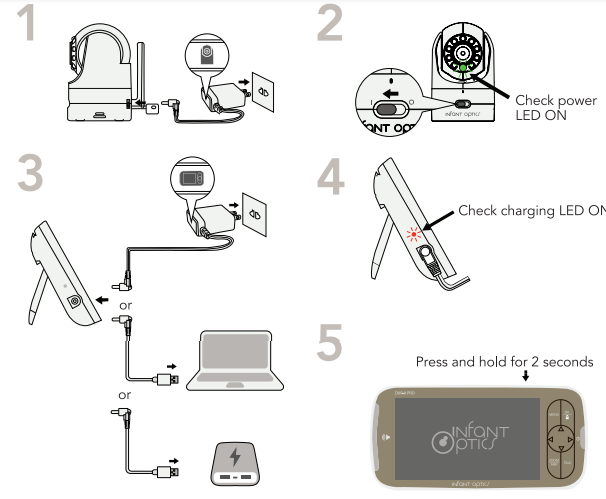
Quick Start 1

Quick Start 2
ANR Explained
How it works
The DXR-8 PRO is fitted with a sound processing chipset that detects repetitive sound waves in
background audio and mutes it, allowing ONLY sounds made by the baby to be more
pronounced. Appliances that emit a repetitive/constant droning sound are canceled out.
Intended purpose
hat AND Star at background main team appliances such an.
- Fans
- Arconctioners
- Hemicifers
ANR also filters out the ambient static noise that is commonly found in baby monitors.

Usage with white noise machines
We recommend that the AN be deactivated when white noise machines are used in the nursery. The sounds emitted from SOME white noise machines are surprisingly non-repeating sound waves. This may result in a distorted warping sound in the background from the monitor unit when white noise machines are in use near the camera unit. However, sounds made by your baby (such as crying, talking, and mumbling) are still not affected.

Status Bar

Product Diagram

- LCD Screen
- MENU Button
- OK / Cycle Camera Button
- Navigation Buttons
- Power LED Indicator
- ZOOM / AN Button
- TALK Button
- Microphone
- Volume Level LED
- Power ON/OFF/SLEEP Button
- Brightness Buttons
- Volume Buttons
- Charging LED Indicator
- DC Jack IN
- Speaker
- Kickstand
- Battery Compartment
- Antenna

- ON/OFF Switch
- Microphone
- Power LED Indicator
- Infrared LEDs
- Photo Sensor (Night Vision Mode)
- Antenna
- Temperature Sensor
- DC Jack IN
- Speaker
- PAIR Button
- Hanger Hole
What’s Included

Pairing
This step is usually not required out of the box. The Camera Unit is pre-registered and connected to your Monitor Unit. You do not need to register it again unless the Camera Unit loses its registration with the Monitor Unit. In the event that you need to pair the Camera Unit and Monitor Unit again, do the following:

Battery Access
Accessing the battery compartment for maintenance.

Specifications
Systems General
- RF Frequency: 2400 MHz – 2483.5 MHz
- Type of Modulation: GFSK
- Type of Spread Spectrum: FHSS
- Selectable Camera Channels: 4
- Transmission Range: up to 1000 feet (line of sight, no obstructions)
Camera Unit
- Input Voltage: 100-240VAC @ 50/60Hz
- Operating Voltage: 5.9V, 1000mA
- IR/Night Vision: 8 IR LEDs, 1 Low light sensor
- Operating Temperature: 0°C (+32°F) to +50°C (122°F)
- Power Adapter: Input: 100-240VAC, 50/60Hz 200mA; Output: 5.9V, 1000mA
- Exposure Control: Auto
- White Balance Control: Auto
- Vertical Turning Angle: 95″ UP, 25° DOWN
- Horizontal Turning Angle: 135° both left and right
Monitor Unit
- Input Voltage: 100-240VAC @ 50/60Hz
- Operating Voltage: 5.0V, 1.5A
- Resolution (Pixel): 1280×720
- Battery: 2800mAH Li-ion 3.85V rechargeable battery
- LCD Display: 5’TFT color display at 1280 × 720 GB colors
- Power Adapter: Input: 100-240VAC, 50/60Hz 200mA; Output: 5.0V, 1.5A
- Duration (Standby Mode): 10 Hours
- Duration (Screen ON): 6 Hours
- Time to full charge: 7 Hours
Safety Instructions
- Use only the power adapters provided.
- Adult assembly is required. Keep small parts away from children when assembling
- This product is not a toy. Do not allow children to play with it.
- This product is NOT intended to replace the proper adult supervision of children.
- You MUST check your child’s activity regularly, as this product will not alert parents to any silent activities of the child.
- Before using this product, read and follow all instructions and warnings contained in this User Manual.
- This product is intended for indoor use only.
- This product is not intended for use as a medical monitor and its use should not replace adult supervision.
- Test the monitor before use and after changing the camera’s location. Check reception regularly. Obstacles, such as concrete walls, may shorten the wireless signal transfer range.
- Always unplug power adapters from wall outlets and power sources during periods of non-use.
- Do not touch the plug contacts with sharp or metal objects.
- Do not allow water damage to the monitor unit, charging port, or charging cable, which causes the overheating of the charging components.
BATTERY WARNING:
Rechargeable Li-ion Battery
- Do not open, puncture, crush, or drop the battery. A damaged battery must not be used. This can result in a higher risk of fire, explosion, overheating, and leaking of electrolytes.
- Do not short external contacts.
- If any electrolytes should come into contact with your hands or clothes, wash them thoroughly with water.
- If any electrolytes should come into contact with your eyes, never rub your eyes. Rinse your eyes thoroughly with water and then consult a doctor.
CAUTION:
- Use only the original rechargeable battery provided. Please contact Infant Optics for a replacement battery.
- Insert the battery correctly.
- Do not leave the battery in an automobile exposed to direct sunlight for a long period of time with the doors and windows closed.
- Remove the battery if you do not use the product for a long period of time. Keep it in a cool and dark area.
- Do not replace the battery with wet hands. There is a risk of explosion if the battery is replaced with an incorrect type. Dispose of the used battery according to local regulations.
- Stop using the battery immediately and keep away from the fire if it emits an abnormal smell or leaks electrolytes. Released electrolytes may cause fire or burns
- Exercise care when handling the batteries. Do not allow conductive materials such as rings, bracelets, or keys to touch the batteries, otherwise, a short circuit may cause the batteries and/or the conductive material to overheat and cause burns.
Troubleshooting
Camera Unit does not switch on
- Ensure that the Camera Unit is ON (the Power LED indicator shows a green light).
- Ensure the Camera Power Adapter is properly connected.
- There may be no power from the outlet. Switch to another electrical outlet.
The monitor Unit does not switch on
- The battery may not be securely connected inside the battery compartment. Reconnect the battery and ensure that the tab is firmly plugged into the slot.
- The battery may be depleted. Recharge or replace the battery.
- Ensure that the power button is pressed and held for at least 4 seconds.
Camera Unit loses link with Monitor Unit
- If the Camera Unit is too far away with low reception, move the Camera Unit closer to the Monitor Unit.
- Reset both units by disconnecting them from both battery and electrical power. Wait about 15 seconds, then reconnect.
- Large metallic objects, including doors, refrigerators, mirrors, filing cabinets, and reinforced concrete may block the radio signal between the Camera Unit and Monitor Unit.
- The signal strength may be reduced when in close proximity to radio or electrical equipment, such as TVs, computers, cordless or mobile phones, fluorescent lights, or dimmer switches.
- Use of other 2.4GHz products, such as wireless networks (WiFi routers), Bluetooth systems, or microwave ovens, may cause interference with this product. Keep the Camera and Monitor Unit at least 5 ft (1.5m) away from these items, or turn them off if they appear to cause interference.
- Pair the Camera Unit under a different channel.
The picture playback is not smooth (choppy video with low frame rate)
- The Camera and Monitor Unit may be too far apart.
- Ensure that both the Monitor and Camera Unit remain at least three feet away from any routers or 2.4GHz Wi-Fi devices such as smartphones and tablets. Users may forget that they have a smartphone in their pocket when using the Monitor Unit or may place the Monitor Unit close to their smartphone on a bedside table at night. Maintaining distance between the Monitor Unit and Wi-Fi devices minimizes interference.
- Ensure that no 2.4GHz devices are located between the direct line of communication of the Monitor and Camera Unit. For example, ensure that there is no smartphone between the Monitor Unit and the Camera Unit (regardless of the room in which the devices are placed).
- If the Monitor and Camera Unit are located on the same floor, position the antenna in the upright position. If the Monitor and Camera Unit are on different floors (e.g. in a two-story house), position the antenna in the horizontal position.
- Change the Wi-Fi channel setting on your router. As per the instruction manual of your router change the “Channel” from “Automatic” to “Channel 1” in “Settings” If “Channel 1” does not work, try other channels.
- There may be interference with your Wi-Fi network, such as slow download speeds. Try positioning the Monitor and Camera Unit as far away from your router as possible. Avoid placing your router between the Camera Unit and the Monitor Unit.
- Ensure that nearby Wi-Fi devices are in the 5GHz band, if possible.
Noise interference on the Monitor Unit
- The volume setting may be too high. Adjust to a lower setting.
- The Camera and Monitor Unit may be too close. Move them further apart.
- The Camera Unit may be too far away and out of range. Move the Camera Unit closer to the Monitor Unit.
- Ensure the Camera and Monitor Unit are placed away from other electrical equipment, such as a television, computer, or cordless/mobile telephone.
The battery will not charge or there is no charge light
- Try the included spare charging cable.
- The battery may not be securely connected inside the battery compartment. Reconnect the battery and ensure that the tab is firmly plugged into the slot.
- The battery may be depleted. Recharge or replace the battery.
Temperature reading is not accurate
- Move the sensor further away from the Camera Unit.
- Ensure adequate airflow around the Camera Unit.
- Avoid placing the Camera Unit near a structure that radiates heat, such as a window or wall.
- Avoid placing the unit near heaters, air conditioning vents, and heat-producing appliances such as lights.
- Move the Camera Unit to a lower altitude to avoid heat that rises to the ceiling.
Pairing failed
- Ensure that the Power Adapter is connected to the Camera Unit.
- Ensure that the Camera Unit is turned ON (Power LED indicator shows a green light).
- Ensure the PAIR Button is long pressed until the Power LED starts blinking rapidly.
- Try pairing to another CAM channel.
The video is not clear with stagnant spots/marks on the screen
The optical lens could be dirty. Smudges and dust on the optical lens can diminish sharpness and reduce video quality. Remove smudges and dust on the lens by using a microfiber cloth or a piece of lens tissue to wipe the lens surface in a circular motion. If the above troubleshooting guide did not help you solve your problem, contact customer service. Our toll-free number and customer service email address are located in the back of this User Manual.
Maintenance
- The Camera and Monitor Unit contain sophisticated electronic parts, so they must be treated with care.
- The Camera and Monitor Unit can be damaged if it gets wet. Do not not use the Monitor Unit and/or Camera Unit outdoors in the rain, or handle it with wet hands. Do not install the Camera and Monitor Unit near a sink, bathtub, or shower.
- The Camera and Monitor Unit have a durable plastic casing that should retain its luster for many years. Clean it only with a soft cloth slightly dampened with water or mild soap. Do not use excess water or cleaning solvents of any kind.
FCC Regulations
This equipment has been tested and found to comply with the limits for a Class B digital device under Part 15 of the Federal Communications Commission rules. These limits are designed to provide reasonable protection against harmful interference in a residential installation. This equipment generates, uses, and can radiate radio frequency energy and, if not installed and used in accordance with the instructions, may cause harmful interference to radio communications.
However, there is no guarantee that interference will not occur in a particular installation. If this equipment does cause harmful interference to radio or television reception, which can be determined by turning the equipment off and on, the user is encouraged to try to correct the interference through one or more of the following measures:
- Reorient or relocate the receiving antenna.
- Increase the separation between the equipment and the receiver.
Connect the equipment to an outlet on a circuit different from that to which the receiver is
connected.
Consult the dealer or an experienced radio/TV technician for help. Changes or modifications not expressly approved by the party responsible could void the user’s authority to operate this device. This device complies with part 15 of the FCC Rules. Operation is subject to the following two conditions:
- This device may not cause harmful interference, and
- This device must accept any interference received, including interference that may cause undesired operation.
This equipment complies with FCC radiation exposure limits set forth for an uncontrolled environment. The end user must follow the specific operating instructions to satisfy FCC RF exposure compliance. This transmitter must not be co-located or operating in conjunction with any other antenna or transmitter.
Warranty Information
We warrant to the original user that this product shall be free from all defects in material or workmanship for one year from the date of purchase. This warranty does not apply to any product that has been subject to abuse, misuse, negligence, or accident, nor does it apply to any batteries that may be supplied with the product.
Defects caused by tampering, unauthorized alterations, or repairs are not covered by this warranty. We may elect to replace the entire unit, at no extra cost to you, with the same model or a similar model rather than repair it. If a defect covered by this warranty should occur, email us with a scanned copy of your original receipt and a brief explanation of the problem, failing which Infant Optics will not perform any of its obligations under this warranty.
Our service representative will provide you with the address of our closest office/warehouse to where you live, together with a return authorization number. To return the item, you must use the original packaging or the equivalent, and you must pay postage.
This limited warranty is valid only in the United States and applies only when this product is used in the United States. OUTSIDE US: This warranty does NOT apply to, and Infant Optics is not responsible for, any warranty claims made on products sold or used outside the United States. TOLL-FREE CUSTOMER SUPPORT 1-800-291-0195 DEDICATED CUSTOMER SUPPORT EMAIL info@infantoptics.com We aim to reply to all inquiries within 24 hours. This warranty gives you specific legal rights, and you may have other legal rights that vary from state to state.
REFERENCE LINK
https://www.infantoptics.com/product/dxr-8-pro-full-kit/
DOWNLOAD PDF
Infant Optics DXR-8 PRO Digital Video Monitoring System Guide


