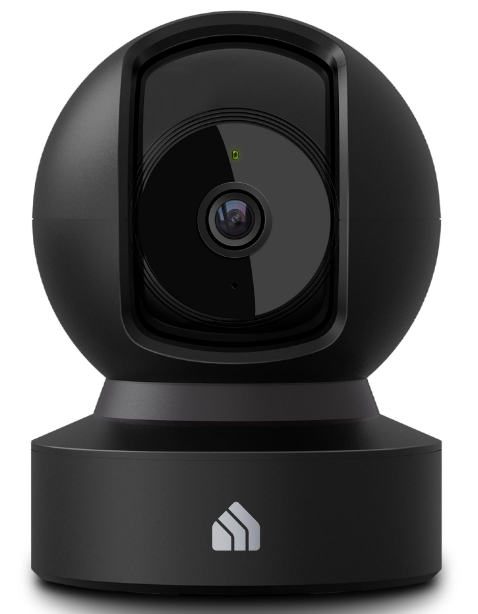
Kasa Smart EC71 Kasa Spot Pan Tilt, 24/7 Recording User Manual

About This Guide
This guide provides a brief introduction to the Kasa Spot Pan Tilt and the Kasa Smart app, as well as regulatory information. Features available in Kasa Smart may vary by model and software version. Kasa Smart availability may also vary by region or ISP. All images, steps, and descriptions in this guide are only examples and may not reflect your actual Kasa Smart experience.
More Info
- Specifications can be found on the product page at https://www.tp-link.com.
- Our Technical Support and troubleshooting information can be found at https://www.tp-link.com/support/.
- A TP-Link Community is provided for you to discuss our products at https://community.tp-link.com.
- Frequently Asked Questions (FAQs) can be found at https://www.tp-link.com/support/faq/.
Introduction
With the Kasa Spot Pan Tilt connected to your home network, you can get the full picture of any space in your apartment, dorm, or home. With a 360° horizontal view and 113° vertical view, the Pan Tilt has everything covered.
- Crystal Clear Video – Sharp and clear 1080p Full HD provides high-quality video right in the palm of your hand.
- Pan and Tilt – Swipe up, down, left, and right on your phone to rotate and set the camera’s point of view.
- Motion Tracking – When motion activity is detected, Kasa Spot Pan Tilt tracks and follows the subject to keep it within the camera’s field of view.
- Secure Local Storage – Save your footage on a microSD card and playback with your Kasa Smart app.
- Patrol Mode – Set 4 distinct viewpoints and program your pan-tilt camera to keep an eye on each region at intervals of your choosing.
Cntinued
- Night Vision – Even in the dark, the camera has Night Vision up to 30 feet. Never miss a thing at night and still get the same high-quality video you’re used to.
- Instant Activity Alerts – No need to check your Kasa Spot Pan Tilt throughout the day. Get automatic alerts when it detects motion. Take quick action when you see your pet on the couch, a roommate walking through your room, or an intruder entering your front door.
- Two-Way Audio – Use crisp two-way audio to communicate with nosy roommates, family, or even mischievous pets.
- Activity Zones – Control what alerts you receive by creating up to 16 custom activity zones, at no charge, around areas that are important to you.
- 24/7 Recording – Support continuous video recording with an SD card inserted into your Kasa Spot Pan Tilt.

Appearance
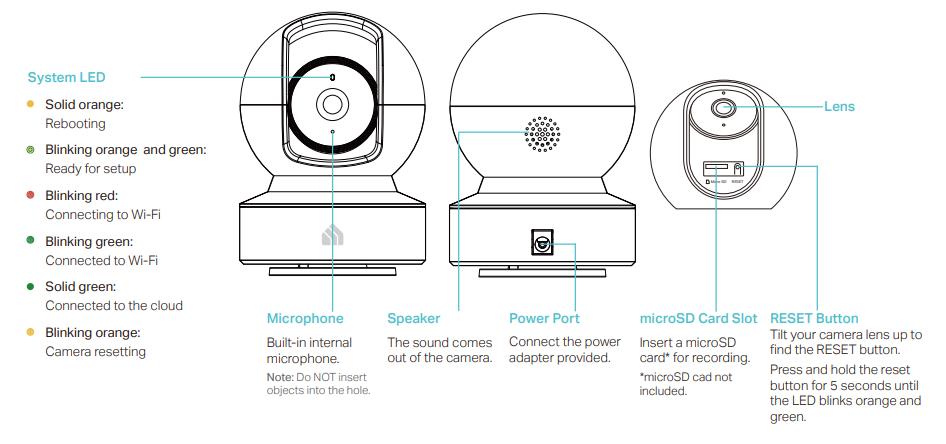
Kasa Spot Pan Tilt has a system LED that changes color according to its status, a lens, microphone, speaker, micro USB port, an SD card slot, and a RESET button. Refer to below for details.

Set Up Your Camera
Follow the steps below to get started with your new camera.
Step 1. Download Kasa
Get the Kasa Smart app from the App Store or Google Play, or by scanning the QR code below.

Step 2. Log In
Open the app, and log in with your TP-Link ID. If you don’t have an account, create one first.

Step 3. Start Setup
Tap the![]() button in the Kasa app and select Cameras > Kasa Spot Pan Tilt.
button in the Kasa app and select Cameras > Kasa Spot Pan Tilt.

Step 4. Configure
Camera Follow app instructions to configure your camera and add it to your home network.

Step 5. Place Camera
Place your camera on a flat surface, or install it on a wall or ceiling with
the provided indicator label and mounting screws.
- For soft surfaces: Directly screw the screws in.
- For the cement wall: Drill two holes* with the help of an indicator label, insert the plastic expansion tubes into holes, and screw the mounting screws into the expansion tubes.
* Diameter of the holes: 6 mm (15/64 in.)

Authentication
Responsible Party:
TP-Link USA Corporation
- Address: 10 Mauchly, Irvine, CA 92618
- Website: http://www.tp-link.com/us/
- Tel: +1 626 333 0234
- Fax: +1 909 527 6804
- E-mail: sales.usa@tp-link.com
This equipment has been tested and found to comply with the limits for a Class B digital device, pursuant to part 15 of the FCC Rules. These limits are designed to provide reasonable protection against harmful interference in a residential installation. This equipment generates, uses, and can radiate radio frequency energy and, if not installed and used in accordance with the instructions, may cause harmful interference to radio communications. However, there is no guarantee that interference will not occur in a particular installation. If this equipment does cause harmful interference to radio or television reception, which can be determined by turning the equipment off and on, the user is encouraged to try to correct the interference by one or more of the following measures:
- Reorient or relocate the receiving antenna.
- Increase the separation between the equipment and the receiver.
- Connect the equipment to an outlet on a circuit different from that to which the receiver is connected.
- Consult the dealer or an experienced radio/ TV technician for help.
This device complies with part 15 of the FCC Rules. Operation is subject to the following two conditions:
- This device may not cause harmful interference.
- This device must accept any interference received, including interference that may cause undesired operation.
FCC RF Radiation Exposure Statement
This equipment complies with FCC RF radiation exposure limits set forth for an uncontrolled environment. This device and its antenna must not be co-located or operating in conjunction with any other antenna or transmitter. “To comply with FCC RF exposure compliance requirements, this grant is applicable to only Mobile Configurations. The antennas used for this transmitter must be installed to provide a separation distance of at least 20 cm from all persons and must not be co-located or operating in conjunction with any other antenna or transmitter.”
We, TP-Link USA Corporation, has determined that the equipment shown as above has been shown to comply with the applicable technical standards, FCC part 15. There is no unauthorized change is made in the equipment and the equipment is properly maintained and operated.
- FCC compliance information statement
- Product Name: I.T.E. Power Supply
- Model Number: T090060-2B1
- Responsible Party:
- TP-Link USA Corporation
- Address: 10 Mauchly, Irvine, CA 92618
- Website: http://www.tp-link.com/us/
- Tel: +1 626 333 0234
- Fax: +1 909 527 6804
- E-mail: sales.usa@tp-link.com
This equipment has been tested and found to comply with the limits for a Class B digital device, pursuant to part 15 of the FCC Rules. These 8 limits are designed to provide reasonable protection against harmful interference in a residential installation. This equipment generates, uses, and can radiate radio frequency energy and, if not installed and used in accordance with the instructions, may cause harmful interference to radio communications
- Reorient or relocate the receiving antenna.
- Consult the dealer or an experienced radio/ TV technician for help.
Safety Information
- Keep the device away from water, fire, humidity or hot environments.
- Do not attempt to disassemble, repair, or modify the device.
- Do not use a damaged charger or USB cable to charge the device.
- Do not use any other chargers than those recommended
- Do not use the device where wireless devices are not allowed.
- The adapter shall be installed near the equipment and shall be easily accessible.
- Use only power supplies that are provided by the manufacturer and in the original packing of this product. If you have any questions, please don’t hesitate to contact us.
REFERENCE LINK
https://www.kasasmart.com/us/products/security-cameras/kasa-spot-pan-tilt-ec71
Download Link
Kasa Smart EC71 Kasa Spot Pan Tilt, 24/7 Recording User Manual


