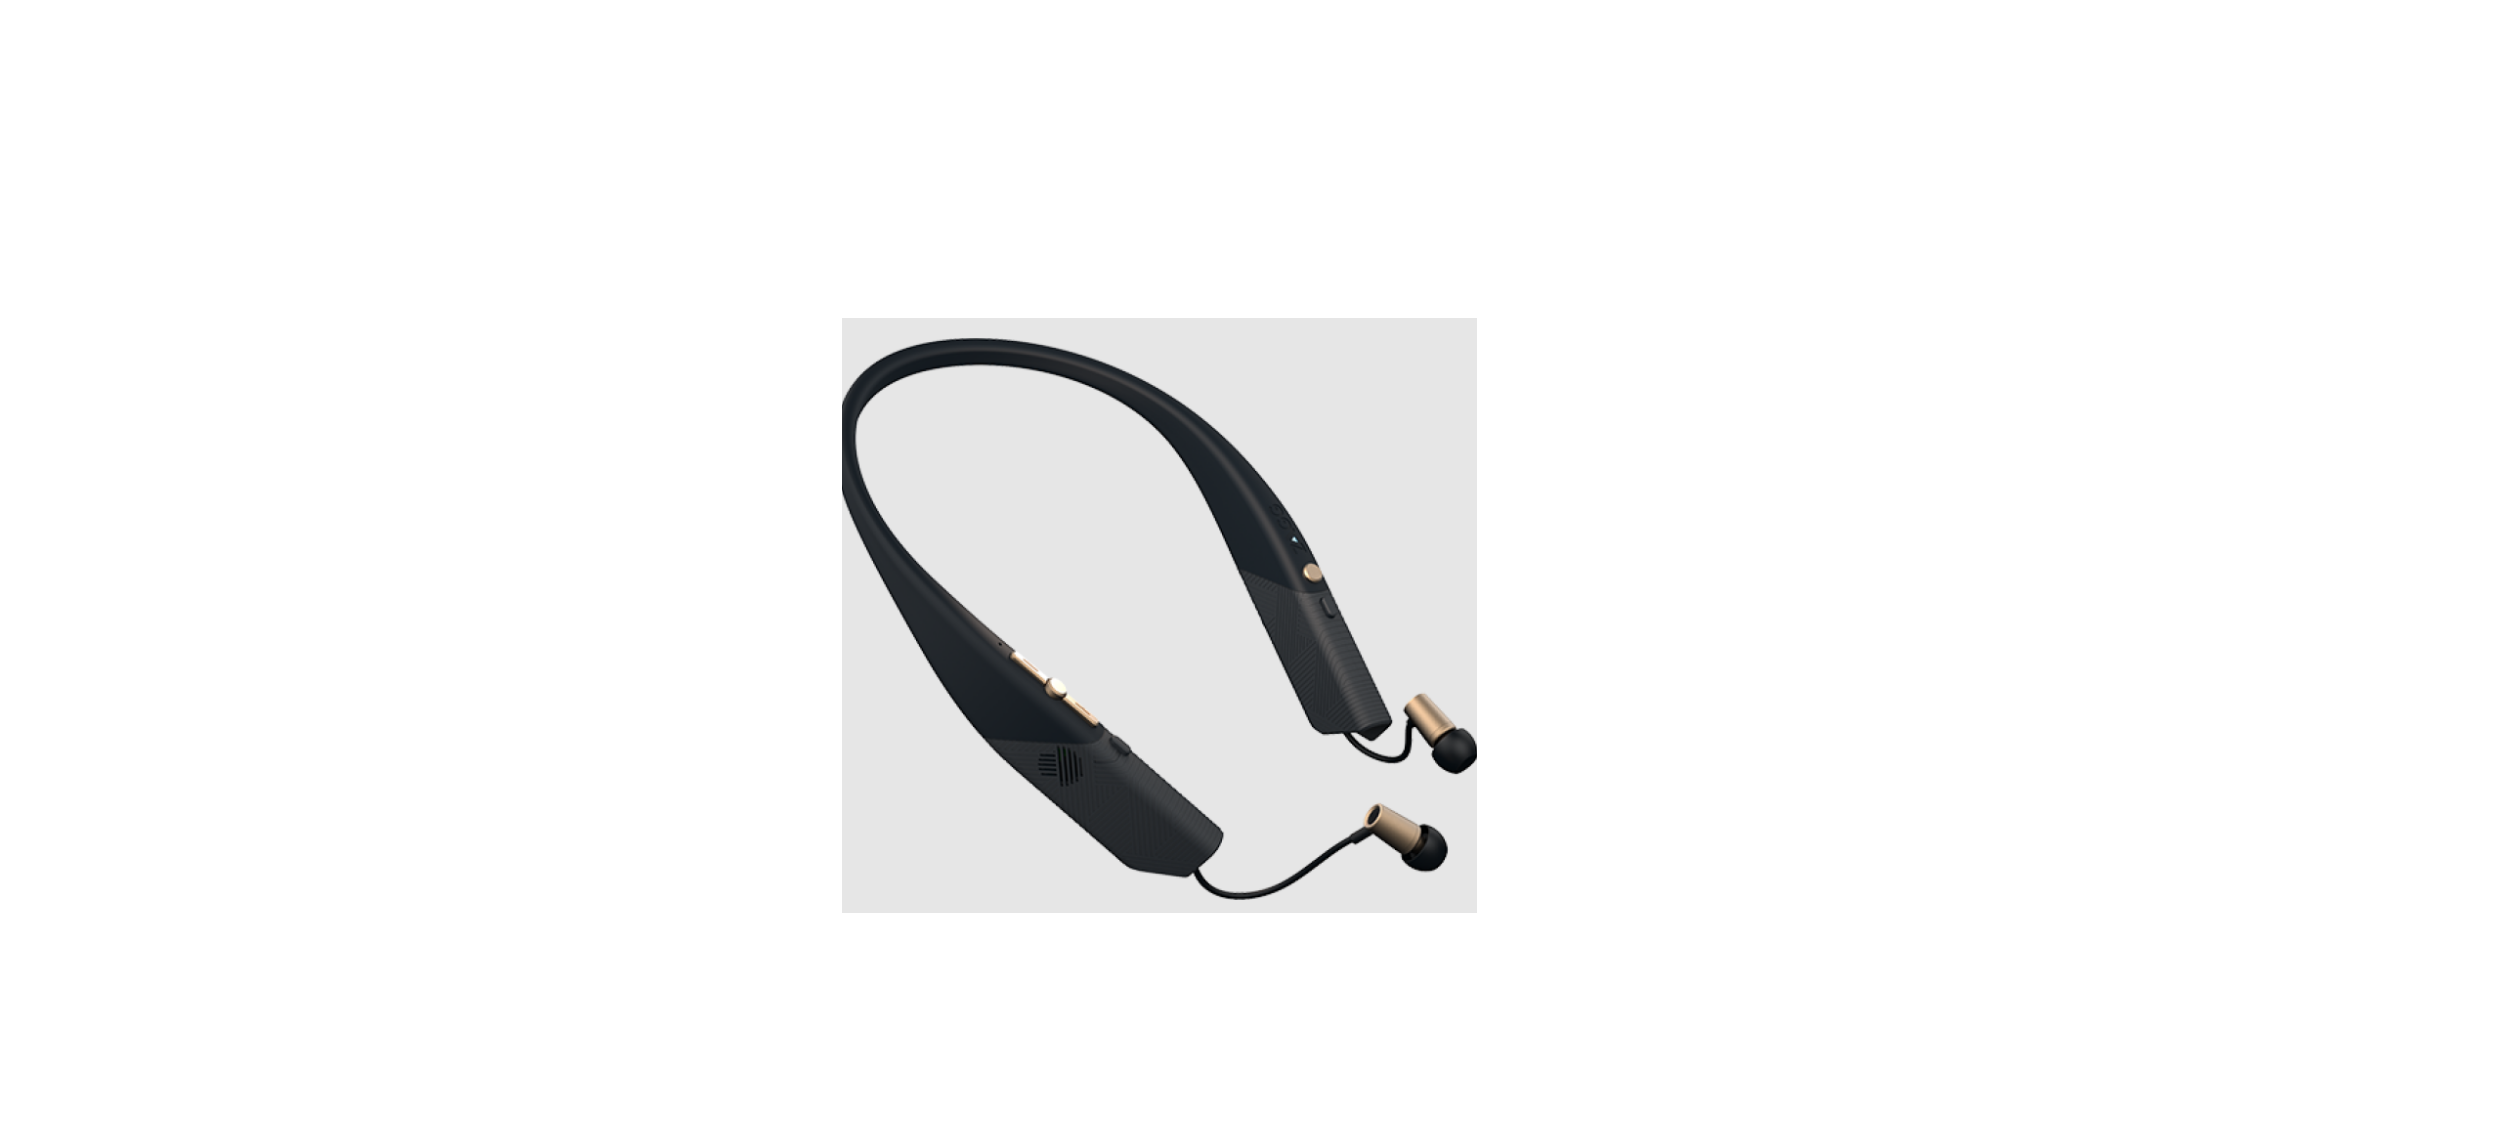

ZAGG Flex Arc Wireless Bluetooth Earbuds User Manual

*WARRANTY REGISTRATION
Your ZAGG Flex Arc™ comes with a one-year manufacturer’s warranty. To activate the warranty, you must register your Flex Arc as well as keep your purchase receipt. If you purchased your Flex Arc from ZAGG.com, ZAGG has already registered it and has a copy of your proof of purchase. Need more help? Please see our FAQ section at www.ZAGG.com/faq.
INTRODUCTION
Welcome to the latest advancement in personal audio technology. You are about to experience the Flex Arc’s amazing sound and simple versatility. You’ll see that you can wear it anywhere and enjoy your music, calls, and movies privately through the earbuds, or switch to external speakers when you still need to hear what’s going on around you. No matter how you use it, the Flex Arc is the perfect accessory for your busy life. Keep these instructions for future reference. Note: All left and right instructions are given as though the Flex Arc was sitting around your neck

POWER AND PAIRING
Your Flex Arc automatically begins searching for devices to pair with when you turn it on; however, you can manually control its pairing as well. Here’s how to power it up and get it paired.

- To turn your Flex Arc on, press and hold the Power button for three seconds. The first time you power on and pair it, you will need to hold the Power button down for five seconds. Your Flex Arc will sound a power-up tone and vibrate to indicate it is powered on.
- The LED, located on the left side by the Power button, will begin flashing red and blue indicating your Flex Arc is on and in pairing mode. Access your device’s Bluetooth® settings and ensure Bluetooth is turned on.
- Select “ZAGG Flex Arc” from your device’s list of available Bluetooth devices. Complete any additional pairing steps based on your device. The LED will flash blue every five seconds while your Flex Arc is on and connected.
- Press and hold the Power button for three seconds to turn your Flex Arc off. When it powers off, it will vibrate twice and you will hear a power-down tone; the LED will also flash red until it is powered off.
PLAYING MUSIC
Your Flex Arc lets you enjoy your audio through the earbuds or the external speakers. Here’s how to use both:
- Pair your Flex Arc as described in the Power and Pairing section of this manual.
- Press the Play button to begin playing your audio. Note: If your earbuds are fully retracted, your audio will automatically play through the speakers. If one or both earbuds are extended, your audio will play through the earbuds. You can manually change the play mode by quickly pressing the Power button.
- While audio is playing, press the Play button to pause your audio. Press the Play button while paused to resume playing.
- Control your volume by quick-pressing the Volume Up and Volume Down buttons.
- Press and hold the Volume Up button to track forward on your playlist. Press and hold the Volume Down button to track back on your playlist.
TAKING CALLS
You can easily take calls using your Flex Arc. Calls work with the earbuds extended or retracted. Here’s how:
- 1. Your Flex Arc will sound a ringtone and vibrate when you receive a call. To maintain your privacy, the ringtone will not play through the speakers. Answer the incoming call by pressing the Play button once. Note: You can still use the Power button to change between earbud and speaker modes during a call.
- Press and hold the Play button for three seconds to send the caller to your phone’s voicemail. If the caller leaves a message, your Flex Arc will vibrate twice.
- Press the Play button during a call to disconnect.
CHARGING
When fully charged, your Flex Arc will deliver up to eight hours of audio enjoyment per charge. Charging it is easy; here’s how:
- Connect the included micro USB cable to the port underneath the left side of your Flex Arc. 2. Connect the USB end of the cable to your preferred USB outlet.
- The LED will light red while your Flex Arc is charging. The LED will turn off when your Flex Arc is fully charged.
- Remove the micro USB charging cable and enjoy your Flex Arc for up to eight hours.
EXTENDING AND RETRACTING THE EARBUDS
Your Flex Arc’s earbuds extend and retract for a perfect fit every time or for easy storage. Here’s how to use and store them:
- To extend the earbuds, grasp one earbud at a time and pull it slowly straight out from its housing until it is your desired length.
- To retract the earbuds, press and hold the Retract button for each earbud. Note: The earbuds retract rapidly. To avoid potential injury either hold an earbud and let it retract slowly, or avoid retracting the earbuds while the Flex Arc is around your neck.
For more help, please see our FAQ at: www.ZAGG.com/faq To reach a trained customer service representative, please use one of the following: ZAGG.com/support/contact.php questions@zagg.com 1-800-700-ZAGG [9244] For unparalleled scratch protection for your device, we recommend a ZAGG InvisibleShield®.
©2016 ZAGG Inc All Rights Reserved | NASDAQ: ZAGG | MADE IN CHINA The Bluetooth® word mark and logos are registered trademarks owned by Bluetooth SIG, Inc., and any use of such marks by ZAGG Inc is under license. Other trademarks and trade names are those of their respective owners. ZAGG, Flex Arc, and InvisibleShield are trademarks of ZAGG Inc.
FCC STATEMENT
This equipment has been tested and found to comply with the limits for a Class B digital device, under Part 15 of the FCC Rules. These limits are designed to provide reasonable protection against harmful interference in a residential installation. This equipment generates, uses, and can radiate radio frequency energy and, if not installed and used following the instructions, may cause harmful interference to radio communications. However, there is no guarantee that interference will not occur in a particular installation.
If this equipment does cause harmful interference to radio or television reception, which can be determined by turning the equipment off and on, the user is encouraged to try to correct the interference by one or more of the following measures:
- Reorient or relocate the receiving antenna.
- Increase the separation between the equipment and the receiver.
- Connect the equipment to an outlet on a circuit different from that to which the receiver is connected.
- Consult the dealer or an experienced radio/TV technician for help
This device complies with FCC radiation exposure limits set forth for an uncontrolled environment. This device complies with Part 15 of the FCC Rules. Operation is subject to the following two conditions: (1) this device may not cause harmful interference, and (2) this device must accept any interference received, including interference that may cause undesired operation. CAUTION Changes or modifications not expressly approved by the party responsible for compliance could void the user’s authority to operate the equipment.