
Sunbeam FPSBHS0404 Hand-Stand Mixer User Manual

IMPORTANT SAFEGUARDS
When using electrical appliances, basic safety precautions should always be followed including the following: Read all instructions before use
- To protect against risk of electrical shock, do not put mixer in water or other liquid. This may cause personal injury or damage to the product.
- Close supervision is necessary when mixer is used by or near children or incapacitated persons.
- Turn off or to 0 and Unplug cord from outlet while not in use, before putting on or taking off parts, and before cleaning.
- Avoid contacting moving parts. Keep hands, hair, clothing, as well as spatulas and other utensils away from beaters during operation to reduce the risk of injury to persons and/or damage to the mixer.
- Do not operate mixer with a damaged cord or plug or after the appliance malfunctions, or is dropped or damaged in any manner. If the mixer becomes damaged please contact Consumer Services for assistance. (1-800-557-4825 in the U.S. or 1-800-667-8623 in Canada)
- The use of attachments not recommended or sold by Jarden Consumer Solutions may cause fire, electrical shock or injury.
- Do not use outdoors or for commercial purposes.
- Do not let cord hang over edge of table or countertop or touch hot surfaces, including the stove.
- Remove beaters from mixer before washing.
- Do not place mixer or bowl on or near a hot gas or electric burner, in a heated oven (microwave, convection, etc.) or on any other heated surface.
- Do not use mixer for other than intended use.
- Do not leave mixer unattended while it is operating.
- Any servicing, other than cleaning and user maintenance noted in this manual should be performed by any authorized service representative.
- When mixing liquids, especially hot liquids, use a tall container or make small quantities at a time to reduce spillage.
- Don’t Abuse Cord. Never carry the mixer by the cord or yank it to disconnect from an outlet; instead, grasp the plug and pull to disconnect. If the use of an extension cord is necessary, please follow these guidelines:
- Use only extension cords having an electrical rating not less than the rating of the mixer.
- Examine the extension cord before using and do not use if damaged.
- Do not abuse the extension cord and do not yank on any cord to disconnect.
- Keep all cords away from heat and sharp edges.
This Unit Is for Household Use Only
The motor of your mixer is protected by a heat cured insulation. This is a standard process. Due to the heat curing of the insulation, you may experience an odor and possibly a slight wisp of smoke from your mixer’s motor. This effect will disappear after the first few uses.
Special Instructions
For Products Purchased in the U.S. and Canada Only To reduce the risk of electrical shock, this appliance is equipped with a polarized plug (one blade is wider than the other). This plug fits a polarized outlet only one way; if the plug does not fit fully into the outlet, reverse the plug. If it still does not fit, contact a qualified electrician. Do not attempt to defeat this safety feature. Also, do not pull, twist or otherwise abuse the power cord; instead, grasp the plug and pull to remove from the outlet.
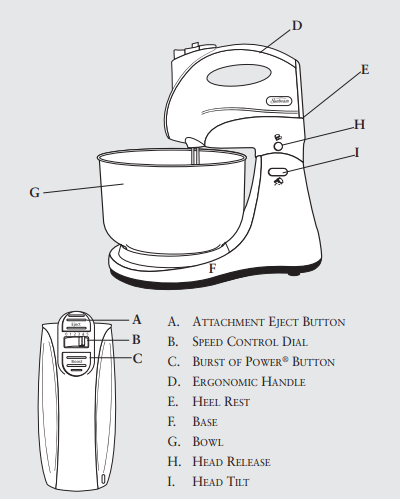
Features of Your Hand-Stand Mixer
Accessories

- J. Beaters (2)
- K. Dough Hooks (2)
- L. Stainless Steel Whisks (on select models only)
Features of Your Hand-Stand Mixer
- A. Attachment Eject Button
- B. Speed Control Dial
- C. Burst of Power® Button – This feature allows for an added boost to the selected speed setting at the press of a button.
- D. Ergonomic Handle – The handle has been ergonomically designed to provide comfort to prevent hand fatigue during heavy or long mixing tasks.
- E. Heel Rest – The newly designed heel rest provides exceptional stability.
- F. Base – The bowl rest tab allows you to easily rest the hand mixer against the bowl to provide more stability and comfort while mixing.
- G. Bowl – For holding contents, use with Hand Mixer or mount to stand for Stand Mixer usage.
- H. Head Release – Button to release Hand Mixer portion from stand.
- I. Head Tilt – Button to tilt head back for easy bowl and accessory access.
- J. Beaters – For creaming butter and sugar, plus mixing cake batter.
- K. Dough Hooks – To knead light dough or other heavy batters.
- L. Stainless Steel Wire Whisks – For whisking cream, egg whites, light batters and cake mixes. (on select models only)
Helpful Hints
- When mixing liquids, especially hot liquid, add small quantities at a time to reduce spillage.
- Ingredients should be added to the mixing bowl as they are specified in the recipe.
- Use the mixing speed that is recommended in the recipe. Use the speed control dial of the mixer to help you find the correct speed to use.
- If times are specified in the recipe, use them! BE CAREFUL NOT TO OVER MIX. Over mixing can cause the mixture to become very tough.
- Should an object, such as a spatula, fall into the bowl while the mixer is operating, turn the mixer OFF immediately, then, remove the object.
- For easier clean-up remove beaters and rinse immediately with warm water.
Mixing Guide
Please keep in mind that the various mixing tasks and related speeds, listed in the table below, may vary slightly from recipe to recipe. For most recipes, it is better to begin your mixing on a slower speed until the ingredients begin combining, then move to the appropriate speed range for the particular task. When mixing larger quantities you may need to increase the hand-stand mixer speed due to the amount of mixing required and the larger load on the machine.
Speed Guide for Hand-Stand Mixer
Mixing Speed Tasks Example 0 Off
- Stir Use when stirring liquid ingredients or whenmixing dry and liquid together alternately in a recipe. Use when preparing any of the readyprepared or packaged instant puddings
- Mix Use when a recipe calls for combining ingredients together. Use for quick breads or muffins that require a brisk action, just enough to blend.
- Blend Use when preparing cake mixes or for directions calling for a medium speed. Use to cream butter and sugar together.
- Beat Use when preparing a frosting from a recipe or package. Use when whipping cream for desserts.
- Whip Use to mash potatoes to develop a light and fluffy texture.
- Aerate Whisking – Egg Whites, Cream, etc. (on select models only)
Preparing the Hand-Stand Mixer for Use
The Sunbeam® Hand-Stand Mixer has been designed to assist you in preparing delicious foods. Before using your mixer for the first time, wash the attachments in hot, soapy water. Rinse and dry thoroughly. NOTE: All attachments are dishwasher safe.
Installing Attachments
Make sure the speed control is in the “0” position and mixer is unplugged from an electrical outlet. Insert attachments one at a time by placing stem end into the opening on the bottom of the mixer. Turn attachment slightly and push in until it clicks into position. (See Figure A) Plug into the appropriate outlet. Turn mixer on and adjust speed setting using the control on the top of the unit.
Attachments
- Beaters – The beater design allows for thorough, fast mixing results for all types of batters.
- Dough Hooks – Use these hooks to knead light dough or other heavy batters. Use at lower speeds for best results. (on select models only)
- Stainless Steel Wire Whisks – For whisking cream, egg whites, light batters and cake mixes. (on select models only)
NOTE: The dough hook with the collar fits into the left drive hole and the other one goes into the right. (See Figure B) If dough hooks do not click into the drive holes, reverse and try again.

Operating Instructions
When building up a recipe that requires the addition of dry ingredients, such as flour, slow the speed down while these ingredients are being added to avoid a snowstorm effect. Once the extra ingredients begin combining, slowly increase to the appropriate speed for the particular mixing task.
Using as a Hand Mixer
Slowly guide mixer around the sides and through the center of the bowl, going in the same direction. Be careful not to over beat the mixture. Over beating tends to make some mixtures tough. Whenever scraping of the bowl is required, stop the mixer and scrape sides and bottom of bowl with a rubber spatula as needed. Turn speed control to “0” and rest mixer on its heel rest while adding ingredients. Make sure to position beaters over mixing bowl so any drippings will fall back into the mixing bowl. When mixing is complete, set speed control to “1” and raise beaters slowly from batter to clean off clinging food. Make sure to turn unit to “0” before raising beaters completely out of mixing bowl.
- Speed Control Switch – The hand mixer features a 5 or 6 speed control switch. Move the switch with your finger from (Off to High) for desired speed. Gradually move to higher speeds to reduce splattering of contents.
- Burst of Power® Button – During especially heavy mixing tasks, press the button to drive through the mixture with ease. Once the button is released, the mixer will return to the original speed setting.
- Beater Eject Button – Is a large separate button located at the top of the Hand Mixer portion. With the unit on “0”, push with thumb to release the beaters. There will be a noticeable “click” when ejecting beaters.
Using as a Stand Mixer
To attach the Hand Mixer to the Stand, tilt the Stand’s cradle (the top of the Stand that holds the Mixer) back and insert the Mixer’s front into the 2 slots. Then push the back of Mixer until its snaps into place. To remove the Mixer from the Stand, tilt the cradle back then grasp the Mixer firmly with hand and press the Release Button on the bottom of the cradle.
Caution: The Mixer should be unplugged from the electrical outlet and in the “Off” or “0” position when attaching to — or removing from the Stand.

Raising and Lowering the Mixing Head
Press the head lock button, located on the neck of the Stand Mixer. While the button is depressed, hold the handle and ease the head of the Stand Mixer back, release the button, the Stand Mixer head will lock into this position. To lower the mixing head, press the head lock button. While the button is depressed, hold the handle and ease the head of the stand mixer down. A “click” sound will indicate when the mixing head is securely in position. Be sure the mixer head is securely in position before using. Make sure the Hand Mixer is firmly attached to the base and the head is firmly down and locked into place before picking up or moving mixer.

- Ejecting Beaters
Make sure the speed control is in the “0” position and unplugged from an electrical outlet. Scrape off any excess batter with a rubber spatula. Grasp the stems of the beaters with your hand and press the beater eject button. - Bowl Placement
With Hand Mixer firmly attached, tip back head. Place bowl on the mixer turntable and rotate clockwise to lock bowl into position. To unlock hold turntable and rotate bowl counter-clockwise.
Caring & Cleaning of Your Mixer
- Before cleaning any part of the mixer, set the position selector to the “0” position, then unplug the cord from the outlet and eject the beaters. Make sure to wash and dry all non-electrical parts thoroughly before using them again.
- The mixer and cord are be cleaned with a damp cloth but the final cleaning must be with a dry cloth. Do not immerse mixer or cord in liquids.
- To remove stubborn spots, wipe surfaces with a piece of cloth, slightly dampened, in soapy water or a mild, non-abrasive cleaner.
- The attachments and bowl may be washed in hot, soapy water or in a dishwasher.
- Do not use any abrasive cleaner or material to clean any part of the hand mixer, as it can harm the body of the product.
Storage
Store the hand mixer on its heel rest in a clean, dry location such as a cabinet or shelf. Store beaters in a drawer or assembled on the stand, or assemble on stand and store together.
Maintenance
Other than the recommended cleaning, no further user maintenance should be necessary. If for any reason your hand mixer should require repairs, do not try to fix it yourself. Send it to the nearest Authorized Sunbeam Appliance Service Center.
REFRENCE LINK


