Table of contents
show
Ezviz H6C 1080p Outdoor Pan-Tilt Wi-Fi Network Security Camera User Guide

Package Contents

Basics

LED Indicator
- Solid Red: Camera starting up.
- Slow-flashing Red: Wi-Fi connection failed.
- Solid Blue: Video being live viewed in the EZVIZ app.
- Slow-flashing Blue: Camera running properly.
- Fast-flashing Blue: Camera ready for Wi-Fi connection.

Setup
Power-on
Plug the power cable into the camera, and then plug the power adapter into an outlet as shown in the figure below.

Connect to the Internet
Get the EZVIZ app
- Connect your mobile phone to Wi-Fi.
- Download and install the EZVIZ app by searching “EZVIZ” in the App Store or Google Play Store . TM
- Launch the app and register an EZVIZ user account.
Add camera to EZVIZ
Option 1: Wireless Connection
- Log in to your account using the EZVIZ app.
- On the Home screen, tap “+” on the upper-right corner to go to the Scan QR Code interface.

- Scan the QR code on the Quick Start Guide cover or on the body of the camera.

Option 2: Wired Connection
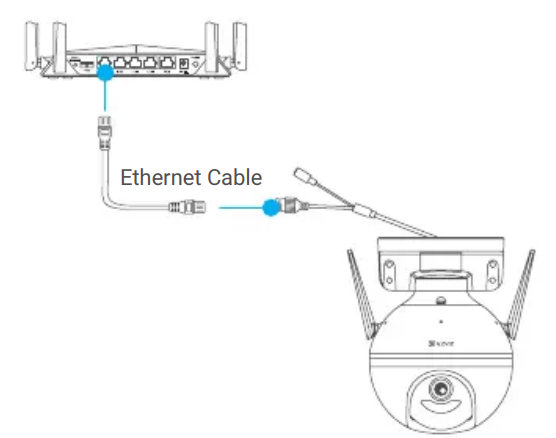
- Connect the camera to the LAN port of your router with the Ethernet cable (not included in the package).

- Log in to your account using the EZVIZ app.
- On the Home screen, tap “+” on the upper-right corner to go to the Scan QR Code interface.
 Scan the QR code on the Quick Start Guide cover or on the body of the camera.

Installation
Install the Micro SD Card (Optional)
- Rotate the camera counterclockwise.
- Remove the cover on the camera.
- Insert the micro SD card (sold separately) into the card slot as shown in the figure below.
- Place the cover back on.

- In the EZVIZ app, tap the Storage Status in the Device Settings interface to check the SD card status.
- If the memory card status displays as Uninitialized, tap to initialize it.
Install the Camera
- Make sure the wall is strong enough to withstand three times the weight of the camera.
- The camera can be mounted on the wall, ceiling or pole.
Wall/Ceiling Mounting
- Place drill template onto the surface you have chosen to mount the camera.
- (For cement wall/ceiling only) Drill screw holes according to the template, and insert four anchors.
- Use four metal screws to fix the camera base.

Pole Mounting
Use the cable tie (not included in the package) to fix the camera base to the pole.

Install the Waterproof Kit (Optional)
- Insert the gasket into the Ethernet port of the camera.

- Pass the A side of the Ethernet cable through the nut, the gasket and the end cap
 Tighten up the nut and the end cap.

- Insert the A side into the Ethernet port of the camera and tighten up the nut.

- Connect the B side with the LAN port of the router or PoE switch.


 Tighten up the nut and the end cap.
