HP MFP M479 Color LaserJet Pro User Manual
SETUP GUIDE FOR HP MFP M479
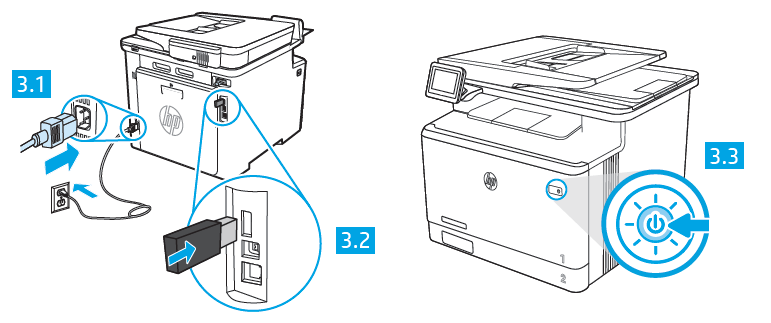
Connect the power cord between the product and a grounded AC outlet. Make sure the power source is adequate for the printer voltage rating.
The voltage rating is on the product label. The product uses either 110-127 V ac or 220‑240 V ac and 50/60 Hz.
CAUTION: To prevent damage to the product, use only the power cord that is provided with the product.
OPTIONAL: Job Storage – Insert a USB thumb drive into the rear USB port. See the User Guide for more information.
NOTE: Do not plug in the printer USB cable at this time.
Turn on the printer power.
Set up the control panel
After turning on the printer, wait for it to initialize. To navigate the touchscreen control panel, use touch, swipe, and scroll gestures. Follow the prompts on the control panel to configure Language, Country/Region, Date/Time, and Self-managed or IT-managed.
- Self-managed: Optimized default settings for most users that include guided setup and configuration steps and automatic updates.
- IT-managed: Optimized default settings for fleet manageability.
Follow additional prompts to complete control panel setup. Settings are fully customizable after initial setup.
Download and install the software
NOTE: Do not connect the USB cable until you are prompted to do so.
Method 1: Download HP Easy Start (Windows and macOS)
HP Easy Start will detect the printer, assist with selecting the printer connection type (USB, Wired, or Wireless), and install the software.
- From the computer, go to 123.hp.com/laserjet, and click Download.
- Run HP Easy Start.
- When prompted to select a connection type, select the appropriate option for the type of connection.
NOTE: If HP Easy Start does not detect the printer or the software does not install automatically, go to Method 2: Manually download from printer support website (Windows).
Method 2: Manually download from printer support website (Windows)
- From the computer, go to www.hp.com/support/colorljm479mfp.
- Select Software and drivers.
- Download the software for your printer model and operating system.
- Launch the software file from the folder where the file was saved.
- Follow the onscreen instructions to install the software.
- When prompted to select a connection type, select the appropriate option for the type of connection.
Manually configure the IP address
See the printer user guide for information on how to manually configure the IP address at www.hp.com/support/colorljm479mfp.
Troubleshooting Tips Connect the printer to a wireless network (wireless models only)
The installation software might not detect the printer during wireless setup. Follow the steps below to connect the printer to the same wireless network as the computer.
- From the Home screen on the printer control panel, swipe the tab at the top of the screen downward to open the Dashboard, and then touch the Wireless icon.
- Touch the Setup icon.
- Touch Wireless Settings.
- Touch Wireless Setup Wizard.
- Follow the display instructions to complete the setup.
- Reinstall the software using Method 1 or Method 2 above.
Mobile printing (Optional)
Connect the mobile device to a wireless network
Print from a mobile device to a printer that is connected to a wireless router/network. Connect the mobile device to the same wireless network as the printer.
Use the HP Smart app to set up, print, and more.

- Go to 123.hp.com or scan the QR code.
- Install the HP Smart app.
- Run the HP Smart app and follow the onscreen instructions to connect, set up, print, and more.
NOTE: The HP Smart app might not be available for all mobile operating systems.
Connect the mobile device using Wi-Fi Direct (wireless printer models only)
Print using Wi-Fi Direct with no router/network connection needed.
- Enable Wi-Fi Direct on your printer
- From the Home screen on the printer control panel, swipe the tab at the top of the screen downward to open the Dashboard, and then touch the Wi-Fi Direct icon.
- On the Wi-Fi Direct Details screen, open the Wi-Fi Direct Settings menu. Touch the switch to turn the Wi-Direct Status to On.
- Take note of the Wi-Fi Direct name and Wi-Fi Direct password from your printer control panel.
- Discover the printer from your device
- From the mobile device, go to the device Settings menu, and search for the Wi-Fi Direct name you found from the printer control panel.
- Select the correct printer name, and enter the Wi-Fi Direct password if prompted.
HP Roam
For information on using HP Roam mobile print app, go to hp.com/go/roam on the mobile device.
Learn more about mobile printing

The product supports AirPrint and Wi-Fi Direct. For more mobile printing information, go to www.hp.com/go/LaserJetMobilePrinting or scan the QR code.
Set up fax (fax models only – optional)
Connect the printer
The printer is an analog device. HP recommends using the printer on a dedicated analog telephone line.
NOTE: Some countries/regions might require an adapter for the phone cord that came with the printer.
Connect the phone cord that came with the printer to the fax port on the printer and to the telephone jack on the wall.
Configure the printer
Configuring the fax time, date, and header settings is required to use the fax feature. The easiest method is to use the Fax Set-Up Wizard in the product software. Alternately, configure these and other basic fax settings using the control panel.
Fax Set-Up Wizard (software)
- Open the HP Printer Assistant.
- Windows 10: From the Start menu, click All Apps (if present), click HP, and then select the printer name.
- Windows 8.1: Click the down arrow in lower left corner of the Start screen, and then select the printer name.
- Windows 8: Right-click an empty area on the Start screen, click All Apps on the app bar, and then select the printer name.
- Windows 7: From the computer desktop, click Start, select All Programs, click HP, click the folder for the printer, select the icon with the printer’s name, and then open HP Printer Assistant.
- In the HP Printer Assistant, select Fax, and then select Fax Setup Wizard.
- Follow the onscreen instructions to configure the fax settings.
Control Panel
- From the Home screen on the printer control panel, swipe the tab at the top of the screen downward to open the Dashboard, and then touch the Fax Setup icon.
- Touch Setup Wizard.
- Enter your fax number. The maximum number of characters for the fax number is 20.
- Enter a name for your fax machine. The maximum number of characters for the fax machine name is 25.
- Follow the remaining onscreen instructions to configure the fax settings.
Learn more!
For more information about other ways to send faxes, such as scheduling a fax to be sent later or sending faxes from a computer, see the user guide or go to www.hp.com/support/colorljm479mfp.
How do I set up HP printers in digital phone environments?
HP printers are designed specifically for use with traditional analog phone services. For a digital phone environment (such as DSL/ADSL, PBX, ISDN, or FoIP), digital-to-analog filters or converters might be necessary when setting up the printer for fax.
NOTE: Depending on the phone company, the printer might not be compatible with all digital service lines or providers, in all digital environments, or with all digital-to-analog converters. Contact the phone company to determine which setup options are best.
NOTE: When setting up ring pattern detection in a PBX phone system that has different ring patterns for internal and external calls, make sure to dial the printer fax number using an external number for recording the ring pattern.
Use the scan feature
Windows
Use the HP Scan application shortcut on the Desktop, or open the HP Printer Assistant, select Scan, and then select Scan a Document or Photo.
macOS
Go to the Applications folder and open HP Easy Scan.
Troubleshooting
User guide
The user guide includes printer usage and troubleshooting information. It is available on the Web:
- Go to www.hp.com/support/colorljm479mfp.
- Select the printer if prompted, and then click User Guides.
Check for firmware updates
- Go to www.hp.com/support/colorljm479mfp.
- Select the printer if prompted, and then click Software and Drivers.
- Select the operating system, and click the Next button.
- Select Firmware, and click the Download button.
Additional support resources
For HP’s all-inclusive help for the printer, go to: www.hp.com/support/colorljm479mfp
- Solve problems
- Find advanced configuration instructions
- Download software updates
- Join support forums
- Find warranty and regulatory information
- Access mobile printing resources
REFRENCESS LINK
- www.hp.com/support/colorljm479mfp
- https://www.hp.com/us-en/shop/pdp/hp-color-laserjet-pro-mfp-m479fdw

 Afrikaans
 Albanian
 Amharic
 Arabic
 Armenian
 Azerbaijani
 Basque
 Belarusian
 Bengali
 Bosnian
 Bulgarian
 Catalan
 Cebuano
 Chichewa
 Chinese (Simplified)
 Chinese (Traditional)
 Corsican
 Croatian
 Czech
Czech Danish
 Dutch
Dutch English
 Esperanto
 Estonian
 Filipino
 Finnish
 French
 Frisian
 Galician
 Georgian
 German
 Greek
Greek Gujarati
 Haitian Creole
 Hausa
Hausa Hawaiian
 Hebrew
 Hindi
Hindi Hmong
Hmong Hungarian
 Icelandic
 Igbo
Igbo Indonesian
 Irish
Irish Italian
 Japanese
 Javanese
 Kannada
 Kazakh
 Khmer
Khmer Korean
 Kurdish (Kurmanji)
 Kyrgyz
 Lao
Lao Latin
Latin Latvian
 Lithuanian
 Luxembourgish
 Macedonian
 Malagasy
 Malay
Malay Malayalam
 Maltese
 Maori
Maori Marathi
 Mongolian
 Myanmar (Burmese)
 Nepali
 Norwegian
 Pashto
 Persian
 Polish
 Portuguese
 Punjabi
 Romanian
 Russian
 Samoan
 Scottish Gaelic
 Serbian
 Sesotho
 Shona
Shona Sindhi
 Sinhala
 Slovak
 Slovenian
 Somali
 Spanish
 Sundanese
 Swahili
 Swedish
 Tajik
Tajik Tamil
Tamil Telugu
 Thai
Thai Turkish
 Ukrainian
 Urdu
Urdu Uzbek
Uzbek Vietnamese
 Welsh
Welsh Xhosa
Xhosa Yiddish
 Yoruba
 Zulu
Zulu