
Logitech LOGI DOCK User Manual

KNOW YOUR PRODUCT
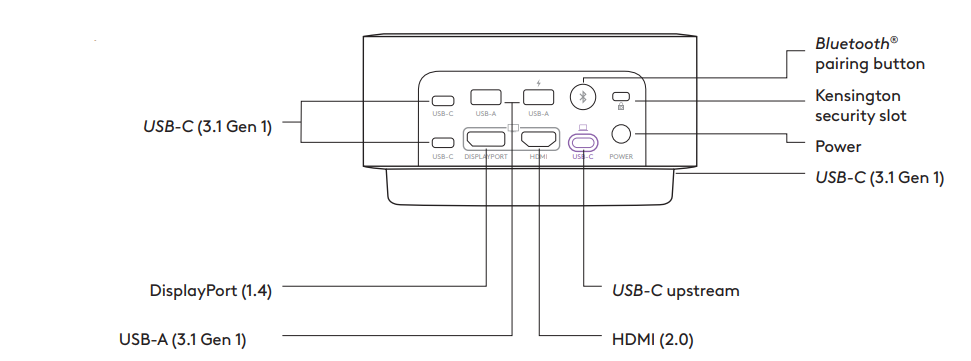
UC VERSION

BACK VIEW
WHAT’S IN THE BOX

- Logi Dock
- Power supply (1.6 m)
- AC power cord (1.7 m)
- USB-C to USB-C cable (1 m)
- User documentation
CONNECTING TO POWER

- Connect one end of the AC power cord to the power supply, and connect another end to an outlet.
- Connect the power supply to the AC power port on the docking station.
CONNECTING VIA USB-C CABLE

Connect one end of the USB-C cable to the USB-C upstream port on Logi Dock, and connect another end to the USB-C port on your computer.
LOGI TUNE APP

Download and install Logi Tune from www.logitech.com/tune for calendar integration with Google Calendar and Office 365, and one-touch meeting controls.
CALENDAR INTEGRATION
- Open the Logi Tune app on your computer.
- Link your preferred calendar and authenticate with your calendar provider. Then follow the steps in the app.
- Your agenda will show up in the dashboard upon successful link.
ONE-TOUCH MEETING CONTROLS
- Link your calendar with Logi Tune.
- Make sure Tune is running in the background. You can see the app in the taskbar if Tune is active.
- One-touch-to-join will be activated by default.
- To deactivate, visit the device settings in the Tune app.
MEETING CONTROLS AND INDICATOR LIGHT
Note:
- When the Zone Wireless (Plus) headset or Zone True Wireless earbuds are connected to Logi Dock, both speakerphone and headset status will be in sync.
- The mute indicator light is available when Logi Dock, Zone Wireless (Plus) headset or Zone True Wireless earbuds are the audio sources. The video indicator light is available for UC or Teams-certified devices only.

Note:
- Teams activities are only functional when Teams is running on an unlocked PC or Mac.
- When the Zone Wireless (Plus) headset or Zone True Wireless earbuds are connected to Logi Dock, both speakerphone and headset status will be in sync.
- The mute indicator light is available when Logi Dock, Zone Wireless (Plus) headset or Zone True Wireless earbuds are the audio sources. A video indicator light is available for UC or Teams-certified devices only.
- If Zone Wireless (Plus) headset or Zone True Wireless earbuds are connected directly to Logi Dock and you are in an active call, a single press on Logi Dock will end the call instead of transferring an active call.
- Refer to www.logitech.com/support/Logi-Dock-compatibility for the latest Teams feature updates.
CONNECTING USB DEVICES

- Logi Dock has 5 USB ports: 2 USB-A and 2 USB-C ports on the back panel; 1 USB-C port on the side.
- Simply connect your external USB devices such as a keyboard and mouse with the USB-A or C ports.
Note:
Please charge your iOS device via USB-A or C ports with the charging port icon ![]() only when the Logi Dock is disconnected from the laptop.
only when the Logi Dock is disconnected from the laptop.
CONNECTING BLUETOOTH®-ENABLED MOBILE DEVICES

- Press the Bluetooth® pairing button at the back panel for 3 seconds. The ambient light in front will blink blue.
- Open Bluetooth® settings on your mobile device.
- Select Logi Dock in discoverable devices.
- Once successfully paired, the ambient light will turn solid blue for 5 seconds with sonification.
CONNECTING A DISPLAYPORT DEVICE

To connect your DisplayPort video device (such as monitor, or projector) to Logi Dock, insert the DisplayPort cable* to DisplayPort on the back panel. * DisplayPort cable is not included.
CONNECTING A HDMI DEVICE

To connect your HDMI video device (such as monitor, or projector) to Logi Dock, insert the HDMI cable* to the HDMI port on the back panel. * HDMI cable is not included.
USING A KENSINGTON LOCK

To secure Logi Dock with a Kensington lock:
- Wrap one end of the security cable around a secured object.
- Insert the key into the cable lock.
- Insert the cable lock into the Kensington security slot at the back panel. Turn and remove the key. * Kensington lock and keys are not included.
DIMENSIONS
- Height x Width x Depth: 84.8 mm x 160.0 mm x 131.5 mm
- Weight: 0.942 kg
SYSTEM REQUIREMENTS
Works with common calling applications across almost all platforms and operating systems. Works with Windows 10 or later, macOS 11 or later, or Chrome-based computer via USB-C with Alt Mode and iOS or Android-based mobile devices via Bluetooth®.
TECHNICAL SPECIFICATIONS
- Microphone type: Six beamforming mics with advanced algorithms
- Frequency response (Speaker): 60 Hz – 20 kHz
- Frequency response (Microphone): 65 Hz – 8 kHz
- Wireless range: Up to 30 m / 100 ft (open field line of sight)
- Power to the system: Up to 100 watt charging
- Cable length (USB-C to C cable): 3.3 ft (1 m)
- Cable length (AC power cord): 5.6 ft (1.7 m)
- Cable length (Powers supply): 5.2 ft (1.6 m)
© 2023 Logitech. Logitech, Logi, and their logos are trademarks or registered trademarks of Logitech Europe S.A. and/or its affiliates in the U.S. and other countries. The Bluetooth® word mark and logos are registered trademarks owned by Bluetooth SIG, Inc. and any use of such marks by Logitech is under license. Windows, macOS, iOS, Chrome, Android, USB-C, and all other 3rd party trademarks are the property of their respective owners.
REFERENCE LINK
https://www.logitech.com/en-us/products/personal-workspaces/logi-dock.html


 Afrikaans
 Albanian
 Amharic
 Arabic
 Armenian
 Azerbaijani
 Basque
 Belarusian
 Bengali
 Bosnian
 Bulgarian
 Catalan
 Cebuano
 Chichewa
 Chinese (Simplified)
 Chinese (Traditional)
 Corsican
 Croatian
 Czech
Czech Danish
 Dutch
Dutch English
 Esperanto
 Estonian
 Filipino
 Finnish
 French
 Frisian
 Galician
 Georgian
 German
 Greek
Greek Gujarati
 Haitian Creole
 Hausa
Hausa Hawaiian
 Hebrew
 Hindi
Hindi Hmong
Hmong Hungarian
 Icelandic
 Igbo
Igbo Indonesian
 Irish
Irish Italian
 Japanese
 Javanese
 Kannada
 Kazakh
 Khmer
Khmer Korean
 Kurdish (Kurmanji)
 Kyrgyz
 Lao
Lao Latin
Latin Latvian
 Lithuanian
 Luxembourgish
 Macedonian
 Malagasy
 Malay
Malay Malayalam
 Maltese
 Maori
Maori Marathi
 Mongolian
 Myanmar (Burmese)
 Nepali
 Norwegian
 Pashto
 Persian
 Polish
 Portuguese
 Punjabi
 Romanian
 Russian
 Samoan
 Scottish Gaelic
 Serbian
 Sesotho
 Shona
Shona Sindhi
 Sinhala
 Slovak
 Slovenian
 Somali
 Spanish
 Sundanese
 Swahili
 Swedish
 Tajik
Tajik Tamil
Tamil Telugu
 Thai
Thai Turkish
 Ukrainian
 Urdu
Urdu Uzbek
Uzbek Vietnamese
 Welsh
Welsh Xhosa
Xhosa Yiddish
 Yoruba
 Zulu
Zulu