
Secrui M508 & F55 Wireless Doorbell User Manual

Content

Content will vary according to your kit
The push button supplied with this kit is pre-programmed to operate with the doorbell. If it is not, see “Connect a Push Button” on page 5
Safety
Before proceeding with the installation, please note the following safety warnings:
- Always follow the manufacturer’s advice when using power tools and wear suitable protective equipment (e.g. safety goggles) when drilling holes, etc.
- Before drilling holes in walls, check for hidden electricity cables and water pipes. The use of a cable/pipe locator is advisable if in doubt. What You Should Know Before
Installation
- Test the operating range you desire. Choose an electric outlet at the height of 3.3 feet at least and plug in the receiver and take the button outside the door to test if it can work well within the range you have chosen.
- Set a desired music (different or same one) for transmitters before installation. For music setting, see Operating Instructions. Doorbells have been paired and set to a default chime (Ding Dong) before leaving factory.
- Please do not install transmitter on metal doors since it is hard for the signal to transmit.
- Please take out the battery insulating strip before using. ((As picture )
- Ensure all surfaces are clean by wiping the installation area with a clean cloth. Please note that the sticker will have poor adhesion if you attach it to a dirty or uneven surface. Sunlight or rain will also affect the adhesion over a longer period of time.

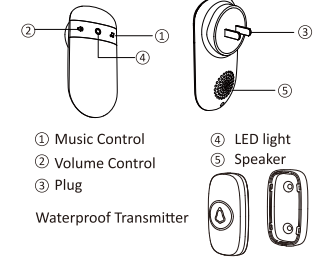
Product Structure Diagram
AC Powered Receiver
Set Up and Operation
Press the push button to test whether it is paired with the doorbell. The doorbell will light up and ring. If it does not, see “Connect a Push Button” on page 5.
- Adjust the Volume
Press the [SPEAKER. (When the power is cut off, and power is restored again, the volume will be automatically adjusted to maximum) - Change the Tune
Press the [MUSIC] 1s: Loop tones in sequence and play the current tones. Long press 5s MUSIc :Change tones loop direction. Press and hold the [MUSIC] to power on: The doorbell receiver will turn on after beeps ten times, indicating that the doorbell receiver will restore the track to the first song, and all the buttons are not deleted.

- Connect a Push Button
You can connect up to 20 accessories to your doorbell, including other push buttons, window or door opening sensors, and motion sensors.
VARIABLE – Tone Pairing
- Plug-in the receiver, pressing and holding the [SPEAKER) on the receiver for 5s, the receiver will beeps once, which means receiver get into pairing mode.
- Press push button, the receiver will beeps twice with LED indicator flashes 1s.
- Press push button again, the receiver will beeps once with LED indicator flashes 1s, which means the pairing is successful.
- Short press (SPEAKER) or leave it 20s without any operation, the doorbell will exit the pairing


Adding the additional push buttons or receivers please according to the above steps.
FIXED – Tone Pairing (only play your saved tone)
- A Select a tone that you like
- Pressing and holding the SPEAKER & MUSIC button for about 5s until the receiver beeps once, which means receiver get into pairing mode.
- Press push button once, the receiver will beeps twice with LED indicator flashes 1s.
- Press push button once again, the receiver will beeps once with LED indicator flashes 1s, which means the pairing is successful.
- Short press [4) or leave it 20s without any operation, the doorbell will exit the pairing mode.

Adding the additional buttons/receivers please according to the above steps.
Note: Pair and set only one transmitter at a time to avoid interference and ensure successful operation.
- Reset (Clearing out Settings)
To return all settings to their default settings Hold down [SPEAKER] and plug it into an outlet. After playing the beep 10 times, all settings will return to factory defaults. Hold down SPEAKER and Plug in

Installation
Choose a location that is not near a heat source or on something that moves (like a door). For non-mounting locations, choose a place where the doorbell will be easy to see and hear.
- For Receiver:
Plug-in receiver: Just plug receiver into standard outlet in room. - For Push button:
IMPORTANT:
Before installation, please test if the operating range you choose is working and set music if needed. Before you drill any hole in the wall, please make sure there are not cables or pipes. To install you will require a drill and cross headed screwdriver.
- Open the Transmitter with screw driver and separate the front cover from the back cover. Penetrate the two standby holes at the back cover with two screws. Then fix the screws on the wall at suitable height

- Or you can stick the Transmitter with the double-sided adhesive tape

Battery Replacement of Push Button
Open the battery cover and install the CR2032 battery.

Specifications

Troubleshooting


1 Year Limited Warranty
This product is warranted to the original purchaser only for a period of 1 year from the date of purchase for products damaged due to defect in workmanship and materials. Proof of purchase is required to obtain warranty service. Warranty is for replacement only. No service parts are available for these products. No other warranties are expressed or implied. Batteries are not covered under this warranty. For warranty service, please contact SECRUI Customer Service by email: contact@secrui.com
REFRENCE LINK


