
Magic Chef MCSRG24S 24-Inch Freestanding Gas Range User Manual

PRECAUTIONS
THIS PRODUCT IS INTENDED FOR HOUSEHOLD USE ONLY
WARNING:
Read and understand all safety precautions. Failure to follow all instructions described in this user manual may result in electric shock, fire, serious personal injury, and/or loss of life. The warnings, cautions and instructions discussed in this user manual cannot cover all possible conditions and situations that may occur.
- Risk of child entrapment. Child supervision is necessary. This appliance is to be used only for its intended purpose as described in this manual. Read all recommended safeguards thoroughly.
- If information in this manual is not followed exactly, a fire or explosion may result causing property damage, personal injury or death.
- DO NOT store or use gasoline or other flammable vapors and liquids in the vicinity of this or any other appliance.
- Tip Over Hazard
- A child or adult can tip the range and be killed.
- The range can tip if you apply too much force or weight on the oven door without the anti-tip bracket being installed properly. Do not step, lean, or sit on the door or drawer; doing this may result to serious injury.
- To avoid the risk of tipping the range, the range must be secured by a properly installed anti-tip bracket. Refer to Installation Manual for the anti-tip bracket.
- To check if the bracket is installed and secure, look underneath the range to see that the rear leveling legs are engaged to the bracket. If visual inspection is not possible, slide the range forward, confirm the anti-tip bracket is securely attached to the floor or wall, slide the range back so the rear leveling leg is under the anti-tip bracket.
- Verify the anti-tip bracket is re-engaged when the range is moved. Do not operate the range without the anti-tip bracket in place and engaged.
- Failure to follow these instructions can result in death or serious burns to children or adults. Gas Leak
- Gas leaks cannot always be detected by smell.
- Gas supplier recommend that you use a gas detector approved by UL or CSA.
- For more information, contact your gas supplier.
- If a gas leak is detected, follow the “What to Do If You Smell Gas” section below. What to Do If You Smell Gas
- DO NOT try to turn on any appliance.
- DO NOT touch any electrical switch.
- DO NOT use any phones in home.
- Immediately call your gas supplier from a phone outside of the home. (Ex: Go to a neighbor’s home to call your gas supplier or fire department.)
- If the gas supplier cannot be reached, call the fire department.
- Installation and service must be performed by a qualified installer or service agency.
Important Safety Instructions
WARNING: To reduce the risk of fire, electrical shock, injury to persons, or damage when using the oven, follow basic precautions.
- The anti-tipping bracket must be installed and securely attached to the range. Check to ensure the antitipping bracket is securely attached to the range prior to use.
- Be sure the range is properly installed and grounded by a qualified technician.
- DO NOT allow anyone to climb, stand or hang on the oven door, broiler door or cooktop. They could damage the range or tip over the range causing serious injury.
- NEVER use this appliance to warm or heat a room. Doing so may result in carbon monoxide poisoning and overheating of the oven.
- DO NOT LEAVE CHILDREN ALONE OR UNATTENDED – Children should not be left alone or unattended in the area where the oven is in use; they could be seriously burned or injured. Children should never be allowed to sit or stand on any part of the oven; they could be seriously burned or injured.
- WEAR PROPER APPAREL – Loose fitting or hanging garments should NOT be worn while utilizing the oven.
- DO NOT repair or replace any part of the oven unless specifically recommended in the manual. All other servicing should be referred to a qualified technician.
- To avoid the possibility of electrical shock, disconnect the power supply before servicing the unit.
- DO NOT store flammable materials in the oven, or near the cooktop.
- DO NOT store or use combustible materials, gasoline or other flammable vapors and liquids near the vicinity of the range or any other appliance.
- DO NOT use water on grease fires. NEVER pick up a flaming pan or pot. Turn the controls off. Smother the flaming pan or pot by covering it completely with a fitting lid, cookie sheet or flat tray. Use multi-purpose dry chemicals or foam-type fire extinguisher.
- Flaming grease outside of the pan or pot can be put out by covering it with baking soda, multi-purpose dry chemicals or foam-type fire extinguisher.
- Flames in the oven can be put out by completely closing the oven door and turning off all controls. A multipurpose dry chemical or foam-type fire extinguisher can also be used to put out the flames.
- Use only dry pot holders- Moist or damp potholders on hot surfaces may result in steamed burns.
- NEVER cover or block the vent openings of the range. The vent openings provide the air inlets and outlets that are necessary for the range to operate properly with the correct combustion.
- USE CARE WHEN OPENING OVEN DOOR – Use extreme caution when opening the door of the hot oven. The hot air and steam escaping from the oven can cause burns to hand, face an eyes. Let hot air/steam escape before removing or replacing food.
- PLACEMENT OF OVEN RACKS – It is strongly recommended to place oven racks in desired location while oven is cool. If the rack must be moved while the oven is hot, do not let the potholder contact the hot heating element in the oven.
- DO NOT TOUCH HEATING ELEMENT OR INTERIOR SURFACES OF OVEN. Heating elements may be hot even though they are dark in color. During and after use, do not touch, or let clothing or other flammable materials contact heating elements or the interior surfaces of the unit.
- DO NOT HEAT UN-OPENED FOOD CONTAINERS ON THE SURFACE BURNERS OR IN THE OVEN. Pressure could build up and the container can burst, causing injury.
- Make sure the broiler pan is in place correctly to reduce the possibility of grease fires.
- NEVER leave jars of fat drippings on or near your range.
- DO NOT let cooking grease deposits accumulate in or near the range, as this may cause a grease fire.
SPECIFICATIONS

Height 35.5” (900 mm)
Width 23.6” (600 mm)
Depth 23.6” (600 mm)
Depth with Backsplash 25.0” (635mm)
Product Weight 132 lbs.
Capacity 2.73 Cu. Ft.
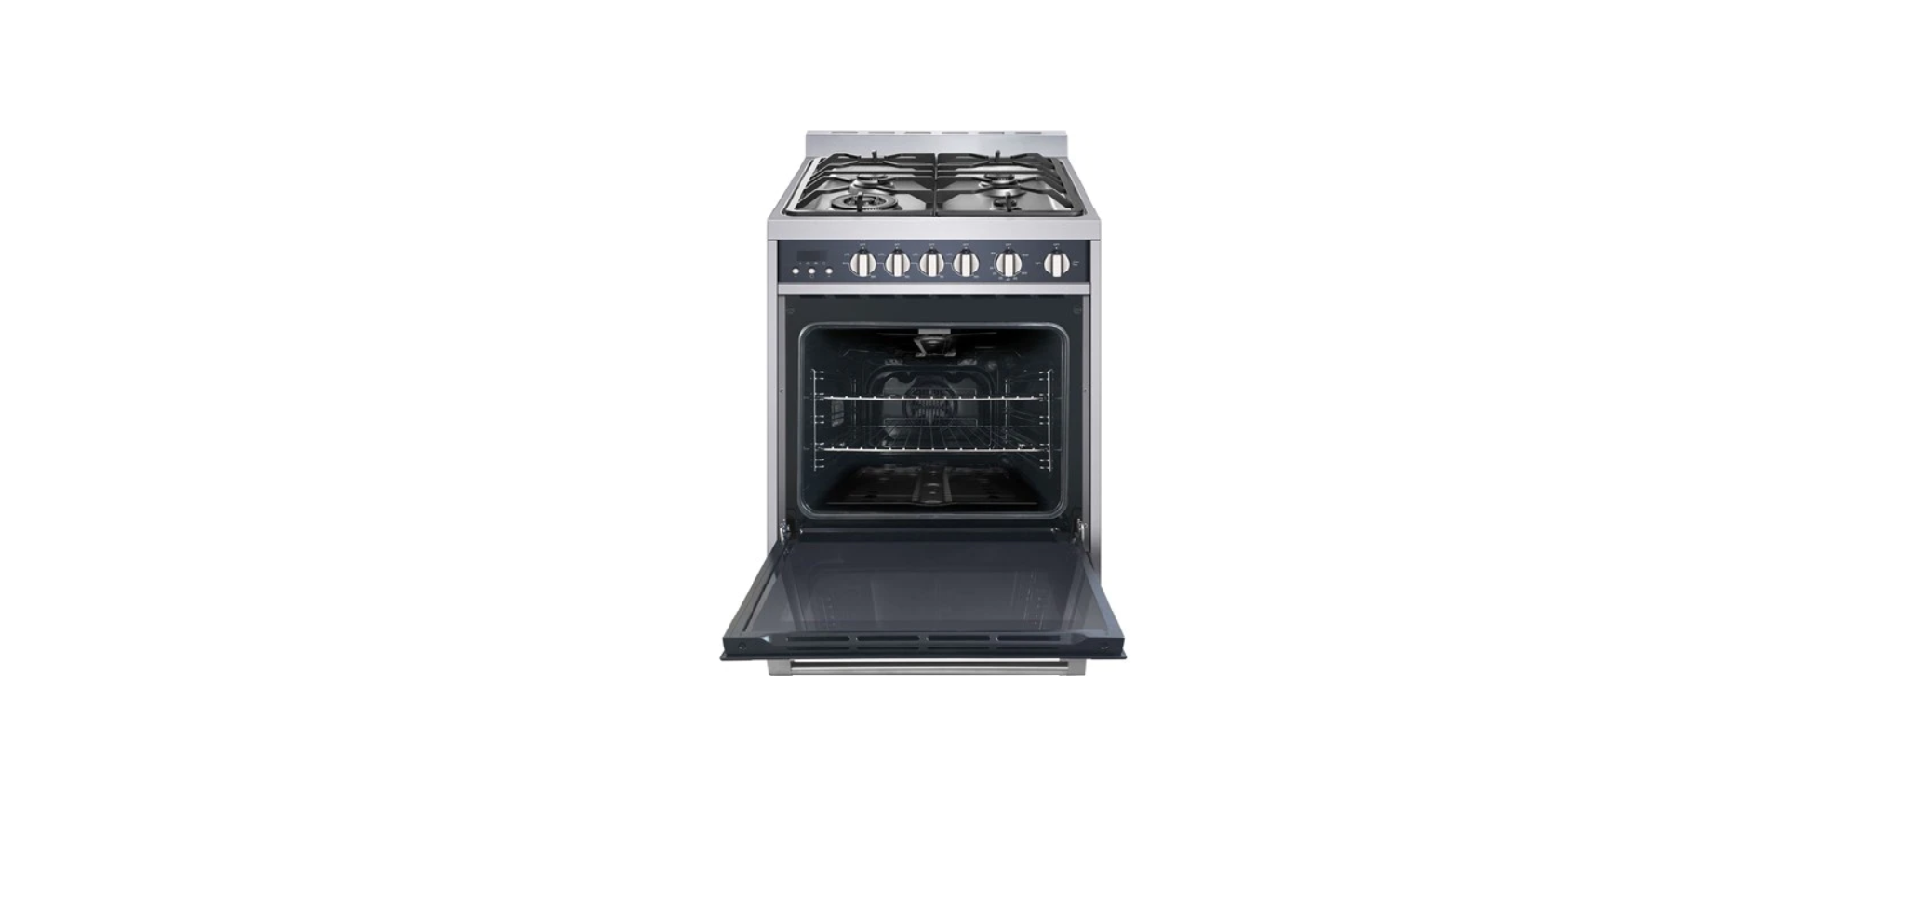
PARTS and features
Product Parts & Accessories

- a. Back Wall Plate (1)
- b. Gas Cooktop Grate (1)
- c. Control Panel (1)
- d. Oven Door Handle (1)
- e. Oven Window (1)
- f. Oven Racks (2)
- g. Grill Set: Basin & Anti-Splash (1)
- h. Anti-Tip Bracket (1)
- Anti-Slip Feet (4)
- j. Screws (2)
- k. Anchors (2)
control panel

before use
WARNING: Failure to follow these instructions can result to serious injury or death.
- DO NOT let the burner flames extend beyond the edge of the pan.
- Turn off all controls when burners are not in use.
- Always use the LITE position when igniting the top burners and make sure the burners have ignited.
- Never leave the surface burners unattended at high flame settings. Boil overs can cause smoke and greasy spillovers that may catch on fire.
- Excessive flames are hazardous. Adjust the burner flame size so it does not extend beyond the edge of the cookware.
- When removing the cooking grates, always be certain that the controls for all burners are set to off. Make sure all cooking grates are cool before attempting to remove them.
CAUTION: Utilizing Cookware Properly
- Select cookware that is the appropriate size to cover the burner grates.
- DO NOT use cookware that is unstable or easily tippable as this can increase the chances of spillover and serious injury. To avoid spillover make sure cookware is large enough to contain the food properly.
- When utilizing glass cookware. Make sure the glass cookware is suitable for top range cooking.
- Keep all plastic items away from the cooktop as they may melt if left too close to the heat.
- Always turn cookware handles toward the side or back of the range without extending over adjacent burners.
- Always turn the burner controls off before removing the cookware.
- When utilizing pot holders. Only use dry pot/pan holders as moist or damp pot holders to hot surfaces may result in burns from steam. DO NOT let pot holders come near open flames when lifting cookware.
Cookware and the characteristics
Use the following chart as a guide for cookware material characteristics
Cookware Characteristics
Aluminum
- Heats quickly and evenly.
- Suitable for all types of cooking.
- Medium or heavy thickness is best for most cooking tasks.
Cast Iron
- Heats slowly and evenly.
- Good for browning and frying.
- Maintains heat for slow cooking.
- Stainless Steel
- Heats quickly, but unevenly.
- A core or base of aluminum or copper on stainless steel provides even heating.
operation instructions – GAS Burner
burner grates

- Rapid Burner: The front left burner is designed to give maximum power when fully on. This burner is used to rapidly bring liquids to a boil and cook large quantities of food.
- Auxiliary Burner: The front right burner allows for more precise simmering and low temperature cooking.
- Semi-Rapid Burner: The left rear and right rear burners provide a burner power level between the Rapid burner and the Auxiliary burner. These two burners are considered to be multipurpose burners. The two grates are identical and can be used on either the left or right of the cooktop.
- Wok Ring: The Wok Ring grate can be attached on top of the Rapid Burner grate. Both flat-bottom Wok pans and round-bottom Wok pans can be utilized with the Wok ring.
NOTE: Burner grates should be washed regularly and after spillovers. Wash them in hot, soapy water and rinse with clean water. Make sure the grates are fully dry before putting back into place.
Sealed Surface Burners
WARNING: DO NOT obstruct the flow of combustion and ventilation air around the burner grate edges. Gas must flow freely throughout the gas tube opening for the burner to light properly. Keep this area free of soil and do not allow spills, food, cleaning agents or any other material to enter the gas tube opening. To avoid spills, food, cleaning agents or other materials entering the gas tube, always keeps the Burner Cap on.
- Burner Cap: Always keep the burner cap in place when utilizing a surface burner. To avoid poor ignition and uneven flames, maintain clean burner caps. (Refer to “Cleaning Cooktop” on page 16.)
- Burner Ports
- Flame: Occasionally check burner flames for proper size and shape (Refer to Figure 5.)
NOTE: A good flame is blue in color and not yellow.

How to Light the Surface Burners
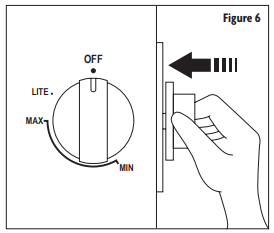
- Push in and turn the control knob counterclockwise to the LITE position. All surface burners will click but only the burner with control knob turned to LITE will produce a flame.
- After the burner ignites, turn the control knob to the desired flame size.
NOTE: Always position cooking cookware on the burner grate before lighting the burner.
CAUTION: The flame should not extend beyond the sides or the pot or pan.
In Case of Power Failure
WARNING: Use extreme caution when lighting burners this way.
- Hold a lit match to the desired burner head.
- Push and turn the control knob to the “LITE” position.
- Once burner ignites, adjust flame to the desired size.

operation instructions – OVEN
OVEN

- a. Control Panel
- b. Cooling Vents
- c. Oven Interior Light
- d. Top Central Heating Element
- e. Convection Fan and Heating Element
- f. Rack Position Guide
Positioning Racks and Bakeware
NOTE: To avoid damage to the porcelain finish, do not place food or bakeware directly on the oven door or bottom.
Positioning Oven Rack
- Slightly tilt up the front edge of the rack and slide rack back until it clears the stop position.
- Make sure the rack is level.
NOTE:
- Position racks to the desired rack position before turning on the oven.
- DO NOT position racks with bakeware on them.
Removing Oven Rack
Pull the rack out to the stop position, then raise the front edge and continue to pull towards you.
NOTE: DO NOT remove racks with bakeware on them.
Cooking Modes
Preheating
- Preheat means to bring the oven up to a specified temperature before putting food into the oven Preheat the oven based on your recipe.
- Preheating is great for baking cakes, cookies, pastries and breads.
Baking (Refer to Figure 9.)
NOTE: This oven utilizes a gas burner located under the oven cavity. This allows the heat to rise naturally to bake foods evenly.
- Push in the temperature control knob for 3 seconds and then release.
- The igniter will continue to spark.
- Then push and turn temperature control knob counter-clockwise to the desired temperature between MIN (150°F) to MAX.
Broiling (Refer to Figure 10.)
NOTE: This oven utilizes a gas burner located at the top of the oven cavity for broiling and browning.
- Push in the temperature control knob, and turn clockwise to automatically ignite the broil burner.
CAUTION: The broil burner will remain on until the temperature control is returned to the off position.
- Always utilize the broiler grid & pan when broiling.
- Never cover the broiler grid openings with aluminum foil. If the rack is covered by aluminum foil, the fat cannot drip away from the meat and may easily ignite.
- DO NOT allow fatty edges hang over the sides of the broiler pan.
Convection Cooking (Refer to Figure 11.)
- During Convection cooking the fan will circulate hot air throughout the oven. The movement of heated air around the food will help to speed up cooking by penetrating the cooler outer surfaces. Foods cook more evenly. Browning and crisping outer surfaces while sealing the moisture in.
- During convection cooking, the bake and broil elements, and the fan operate to heat the oven cavity. If the oven door is opened during convection cooking or preheating, the fan turns off immediately and the element(s) will turn off after 30 seconds. Once the door closed, the element(s) will turn back on.
NOTE: The convection fan can be turned on and off at any time.
Oven Light (Refer to Figure 12.)
- When the Bake or Broil function is selected the oven light will turn on automatically and remain on during operation.
- While the oven door is closed, turn the knob to “Light” to turn lights on and off. Oven lights will turn on when the door is opened.
Oven Display
- The oven display will illuminate when the oven is pre-heating.
- The oven display will turn off when the selected cooking temperature has been reached.

CLOCK & TIMER
Set Time of Day
- When the range is first connected with power, the screen will display “12:00”.
- To set the correct time, press “ + ” or “ – ” button until the correct time is displayed. After 5 seconds, the displayed time will be set, or you can press the “ ” button to select manual operation.
Setting the Timer
NOTE: The digital countdown timer can be set up to the maximum of 23 hours and 59 mins.
- Press the “ ” button repeatedly until the “ ” symbol above “ ” symbol is displayed.
- Once the “ ” symbol is above “ ” symbol then utilize the “ + ” or “ – ” button to set the timer.
- The time will automatically be set if no button is pressed for 5 seconds.
- When the set time is reached, “ ” symbol disappears and the alarm will ring.
- To stop the alarm, press any button.

Timed Cooking
This feature allows the oven to be set to turn on at a certain time of day, cook for a set length of time and/or shut off automatically.
CAUTION: Delayed cooking is not recommended for baking breads or cakes, as it may not bake properly.
- Check to see the clock is set to the correct time of day.
- Press the “ ” button repeatedly until the “ ” symbol above “ ” symbol flashes. Then press the “ + ” or “ – ” button to the desired time frame.
- Press the function button repeatedly until the bar above “ ” symbol flashes and then press the “ + ” or “ – ” button to set the time to turn off the oven.
- Then set the cooking temperature and cooking mode by turning the thermostat knob and the selector knob.
- The “ ” symbols above “ ” symbol and “ ” symbol will flash, indicating that the automatic cooking feature has been set.
Example: If the cooking time takes 30 mins and you want to finish cooking at 12:30. - Press the “ ” button repeatedly until the “ ” symbol above “ ” symbol flashes and set the cooking time to 30 minutes.
- Press the “ ” button repeatedly until the “ ” symbol above “ ” symbol flashes and set the finish time to 12:30.
- Once the above settings have been set the current time is displayed and the “ ” symbols above “ ” symbol and “ ” will flash indicating that the automatic cooking feature is set. When the clock displays “12:00”, the oven will start cooking automatically, and the “ ” symbol will flash.
care and Maintenance
CLEANING Cooktop
Removing Trivets
- The trivets located in the recessed area of the hob.
- They can be removed for cleaning by carefully lifting them from the hob.
- Clean by washing in warm soapy water. Make sure to dry thoroughly.
- Do not drop the trivet into place. To avoid scratches and damages carefully place the trivets back to its place.
Removing the Burner
- The burner caps and heads are removable for cleaning.
- Blockage of the flame port should be cleaned using a match stick or brush.
- If the caps, heads and cups are heavily soiled, use a non-abrasive cleaning compound to help remove build-up.
Refitting the Burner Heads and Caps
- The burner cap must be placed correctly into the burner head or damage may occur during operation.
- To ensure correct placement, make sure the Ignitor and Flame detector are position into the 2 slots of the burner head. (Refer to Figure 14.)
- The burner cap is simply positioned over the top of the burner head. (Refer to Figure 14.)

CLEANING oven
IMPORTANT: Before cleaning, make sure all controls are off and the oven is cool. Always follow the label instructions on all cleaning products used on this oven. Soap, water and a soft cloth or sponge are suggested first unless otherwise noted. DO NOT use abrasive cleaning products as it may damage the unit. Stainless Steel
- DO NOT use soup-filled scouring pads, abrasive cleaners, cooktop cleaner, steel-wool pads, gritty wash cloths or abrasive paper towels.
- It is recommended to use stainless steel cleaner or polish.
- It is recommended to use vinegar for hard water spots.
- It is recommended to use liquid detergent or all-purpose cleaner. Rinse well with clean water and dry with soft, lint-free cloth.
- It is recommended to rub in the direction of grain to avoid damage.
Oven Door Exterior
- It is recommended to use glass cleaner and paper towel or non-abrasive plastic scrubbing pad.
- It is recommended to apply glass cleaner to soft cloth or sponge.
- DO NOT apply directly to panel.
Grates and End Caps - DO NOT clean until the grates and caps have cooled.
- DO NOT reassemble grates and caps if they are still wet.
- To avoid chipping, do not bang grates and caps against each other or hard surfaces.
- It is recommended to utilize mildly abrasive cleaner.
- It is recommended to utilize a non-abrasive cloth or plastic scrubbing pad.
Burner Spreader - It is recommended to frequently wash the burner spreader with boiling water and detergent to remove any deposit build up. This will maintain steady flame output.
- Always dry the burner spreader thoroughly before re-installing.
Control Panel - DO NOT spray glass cleaner on glass control panel.
- DO NOT use abrasive cleaners, steel wool pads, and gritty wash cloths. Damage may occur.
- Apply glass cleaner to soft cloth or sponge then begin cleaning glass panel.
Oven Cavity
NOTE: At high temperatures, foods react with porcelain, so staining, etching, pitting or faint white spots can result.
- DO NOT begin cleaning the oven cavity until it has fully cooled.
- DO NOT use oven cleaners.
- It is recommended to use mild detergent and warm water.
- It is recommended to use soft cloth or non-abrasive plastic scrubbing pad.
Oven Light Replacement
CAUTION: Before replacing, make sure the oven and cooktop are cool and all control knobs are to the OFF position.
- Remove the light cover by rotating it counter-clockwise. (Refer to Figure 15.)
- Then remove the light bulb by rotating it counter-clockwise.
- Replace the old light bulb with a new oven-safe light bulb with the following characteristics.
- Light bulb is a standard 25 – Watt (G9) appliance bulb
- Voltage: 120V
- Wattage: 25W
- Re-install light cover by rotating it clockwise.

Troubleshooting
Cooktop
Problem Possible Causes Solutions
Burner does not ignite. There is no power to the cooker top.
Check to see the unit is plugged in.
Replace fuse or reset circuit breaker.
Burner does not operate.
Air may be in the gas line. To release air from the gas line, turn on any one of the surface burner knobs.
Control knob is not set correctly. Push in knob before turning to a setting.
Burner ports are blocked. Check burner ports to ensure it is clean. If it is clogged use a tooth brush or paper clip to clean.
Burner flames are uneven, yellow and/ or noisy.
Burner ports are blocked. Check burner ports to ensure it is clean. If it is clogged use a tooth brush or paper clip to clean.
Burner caps are positioned incorrectly.
Place the burner caps so that the alignment pins are properly aligned to the slots.
Propane gas is being used. If utilizing liquid propane the range should be converted to LP gas by a qualified technician.
Burner flames are too high or too low.
Cooktop gas supply is incorrect.
Check to see the range is set up for the correct gas type. The range comes set up for natural gas. Please contact a qualified technician if you look to set up LP.
The gas pressure is incorrect. Check to see the pressure regulator is installed correctly and
the gas line pressure to be correct.
Burner makes popping noises.
Burner is wet. Dry the burner before use.
Burner cap and/or gas spreader is not positioned correctly.
Place the burner caps so that the alignment pins are properly aligned to the slots.
Excessive heat around the cookware
The cookware is not the proper size for the burner.
The cookware’s bottom surface should approximately be the same size as the cooking area and burner. Cookware should not extend more than 1” outside the cooking area. Adjust the flame so that it does not come up around the cookware.
Oven
Problem Possible Causes Solutions
Oven is not heating. There is no power to the oven. Check to see the unit is plugged in.
Replace fuse or reset circuit breaker.
Oven display is off. Power interruption Turn off at the main power supply (fuse or breaker box). Turn
breaker back on. If conditions persists, call for service.
Cooling fan continues
to run after the oven is
turned off.
The electronic components
have not yet cooled sufficiently.
The fan will automatically turn off when the electronic
components have cooled.
Oven light does not
turn on.
Light bulb is either lose or
burned-out.
Remove bulb to see if the bulb is burned-out. Replace if
burned-out and re-insert bulb.
Oven light stays on. Door is not properly closed.
Check for obstruction in oven door.
Check to see if the hinge is bent or door switch is broken.
Excessive moisture When utilizing bake mode pre-heat the oven. Convection Bake
and Convection Roast will eliminate any moisture in the oven.
Oven – Baking
Problem Possible Causes
Food browns unevenly.
Oven was not pre-heated.
Baking cookware is too large for the recipe.
Aluminum foil on oven rack
Aluminum foil on bottom of oven
Food is too brown on bottom.
Oven was not pre-heated.
Utilization of incorrect rack position
Avoid dark colored cooking pans/sheets
Food is dry or shrunk in size.
Oven temperature is too high.
Baked for too long of time.
Oven door opened frequently.
Pan size is too large.
Food is baking/roasting too slow.
Oven was not pre-heated.
Oven door opened too frequently.
Oven temperature is too low.
Tightly sealed with aluminum foil.
Cookware is too small.
Pie crust is not brown or is soggy.
Baking time was not long enough.
Utlization of shiny steel pans Rack position Oven temperature is too low.
Cake is pale and flat.
Oven temperature is too low.
Check baking time to be correct.
Tested the cake too soon.
Oven door opened too frequently.
Pan size is too large.
Cake is high in middle with crack on top.
Oven temperature is too high.
Baking time was too long.
Check baking time to be correct.
Rack position Pan size is too small.
Pie crust edges are too brown. Oven temperature is too high.
The crust is too thin.
REFRENCE LINK


