Table of contents
show
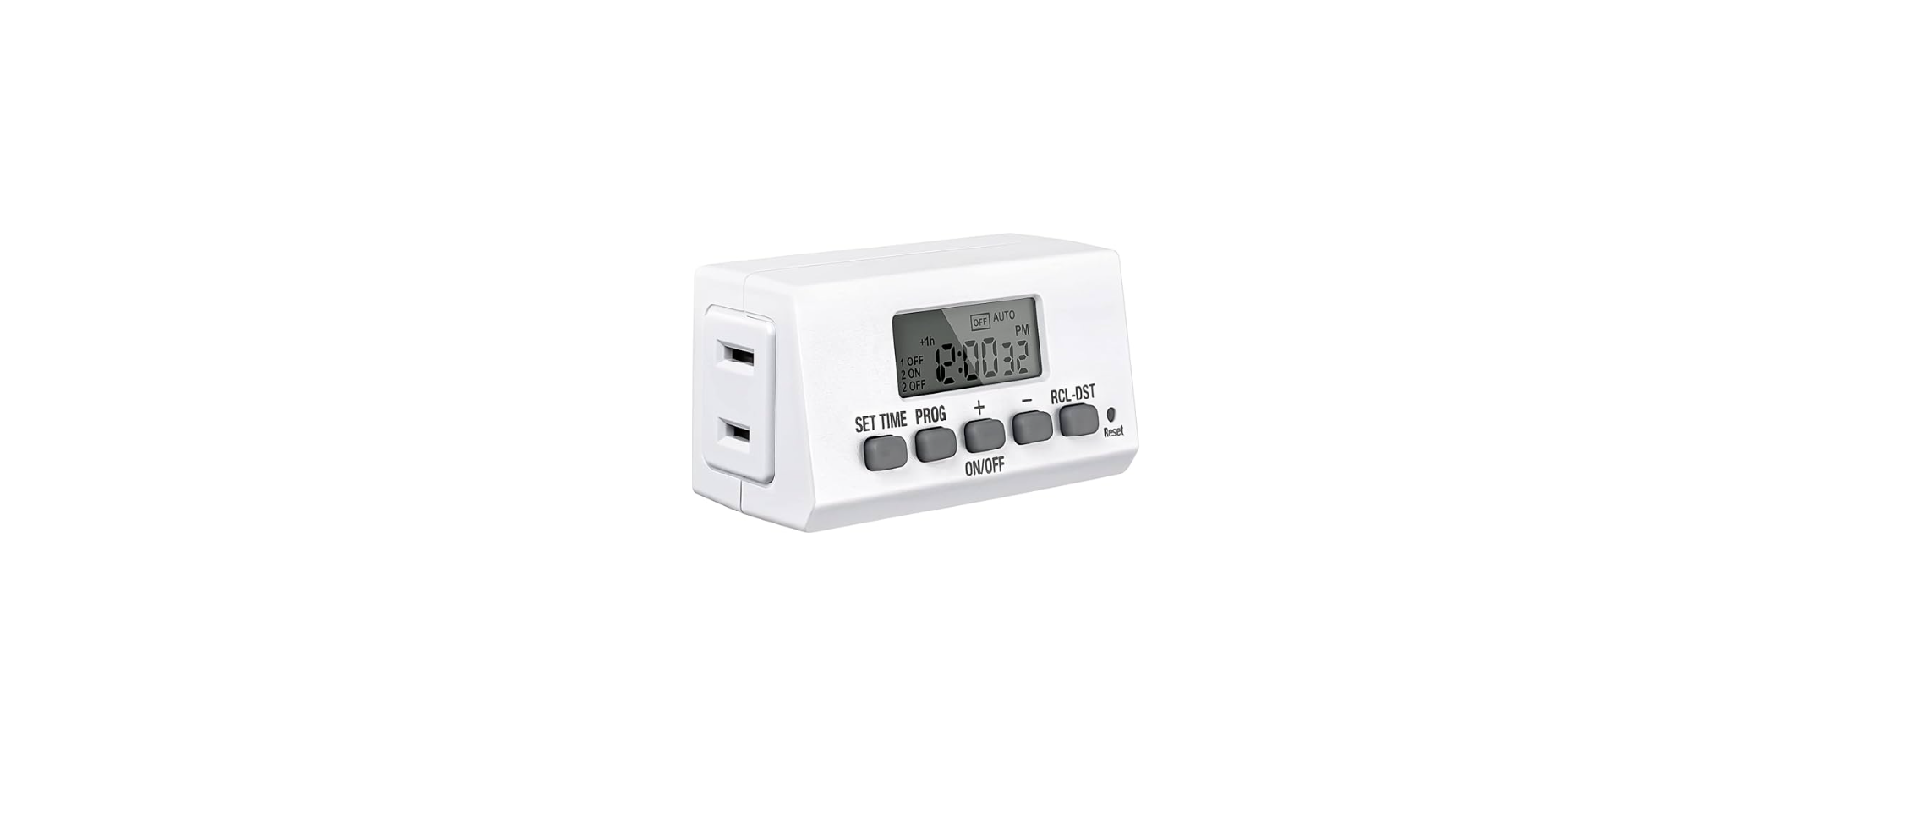
BN-LINK Mini Indoor Easy Set 24 Hour Timer User Manual

PROGRAMING & SAFETY INSTRUCTIONS
APPLICATIONS
- Lighting
- Humidifiers
- Indoor sprinkers • Nebulizers
- Aquariums
- Ventilators
WARNING
- For indoor use only
- Do not exceed electrical ratings
- Follow local electrical codes
INITIAL SETUP
- Remove sticker
Locate the tab at the top right of the sticker and pull to remove sticker from face of screen.

- Charge the internal battery
If the screen is blank, plug the timer into any outlet for 30 minutes to charge the internal battery.

- Reset the timer
Press the “RESET” button with the tip of a small non-metallic insulated tool, such as a pencil or toothpick.

- Unplug and program timer
Charging the battery allows the programming and setup of timer to occur from the comfort of your chair!
SET UP CURRENT TIME
Example: if it is 7:30am, please follow below steps to set time.
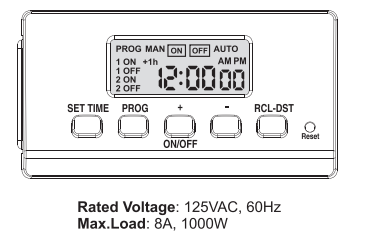
- Press “SET TIME”. the time displaved on the screen will flash.
- Press “+” or “-” to adjust the time in 1-minute intervals until the 7:30 00 AM is displayed. You can hold the buttons to fast scrol. Please make sure AM/PM is correct.
- Press “SET TIME” to save and quit. If no button is pressed within 60 seconds, the current time will be saved automatically.
SET AN ON AND OFF PROGRAM
- Press the “PROG” button to start the program setting, you will see the screen display shown as Fig 04.

Example: if you want to turn on a device every day at 8:05am and turn it off at 9:00pm, please follow below steps.
- Press and hold “+” or “-” button until 8:05 AM displays on the screen.
- Press the “PROG” button to save and move to the OFF time setting for the first program.
- Press and hold “+” or “-” button until 9:00 PM displays on the screen.
- Press the “PROG” button to save and repeat above steps to set another program if necessary.
Note:
- During the program setting stage, you can press “RCL-DST” button to clear the current input and resume it by pressing it again.
- You can revert to clock display screen at any time during the program setup by pressing “SET TIME” button or leave no button pressed for 60 seconds.
- The programs take effect in AUTO mode only. Please press and hold “ON/OFF” button for 4 seconds to switch between AUTO and MAN mode.
Attach a DEVICE to the timer
Plug a device into the outlet of the timer.

OPERATING MODE
The timer has two different operating modes: AUTO and MANUAL. They are represented by icons AUTO and MAN. Press and hold “ON/OFF” button for 4 seconds to shift between AUTO and MANUAL mode.
- In MANUAL mode, all programs are paused. Pressing the “ON/OFF” button will allow you to manually turn on or off the power.
- In AUTO mode, all programs are running. Pressing the “ON/OFF” button will only temporarily override the power on or off. Timer will continue to run its next program automatically.
DST – DAYLIGHT SAVING TIME FUNCTION
- Press “RCL-DST” button to activate or deactivate DST.
Note:
A “+1” icon will appear on the left of the LCD screen when DST is active. It means manually add 1hour to open the “Summer Time”, otherwise it returns to current time.
TROUBLESHOOTING
Timer does not turn on or off.
- Make sure AM and PM are correct on the current time and in the program settings.
- Timer program should be on AUTO setting.
- Make certain that both ON and OFF time have been specified.
- If the screen display is not clear or blank, please plug the timer into any outlet for 30 minutes to charge the internal battery, then press the “Reset” button.
- If the timer is always ON or always OFF, please check if the program is in Auto mode.
DOWNLOAD PDF LINK


 Afrikaans
 Albanian
 Amharic
 Arabic
 Armenian
 Azerbaijani
 Basque
 Belarusian
 Bengali
 Bosnian
 Bulgarian
 Catalan
 Cebuano
 Chichewa
 Chinese (Simplified)
 Chinese (Traditional)
 Corsican
 Croatian
 Czech
Czech Danish
 Dutch
Dutch English
 Esperanto
 Estonian
 Filipino
 Finnish
 French
 Frisian
 Galician
 Georgian
 German
 Greek
Greek Gujarati
 Haitian Creole
 Hausa
Hausa Hawaiian
 Hebrew
 Hindi
Hindi Hmong
Hmong Hungarian
 Icelandic
 Igbo
Igbo Indonesian
 Irish
Irish Italian
 Japanese
 Javanese
 Kannada
 Kazakh
 Khmer
Khmer Korean
 Kurdish (Kurmanji)
 Kyrgyz
 Lao
Lao Latin
Latin Latvian
 Lithuanian
 Luxembourgish
 Macedonian
 Malagasy
 Malay
Malay Malayalam
 Maltese
 Maori
Maori Marathi
 Mongolian
 Myanmar (Burmese)
 Nepali
 Norwegian
 Pashto
 Persian
 Polish
 Portuguese
 Punjabi
 Romanian
 Russian
 Samoan
 Scottish Gaelic
 Serbian
 Sesotho
 Shona
Shona Sindhi
 Sinhala
 Slovak
 Slovenian
 Somali
 Spanish
 Sundanese
 Swahili
 Swedish
 Tajik
Tajik Tamil
Tamil Telugu
 Thai
Thai Turkish
 Ukrainian
 Urdu
Urdu Uzbek
Uzbek Vietnamese
 Welsh
Welsh Xhosa
Xhosa Yiddish
 Yoruba
 Zulu
Zulu