Table of contents
show
Newentor EM3333 Wireless Weather Station User Manual
WEATHER STATION FEATURES
Main Station
- The weather forecasting function
- WWVB radio controlled time function ( ON or OFF)
- Date and weekday display
- Time in optional 12/24 hour format
- Daily Alarm Function
- Automatic snooze function
- Moon phase display
- USB Charger Output Socket
- 5 Levels brightness backlight with power adapter
- Comfort display
- The trend display of Temperature, Humidity and Barometric
- Temperature:
- Temperature alternatively in °C or °F
- Indoor temperature measurement ranges: 15°F (-9.9°C) to 122°F (50°C)
- Outdoor temperature measurement ranges: -4°F (-20°C) to 140°F (60°C)
- Outdoor thermometer and frost alert
- Humidity: Indoor & Outdoor measurable range: 20%RH ~ 95%RH
- Barometric pressure:
- Barometric pressure measurement ranges: 17.72 in Hg (600 hPa/mb) to 32.50 in Hg(1100 hPa/mb)
- Pressure alternatively in in Hg or mb/ hPa
- Minimum/Maximum display for humidity and temperature
- 3 Remote Sensor can be connected (only 1 included)
Remote Sensor
- Wireless Outdoor Sensor:
- Wall Mount or Table Stand
- 433.92MHz RF transmitting frequency
- 200 feet transmission range in an open area
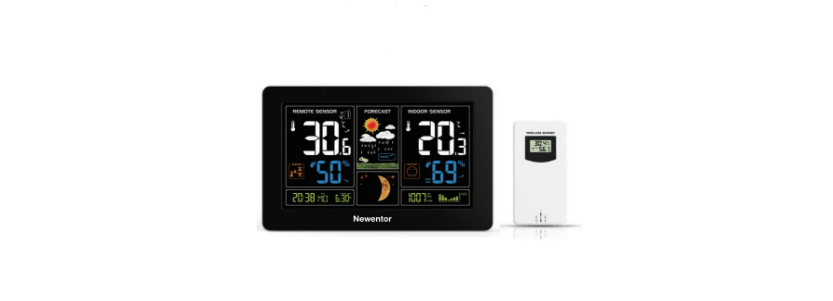
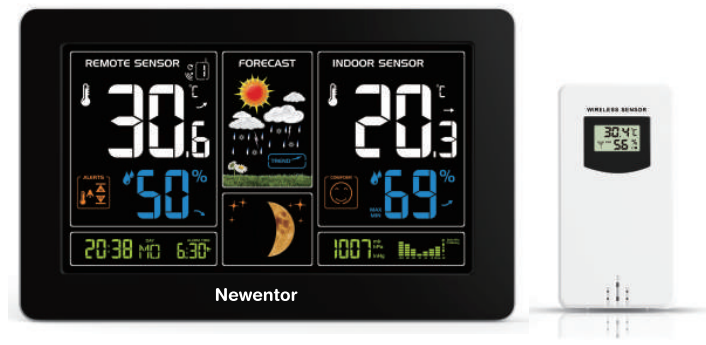
Weather Station Appearance

Part A – Weather Station Front
- A1: Remote Temperature
- A2: Remote Humidity
- A3: Remote Temperature Alert
- A4: Time/Calendar or Alarm time
- A5: Moon Phase
- A6: Barometric pressure
- A7: Histogram shows the atmospheric pressure
- A8: Indoor Humidity
- A9: Indoor comfort
- A10: Indoor Temperature
A11: Weather Forecasting
Part B – Weather Station Back

- B1: touch field
- B2: button
- B3: button
- B4: “▲” button
- B5: “▼” button
- B6: button
- B7: button
- B8: “MEM” button
- B9: Alarm on/off shift switch
- B10: Power supply socket
- B11: USB charger output socket
- B12: Battery compartment
Part C – Wireless Outdoor Sensor:

- C1: LCD display – Temperature
- C2: LCD display – Humidity
- C3: Transmit signal LED
- C4: “°C/°F” switch button
- C5: “TX” reset button
- C6: Battery compartment
- C7: 3 channel select
INITIAL OPERATION AND NOTES
Initial Operation
- Open the weather station battery compartment, insert 2 x AA batteries observing polarity [ “+” and “ –“ marks]
- Remove the battery compartment on the Wireless Remote Sensor, insert 2 x AA batteries observing the correct polarity (+ and – marks) and close the battery compartment.
- When the power is connected all the icons on the LCD display will light up for 3 seconds, you will hear a beep tone and the weather station will start to detect the indoor temperature and humidity
- The weather station will start to make a connection to the outdoor remote sensor. This operation takes about 3 minutes and is displayed by a flashing reception RF icon “ ” in the “Remote Sensor” display area on the receiver.
- Once the weather station has created a connection to the outdoor sensor the clock will start automatically searching for the WWVB Signal to set the time and date. The radio mast icon “ ” will flash showing it is searching for signal, it may take up to 7 minutes to search.
Notes for Customer before Use
- During the WWVB signal search mode only the “ ” and “▲” button will function, all other buttons have no function. And backlight will not keep lighting during this moment even if the adapter plug in. Press the “▲” button it can cancel the WWVB signal search and all buttons and backlight will function.
- If weather station failed to receive transmission from outdoor sensor (“- -”display on the main station LCD), press and hold “▼” button for 3 seconds to receive transmission manually. RF icon “ ” flashes on the LCD and the weather station to re-receive the data from outdoor sensor. Or open the sensor battery compartment, press the TX button to connect the sensor and station again.
TIME, TIME ZONE AND CALENDAR SETTING
Manual Time Setting
- Press once button, can switch the display calendar or second
- Press and hold down the button for 3 seconds, the 12/24 hour mode display starts to flash. Now use“▲” and
- buttons to set the correct 12/24 hour mode.
- Press “ ” to confirm your setting, the Time Zones starts to flash. Now use “▲” and “▼” buttons set a correct time zone (-12 to +12).
- Press “ ” to confirm your setting, the Hour display starts to flash. Now use “▲” and “▼” buttons to set the correct hour.
- Press “ ” to confirm your setting, the Minute displays starts to flash. Now use“▲” and “▼” buttons to set the correct minute.
- Press “ ” button to confirm your setting, the Month and Date icon display starts to flash. Now use “▲” and “▼” buttons to set the date display on Month/Date or Date/Month.
Automatic Time Setting
- The Weather Station automatically starts the WWVB Signal search up to 7 minutes of any restart or change of batteries. Or press and hold down the“▲” button for 2 seconds to manually start the WWVB signal search.
- The radio mast icon “ ” will flash showing it is searching for signal. Once the signal is found the Time and Date will be automatically set. If no signal is found within 7 minutes the radio mast icon will disappear and it will automatically start searching again in 1 hour.
- At 1:00 / 2:00 / 3:00 am the Weather Station automatically carries out a synchronization procedure with the WWVB signal to correct any deviations to the exact time. If this synchronization attempt is unsuccessful (The radio mast symbol disappears from the display), the system will automatically attempt another synchronization at the next full hour. This procedure is repeated automatically up to 5 times.
DAILY ALARM AND SNOOZE FUNCTION SETTING
Setting the Daily Alarm
- Press once button, can switch the display calendar or alarm.
- Press and hold down button for 2 seconds until Alarm Time hour display starts to flash. Use the “▲” and “▼” buttons to set the required hour.
- Press button to confirm your setting, the Minute display starts to flash. Use the “▲” and “▼” buttons to set the required minute.
- Press button to confirm your setting and to end the setting procedure
2 Switching ON/OFF the alarm signal
- The alarm shift switch is pushed in the position, LCD display the icon next to the date, the alarm function is open
- Press back of the alarm shift switch is pushed in the position, the icon disappears, the alarm function is close
- When alarm is ring, press any button except the button to stop the alarm signal. It is not necessary to reactivate the alarm. It switches itself automatically to the alarm time which has already been set.
Snooze Function:
- Touch the field or press the button the alarm signal sounds to get to SNOOZE mode. The alarm signal sounds again after approx. 5 minutes.
WEATHER FORECAST AND BAROMETRIC
Weather Forecast
- The weather station calculates a weather forecast for about the next 8 hours based on the barometric pressure trend. Of course this forecast can‘t compare to that of professional weather services supported by satellites and high performance computers, but merely provides an approximate indication of current developments. Please take the weather forecast from your local weather forecasting service into account as well as the forecast from your weather station. If there are discrepancies between the information from your device and from the local weather forecasting service, please take the advice of the latter as authoritative.
- The weather station displays the following weather icon for next 8 hours weather forecast not current weather:

Barometric Pressure Display
- The current barometric pressure is automatically shown on the Weather Station once it starts receiving readings.
- Press and hold the button for 2 seconds to enter the air pressure unit and weather settings, the pressure units will be flashing display, Use the “▲” and “▼” button to set the pressure unit to display in the “hPa/mb” or “in Hg”.
- If the barometric pressure reading is below the minimum range, then LLLL will be displayed. If the barometric pressure reading is above the maximum range, then HHHH will be displayed
TEMPERATURE, HUMIDITY AND COMFORT DISPLAY
°C or °F temperature display
- The temperature is displayed either in °C or °F. Briefly pressing the “▲” button allows you to switch between the individual modes.
Current Temperature and Temperature Trend Display
- After you insert the batteries, the weather station measures the current temperature. The trend display shows a neutral temperature course . The further course of the trend display is determined as follows: If, after an hour, the temperature is more than 1°C higher than the value measured first, then a positive course is displayed . If, after an hour, the temperature is more than 1°C lower than the value measured first, then a negative course is displayed . If the temperature does not change within an hour, then the upward or downward pointing arrow becomes a horizontal arrow. The measured temperature is then taken as the neutral value from which further prognoses are made.
Outdoor Temperature & Frost Alert Settings
- Press and hold down the button for 2 seconds until the icon for the Temperature Alert” starts to flash
- The icon of Upper limit of the Temperature alarm starts to flash. Use the “▲” and “▼” buttons to set the required maximum temperature. Press “ ” to confirm your setting.
- The icon of the Lower limit of the Temperature alarm starts to flash. Use the “▲” and “▼” buttons to set the required minimum temperature. Press button to confirm your setting and to end the setting procedure
Maximum/Minimum Temperature and Humidity
- To view indoor/outdoor maximum, minimum temperature and humidity data, press the “MEM” button:
- Once to show the maximum temperature and humidity values.
- Twice to sow the minimum temperature and humidity values
- Three times to return to the current temperature and humidity levels
- To reset the maximum and minimum temperature and humidity, press and hold down the “MEM” button about 2 seconds. This will reset all minimum and maximum data recorded to the current displayed values.
BACKLIGHT
- If the product is powered by batteries, touch the ” ” field. Backlight lit 15 seconds.
- When the power supply of the product is inserted into the power supply adapter, the battery will automatically disconnect the power supply, and the backlight will always be bright. Press the “ ” button to adjust the brightness of the backlight, you can adjust the 5 state: 4 different brightness backlight and close the backlight. Users can choose according to the personal preferences of different brightness backlight or turn off the backlight. Turn off backlight when you can touch the ” ” field to light the backlight 15 second.
USB Charger
- When you use USB charger to charging the electronic device, please make sure weather station is powered by main adapter, DO NOT use batteries only.
LOW BATTERY:
- If the battery icon appears the batteries in the outdoor sensor should be replaced as soon as possible.
 Afrikaans
 Albanian
 Amharic
 Arabic
 Armenian
 Azerbaijani
 Basque
 Belarusian
 Bengali
 Bosnian
 Bulgarian
 Catalan
 Cebuano
 Chichewa
 Chinese (Simplified)
 Chinese (Traditional)
 Corsican
 Croatian
 Czech
Czech Danish
 Dutch
Dutch English
 Esperanto
 Estonian
 Filipino
 Finnish
 French
 Frisian
 Galician
 Georgian
 German
 Greek
Greek Gujarati
 Haitian Creole
 Hausa
Hausa Hawaiian
 Hebrew
 Hindi
Hindi Hmong
Hmong Hungarian
 Icelandic
 Igbo
Igbo Indonesian
 Irish
Irish Italian
 Japanese
 Javanese
 Kannada
 Kazakh
 Khmer
Khmer Korean
 Kurdish (Kurmanji)
 Kyrgyz
 Lao
Lao Latin
Latin Latvian
 Lithuanian
 Luxembourgish
 Macedonian
 Malagasy
 Malay
Malay Malayalam
 Maltese
 Maori
Maori Marathi
 Mongolian
 Myanmar (Burmese)
 Nepali
 Norwegian
 Pashto
 Persian
 Polish
 Portuguese
 Punjabi
 Romanian
 Russian
 Samoan
 Scottish Gaelic
 Serbian
 Sesotho
 Shona
Shona Sindhi
 Sinhala
 Slovak
 Slovenian
 Somali
 Spanish
 Sundanese
 Swahili
 Swedish
 Tajik
Tajik Tamil
Tamil Telugu
 Thai
Thai Turkish
 Ukrainian
 Urdu
Urdu Uzbek
Uzbek Vietnamese
 Welsh
Welsh Xhosa
Xhosa Yiddish
 Yoruba
 Zulu
Zulu