Table of contents
show
Escort Passport 8500ci Plus Radar Detector User Guide

Important Installation Notes
Please read both sides of these instructions before starting your installation. For the easiest trouble-free installation, install the Interface first, and wire it to a12-volt switched circuit.
- Installation of this system requires some experience and expertise in automotive electronics. Car Audio specialists and many new car dealers can install this for you.
- If you choose to install it yourself without expertise in automotive electronics, please note that it can cause personal injury or damage to your vehicle.
- If your vehicle is damaged during installation, its safety systems may be compromised and could cause personal injury or property damage.
- Improper installation may also void PASSPORT’s warranty
Features

A.Front Radar/Laser Receiver
- Determine the best location for the Radar/Laser Receiver. The best location is typically under the bumper, or inside the front grill of the vehicle. For the best performance, install the Receiver horizontally, with a clear “view” of the road.
- Using the built-in mounting holes on the Receiver, or the supplied right-angle mounting bracket, mark the hole locations. Drill pilot holes in the vehicle if necessary.
- Mount the Receiver using the supplied
hardware.
B.Receiver Cable
- Connect the receiver cable to the receiver.
- Route cable through the firewall, and secure with zip-ties (included).
- Route receiver cable into the vehicle’s interior. If there is not a suitable opening, drill a 13/32″ or 7/16″ hole.
- Pull cable through firewall, and plug connector into the jack labeled “Antenna” on the Interface.
- Pull cable through the firewall and seal the hole as needed. Use silicone sealant if necessary.
C.Display Controller
- Determine the best location for the Display Controller in the vehicle’s interior.
- Remove paper backing on the backside of the display and apply to a clean dry surface.
- Route display cable and plug into jack marked “Display” on the Interface.
D.Interface
- Install Interface under the dash using supplied zip-ties. DO NOT MOUNT IN ENGINE COMPARTMENT.
- Connect black wire (–) to ground, and red-striped wire (+) to a switched 12-volt supply. Use blue 3M connector (provided) to tap into existing circuit if needed.
- Receiver and Display Controller plug into the Interface. Be sure to plug all cables into the correct jacks.
E.Concealed LED Display (Optional)
If a more discreet display is preferred the included LED can be installed:
- Drill a 1/4″ hole, and install the LED clip.
- Snap LED into clip from behind.
- Plug the modular connector into PASSPORT’s Interface marked “LED.”
Front Radar/Laser Receiver
- Miniature weather-proof Radar/Laser Receiver
- Universal mounting bracket with stainless steel hardware
- Built-in 16 foot shielded cable with water proof connector
- 12 nylon wire ties to secure cable
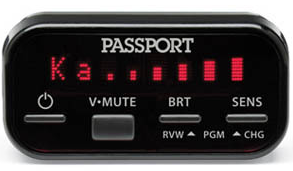
Miniature Display Controller
- Display Controller mounts easily to instrument pod, dashboard or console
- Optional hidden display included
Interface
- Central module connects to switched 12-volt power and ground
- All components plug directly in using modular connections
- 3M connector taps into existing vehicle wiring


 Afrikaans
 Albanian
 Amharic
 Arabic
 Armenian
 Azerbaijani
 Basque
 Belarusian
 Bengali
 Bosnian
 Bulgarian
 Catalan
 Cebuano
 Chichewa
 Chinese (Simplified)
 Chinese (Traditional)
 Corsican
 Croatian
 Czech
Czech Danish
 Dutch
Dutch English
 Esperanto
 Estonian
 Filipino
 Finnish
 French
 Frisian
 Galician
 Georgian
 German
 Greek
Greek Gujarati
 Haitian Creole
 Hausa
Hausa Hawaiian
 Hebrew
 Hindi
Hindi Hmong
Hmong Hungarian
 Icelandic
 Igbo
Igbo Indonesian
 Irish
Irish Italian
 Japanese
 Javanese
 Kannada
 Kazakh
 Khmer
Khmer Korean
 Kurdish (Kurmanji)
 Kyrgyz
 Lao
Lao Latin
Latin Latvian
 Lithuanian
 Luxembourgish
 Macedonian
 Malagasy
 Malay
Malay Malayalam
 Maltese
 Maori
Maori Marathi
 Mongolian
 Myanmar (Burmese)
 Nepali
 Norwegian
 Pashto
 Persian
 Polish
 Portuguese
 Punjabi
 Romanian
 Russian
 Samoan
 Scottish Gaelic
 Serbian
 Sesotho
 Shona
Shona Sindhi
 Sinhala
 Slovak
 Slovenian
 Somali
 Spanish
 Sundanese
 Swahili
 Swedish
 Tajik
Tajik Tamil
Tamil Telugu
 Thai
Thai Turkish
 Ukrainian
 Urdu
Urdu Uzbek
Uzbek Vietnamese
 Welsh
Welsh Xhosa
Xhosa Yiddish
 Yoruba
 Zulu
Zulu