Table of contents
show
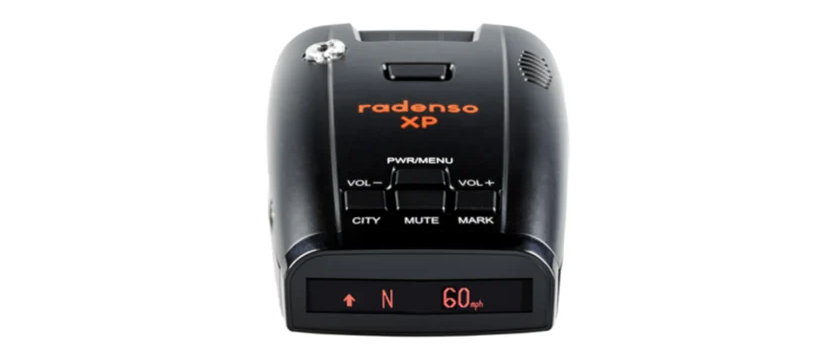
Radenso XP Radar Laser Detector User Manual
Features
- LNA equipped antenna board
- Long range on all radar bands
- RJ11 power connection
- Bright orange-red OLED display
- Selectable radar bands (X, K and Ka band)
- 10 Ka band segments selectable
- K narrow band
- Ka POP radar
- Low power K band detection
- BSM/CAS filter to eliminate falsing from newer cars
- TSR filter to eliminate falsing from Traffic Sensors
- Multiple Threat display
- Auto Mute
- Mute Mode
- Voltage display
- VG2/VG3 undetectable
- Spectre undetectable (up to 15 feet)
What’s Inside

A. Radenso SP
- Small, easily mountable radar detector
- Intuitive OLED display
B. Mute Power Adapter
- Provides power to the SP through the car’s 12V power outlet
C. Windshield Mount
- Attaches easily to the SP
- Strong suction cups attaches securely to the windshield
D. Travel Case
- The travel case fits your detector and cords for compact travel
E. USB Cord
- Mini USB cord connects your SP and computer to allows firmware updates
Additional Accessories.
Direct Wire Kit (optional)

- Allows you to hard wire your unit directly to your vehicle
- Frees up your car’s power adapter
- Compatible with the Radenso XP / S
Visor Mount (optional)

The visor mount allows you to clamp your SP to your visor rather than your windshield Compatible with the Radenso XP / SP
Installation Guide.
Quick Start Up Guide
To start using your Radenso SP radar detector, follow these easy steps:
- Slide the windshield mounting bracket into the Quick Mount slot at the front of the radar detector.
- Insert the RJ11 connector of the power cord into the power jack of the Radenso SP, located on the left side. Insert the 12V plug into the power socket of your vehicle.
- Once connected to a 12V power source, the radar detector starts up with a very brief startup sequence.
- Adjust the volume setting by pressing and holding the VOL-/CITY or VOL+/DIM button for 2 seconds.
Firmware Update
- Connect the radar detector to a Windows-based PC via mini-USB cable and use the Firmware Update Manager
program to download a new firmware to your Radenso SP. - The Firmware Update Manager program can be found on the “Support” section of the Radenso homepage at
http://radenso.com
SP User Interface

A. Power/Menu Button
- Short Press: Power on/off
- Long Press: Enters menu mode
- When in menu mode: Toggle setting option, or long press to exit menu mode
B. Vol -/City Button
- Short Press: Change the driving mode (Highway or City)
- Long Press: Decreases volume (0-9)
C. Mute button
- Short Press: Toggle mute mode on/off (Mute mode will mute all X and K band signals)
- When in menu mode: Toggle setting option
D. Vol +/Dim Button
- Short Press: Changes display brightness
- Long Press: Increases volume (0-9)
E. Release Button
Press the button and slide the windshield mount until it is locked. Press the button to unlock the mount for removal.
Settings
Brightness Mode
- Display brightness while in Smart Dark Mode can be selected as follows:
- S.D.Bright: Full brightness
- S.D.Dim: Reduced brightness
- S.D.Dimmer: Further reduced brightness
Mute Mode
- Pressing the MUTE button during an alert will temporarily mute the detected signal and will automatically unmute 20 seconds after the signal has passed, or if a new or different signal has been detected.
- Pressing the MUTE button without an alert will permanently mute the radar detector on X and K bands until manually unmuted or after a new startup cycle.
Mute Mode: Auto
- Auto Mute Mode is selectable and reduces the alert volume by 0%, 20%, 40%, 60%, or
80%. The default is 40%. - Radar bands (X, K, and Ka) and POI limit speed: current volume level stays for the first 3 seconds after the alert begins, afterwards, it’s reduced to the selected Auto Mute level. Auto Mute is not applicable to laser alerts.
- Auto Mute ends 10 seconds after the alert ends. If the same radar frequency is detected or begins within 10 seconds, the radar detector keeps Auto Mute active.
- If a different radar band is detected or begins while Auto Mute is active, Auto Mute will be disabled and will revert back to the current volume level.
Tech Specs
Detector Type
- Dual conversion super-heterodyne receiver
- Linear polarized self-contained antenna
- Scanning frequency discriminator
Operating Frequency
- X band: 10.475 – 10.575 GHz
- K band wide: 23.950 – 24.250 GHz
- K band narrow: 24.080 – 24.200 GHz
- Ka band wide: 33.400 – 36.000 GHz
Technical Parameters
- Operating temperature: -30° to +185° F
- Power requirement: 11V-16V DC 200mA Negative ground
- Dimensions: 72(W) x 116(L) x 34(H) mm 2.83(W) x 4.75(L) x 1.34(H) in
- Weight: 8.2 oz (200g)
Troubleshooting
The detector will not turn on
- Check if the power cable is connected.
- Turn on ignition.
- Check the fuse located at the tip of the plug.
The display will not turn on.
- Power cable is disconnected or switch has not been turned on
- Display is set to “Dark” or “Smart Dark” mode
The detector did not alert to approaching police vehicle.
- The officer is not operating radar equipment.
- One or more radar bands have been deactivated. Check in the menu if all radar bands used in your area are turned on.
- You may have activated a speed limit in the menu and you were traveling below the set speed limit.

