Forever SC-210 Plus WiFi Sports & Action Cameras Guide

Thank you for purchasing this digital camera. Please carefully read through this product manual before using it and keep this manual properly for future reference. Contents of the product manual are based on the updated information when compiled. The screen display and figures used in the manual are for the detailed and visual operation of the camera. Due to technical development and different production lots, they may differ from the digital camera you use.
OVERVIEW
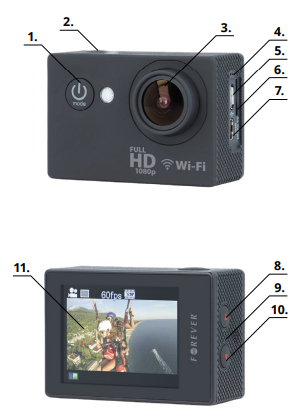
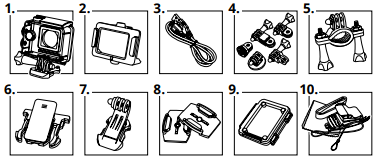
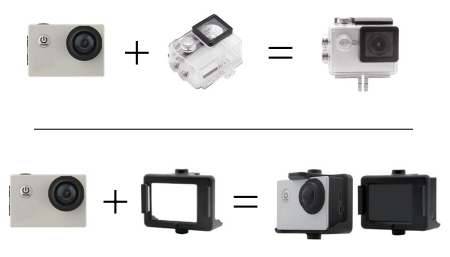
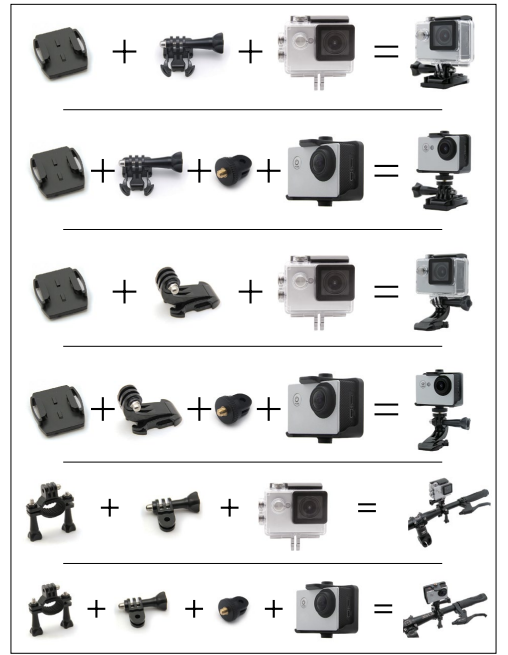
Camera description
- Power/mode button
- REC/OK button
- Camera lens
- Microphone
- micro USB port
- microSD card slot
- microHDMI port
- Up button
- Speaker
- Down button
- LCD screen
Inserting the memory card
The camera is not equipped with an internal memory. This means that before you use the camcorder you need to insert the memory card. Please format the card before using it.
Battery installing
- Open the battery cover
- Set the battery
- Close the battery cover
Battery levels

Battery charging Battery
can be charged using a USB cable (in the kit) from a USB port in a PC or other supply source of 5 V DC.
Switching on and off camera
- Press and hold the power button to turn on the camcorder.
- Press and hold the power button again to turn it off.
Changing the mode
Changing the mode between video mode/shooting mode/preview mode/options of images in batch mode /self-filming/options is done by pressing the power button.
Recording mode
Make sure that your camera is in video recording mode. This mode is symbolized by a yellow icon. To start recording aim the camera at the right target, and then press the „REC” to start recording. Alternate color change of recording icons from yellow to red indicates start recording. To stop recording, press „REC” again. Recording will also end when the batteries are depleted. The recording is automatically saved on the memory card.
Shooting mode
Make sure that your camera is in shooting mode. It is symbolized by a camera symbol. To take a picture, aim the camera at the right target, and then press the „REC” ‚to take a picture. Making pictures is signaled by a blink of the display. The photo is automatically saved on the memory card.
Mode self-timer shots
Make sure that your camera is in shooting mode with the self-timer. It is symbolized by a camera symbol with a loop on the left. To take a picture, aim the camera at the right target, and then press the „REC” ‚to take a photo after the time specified in the settings. Making pictures is signaled by a blink of the display. The photo is automatically saved on the memory card.
Preview videos and photos
Make sure that your camera is in viewing videos or viewing photos. There is an arrow symbol on a green background on the display. To play a video, press the REC button. To scroll through the content, use the arrow buttons.
Settings
Make sure that your camera is in Setup mode. The mode is symbolized by the rack icon
| Menu | Function |
| Video resolution | 1080 FHD 1920×1080 30 fps 720 P 1280×720 60 fps 720 P 1280×720 30 fps WVGA 848×480 VGA 640×480 |
| TV out | Off/On |
| OSD mode | Off/On |
| Time-lapse | Off/1s/2s/5s/10s/30s/1min |
| Capture mode | Single/3s/5s/10s/20s |
| Recording in loop | Off/3min/5min/10min |
| HDR | Off/On |
| Motion detection | Off/On |
| Sounds | Off/On |
| Date indicator | Off/On |
| Picture size | 12 M 4032×3024 10 M 3648×2736 8 M 3264×2448 5 M 2592×1944 3 M 2048×1536 2 MHD 1920×1080 VGA 640×480 1.3 M 1280×960 |
| Quality | Fine/Normal/Economy |
| Sharpness | Strong/Normal/Smooth |
| White balance | Auto/Daylight/Cloudy/Tungsten lamp light/Fluore- scent |
| Color | Colour/Black & White/Sepia |
| ISO | Auto/100/200/400 |
| Exposure | -2.0; -5/3; -4/3; -1.0; -2/3; -1/3; +0.0; +1/3; +2/3; +1.0; +4/3; +5/3; +2.0 |
| Anti-shaking | Off/On |
| Language | Language settings |
| Date/time | Date and time settings |
| Automatic off | Off/3 min/5 min/10 min |
| Sounds buttons | Off/On |
| TV mode | NTSC/PAL |
| Screensaver | Off/30 sec/1 min/3 min/5 min |
| Frequency | 50 Hz/60 Hz |
| Screen rotation | Off/On |
| Car mode | Off/On |
| WIFI name | WIFI name settings |
| WIFI password | WIFI password settings |
| License number | Settings |
| Delete | Delete current/Delete all |
| Format | Formatting a memory card |
| Factory settings | Return to factory settings |
| Version | Information about the software version |
Connection with application
- Download the „FinalCam” app on your device. The application is in the Google Play Store and Apple App Store.
- Start the camera
- Make sure that the camera is in recording mode.
- Press the „Up” button to turn on the network.
- In your device, connect to the network called „SC-210+” The full name of the network will be displayed on the screen of the camera before connecting.
- Enter the network password „12345678” – the password also will be displayed on the screen of the camera before connecting.
- Open the application on your phone.
- Click the „+” at the top of the screen to add a new camera.
- Select the camera.
To return to the normal operation of the camera (turn off Wi-Fi), press again the button „Up.
Specification
| Sensor | AR0330 |
| Chipset | Novatek 966558G |
| Viewing Angles | 170° |
Frequently asked questions
- Pops up the message „File Error” in Review.
Format memory card. - Recordings/images are blurry.
Clean the lens or underwater housing. - Message „No Card’’.
Check that the card is inserted in micro SD.
Safety
- Please read and retain these instructions.
- Do not remove the cover of the device. There are no components that can be repaired by the user. All repairs should be done by a service technician.
- Protect your device without waterproof housing from contact with water or moisture to avoid electrical shock.
- The battery should not be exposed to direct sunlight, fire, or other heat source.
- Use only original parts/accessories supplied by the manufacturer.
TelForceOne S.A. declares that the product is compatible with the requirements and other relevant provisions of the 1999/5/EC directive. You can download the declaration of the product on the website www.telforceone.pl.


 Afrikaans
 Albanian
 Amharic
 Arabic
 Armenian
 Azerbaijani
 Basque
 Belarusian
 Bengali
 Bosnian
 Bulgarian
 Catalan
 Cebuano
 Chichewa
 Chinese (Simplified)
 Chinese (Traditional)
 Corsican
 Croatian
 Czech
Czech Danish
 Dutch
Dutch English
 Esperanto
 Estonian
 Filipino
 Finnish
 French
 Frisian
 Galician
 Georgian
 German
 Greek
Greek Gujarati
 Haitian Creole
 Hausa
Hausa Hawaiian
 Hebrew
 Hindi
Hindi Hmong
Hmong Hungarian
 Icelandic
 Igbo
Igbo Indonesian
 Irish
Irish Italian
 Japanese
 Javanese
 Kannada
 Kazakh
 Khmer
Khmer Korean
 Kurdish (Kurmanji)
 Kyrgyz
 Lao
Lao Latin
Latin Latvian
 Lithuanian
 Luxembourgish
 Macedonian
 Malagasy
 Malay
Malay Malayalam
 Maltese
 Maori
Maori Marathi
 Mongolian
 Myanmar (Burmese)
 Nepali
 Norwegian
 Pashto
 Persian
 Polish
 Portuguese
 Punjabi
 Romanian
 Russian
 Samoan
 Scottish Gaelic
 Serbian
 Sesotho
 Shona
Shona Sindhi
 Sinhala
 Slovak
 Slovenian
 Somali
 Spanish
 Sundanese
 Swahili
 Swedish
 Tajik
Tajik Tamil
Tamil Telugu
 Thai
Thai Turkish
 Ukrainian
 Urdu
Urdu Uzbek
Uzbek Vietnamese
 Welsh
Welsh Xhosa
Xhosa Yiddish
 Yoruba
 Zulu
Zulu