
Solo Stove Tower Patio Heater User Manual

IMPORTANT SAFETY WARNINGS
WARNING:
Failure to comply with all the manual provisions and usage guidelines could result in property damage, serious bodily injury, death, or fire. Solo Stove does not accept any responsibility, legal or otherwise, for the incidental or consequential damage to property or persons resulting from the misuse of this product. Solo Stove shall in no event be liable for any special, indirect, consequential, or other damages of any nature whatsoever in excess of the original purchase price.
This product can expose you to chemicals including carbon monoxide which is known to the State of California to cause cancer, birth defects, and/or other reproductive harm. For more information go to www.p65warnings.ca.gov
FOR OUTDOOR USE ONLY!
Carbon Monoxide is a colorless, odorless gas that can kill. It is released during the combustion process of organic fuels and normally dissipates in open-air, outdoor environments. Do NOT use the Patio Heater inside a structure, tent, vehicle, under covered patios, awnings, near open windows, in close proximity to indoor areas, or in tightly fenced spaces.
- Know the symptoms of Carbon Monoxide Poisoning: headache, dizziness, weakness, nausea, vomiting, sleepiness, and confusion. Remove any affected individuals immediately to fresh air and call 911.
- Alcohol and drugs can increase the effects of Carbon Monoxide poisoning and should be avoided when using the Patio Heater.
- Infants, Young Children, Pregnant Women, the Elderly, Smokers, Immunocompromised Individuals, and people with blood or circulatory system problems are especially vulnerable to Carbon Monoxide poisoning. Extreme care should be taken when using the Patio Heater.
SURFACES WILL BE EXTREMELY HOT!
Use caution when operating the Patio Heater. Outer surfaces will be HOT and should NOT be touched.
- DO NOT LEAVE THE PATIO HEATER UNATTENDED.
- KEEP CHILDREN AND PETS AWAY FROM THE PATIO HEATER AT ALL TIMES.
- Use heat-resistant gloves whenever working with the Patio Heater.
FIRE HAZARD!
DISPOSE OF ASHES PROPERLY! Ashes should be placed into a metal container with a sealed metal lid. Ashes and embers can maintain heat and combustion even after several hours. Handle with care.
- Do NOT dump ashes within 25 feet of combustible materials, into plastic garbage bags or into any combustible containers.
- Do NOT store ashes in a vehicle, tent, home, garage, or any other enclosed area
- Do NOT dump or move ashes in windy conditions
- Do NOT attempt to remove the Ash Pan while in use or until the ashes have cooled completely.
IMPORTANT
It Is the responsibility of the Owner to ensure that all people in the vicinity of the Patio Heater are aware of the warnings and precautions while the unit is in use. Use extreme caution and common sense when operating or near the Patio Heater. Failure to do so could result in severe bodily injury or property damage.
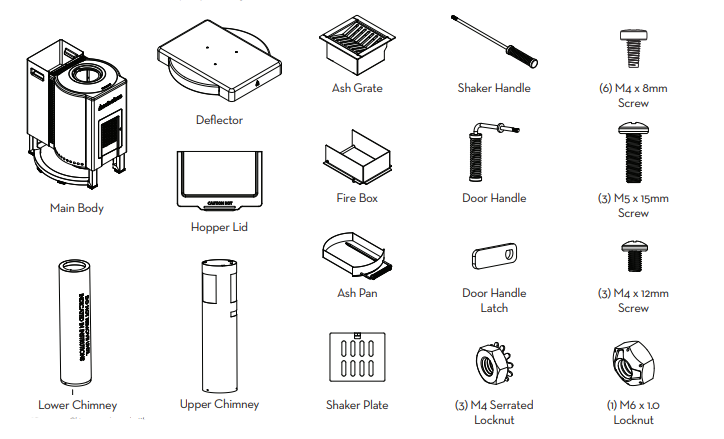
UNPACKING
Remove all items from the box, carefully unwrap, and inspect for damage.
ASSEMBLY
Tools required (not included).

Lid Assembly

- Attach Hopper Lid to Hopper with
(3) M4 x 12mm Screws and
(3) M4 Serrated Locknuts.
Handle Assembly

- Insert the Door Handle through the round opening on the front door. Ensure the handle is turned to the downward position.
- Install the Door Handle Latch onto the Door Handle according to the drawing, followed by the M6 x 1.0 Locknut. Tighten with a 10mm Wrench until snug. Do not over-tighten.
Lower Chimney Assembly

- Remove the bezel from the Base.
- a-b. Install the Lower Chimney onto the base (making sure to keep the protective cover on) with the notch cutout towards the rear. Fasten with (3) M4 x 8mm screws.
- a-b. Replace the bezel, sliding it over the protective chimney cover until it nests into place on the top of the Base. NOTE: The bezel should be evenly seated around the top of the Base.
- Remove the protective cover from the Lower Chimney.
IMPORTANT: The protective cover must be removed from the Lower Chimney before operation.

Deflector Assembly

Install the Deflector onto the Upper Chimney. Fasten with (3) M5 x 15mm screws.
Upper Chimney Assembly

Install the Deflector and the Upper Chimney onto the Lower Chimney. Fasten with (3) M4 x 8mm screws.
Ash Grate and Shaker Handle Assembly

- Insert the Shaker Plate into the bottom of the Ash Grate with the nut facing out.
- Insert the Ash Grate assembly into the Base as shown.
- Insert the Shaker Handle into the opening below the door. Align and thread the Shaker Handle into the Shaker Plate.
Fire Box Assembly

Install the Fire Box. Ensure alignment pins on the bottom of the firebox are nested completely into corresponding holes in the bottom of the Patio Heater.
Ash Pan Assembly
 IMPORTANT: FIRST BURN
 IMPORTANT: FIRST BURN
- Review all usage and safety guidelines prior to operation.
- The patio heater requires a first burn to set the coating and burn off any residual manufacturing residue. Fill the Hopper completely and allow it to burn through all pellets and cool.
- During this first burn, expect to see smoke coming from the coating on the outside of the Patio Heater. Some odors may be present during this time. Smoke and odors may be present for up to an hour. This is normal.
- The Patio Heater color will change from black to dark grey. This will continue to change as the Patio Heater ages, but will be most noticeable at first burn. The amount of color change will be dependent on heat, so the outside of the oven will form a unique pattern that will slowly change over time. This is normal.
- The stainless steel components will patina during the life of the product also. This will be noticeable after the first burn where the stainless changes from a consistent silver color to a bronze hue. This is normal oxidation of the stainless and will continue to darken over time.
OPERATION
- Review all usage and safety guidelines prior to operation.
- Inspect the pellet chute from inside the hopper. Gently reach into the chute and confirm the trap door moves freely.
- From the locked-up position, pull the pellet shutoff handle slightly away from the rear wall of the hopper to release it from the catch and slide down until the shutoff plate rests on the base of the hopper. Push the shutoff handle in the hopper all the way down.
- Open the front door of the patio heater.
- Remove the firebox by lifting the front up and pulling towards the door. Brush ash and debris from the previous burn onto the ash grate.
- Gently move the shaker handle back and forth to knock ash and debris from the top of the grate into the ash pan below
- Inspect the inside of the patio heater for any corrosion or loose parts. Ensure the ash grate is firmly seated into the bottom of the patio heater.
- Reinstall the firebox. Ensure alignment pins on the bottom of the firebox are nested completely into corresponding holes in the bottom of the patio heater
- Remove the ash pan and empty it per local ordinances. A metal garbage can with a lid or burying are suggested methods for properly disposing of ash. Do NOT dump in a normal garbage can or pour onto the ground.
- Inspect where the ash pan rests and ensure it is clean.
- Reinstall the ash pan and make sure it is fully installed.
- Inspect the patio heater for any loose connections or damage. Do not use the patio heater if any of these are present.
- Fill the hopper with pellets. A full hopper will hold approximately 25 lbs of pellets. The patio heater burns roughly 8-10lbs per hour
- Once pellets are added, open the shutoff handle in the hopper and allow pellets to flow into the burn chamber. Lock the shutoff handle in the up position by pulling it out slightly so that it can snap over the capture plate.
- Shut the hopper lid
- Add approximately 1 tbsp of fire starter gel pellet starter to the top of the pellets and light. Once the gel is started, close the front door and allow the pellets to fully ignite. This may take 5-10 minutes. During this time, more smoke than normal will be seen from the chimney.
- IMPORTANT: Note that the front door should remain closed while burning. When the door is open, the patio heater will lose the draft that is created internally, and the pellets will not burn properly or go out.
- To stop the flow of pellets, use gloves to lift the hopper lid and push the shutoff handle all the way down. The fire will continue to burn until the pellets in the firebox are burned. (10-15 minutes)
STORAGE/MAINTENANCE
- Allow the heater to completely cool before attempting to cover or move the patio heater.
- The heater can be moved by gently leaning back so that it rests on the rear wheels and is pushed forward to move. The unit should not be rolled on uneven ground or sloped surfaces as personal injury or damage to the patio heater may result
- When storing, the unit should be covered to protect it from the elements. Use Solo Stove Patio Heater Cover for best results
- Protect the hopper and interior burn chamber from rain and snow. Wood pellets expand when wet and will jamb themselves into small openings. This may damage or prevent the patio heater from working properly.
- The base of the unit should be kept out of standing water, snow, or ice.
- Periodic cleaning of the burn chamber is needed to ensure no ash buildup occurs in the grate openings, around the edges, or inside the chute. A stiff bristle brush can be used to gently clean the inside metal surfaces. A shop vac or ash vac can be used to ensure the patio heater stays clean in between uses.
- Soot buildup on glass is normal during operation and will burn off and reappear as smoke conditions inside the heater change during use. The glass is high-temperature ceramic glass which is designed to handle the high heat conditions inside the patio heater but can be scratched if care is not taken when cleaning. Do NOT use a brush on the glass or wipe off while the glass is dry. Soapy water is best used along with a clean water rinse.
WARRANTY
We warranty each and every Solo Stove product to be free of manufacturing defects, and we will replace it with a new product, at our option, any genuine Solo Stove product sold by an authorized retailer that is deemed defective. Solo Stove does not warranty its products against normal wear or misuse. If your Solo Stove product was damaged due to misuse, our customer service team can analyze the damage and may be able to suggest options for the customer to remedy.
If your Solo Stove product is unable to be repaired after misuse, we will extend a one-time courtesy offer, allowing you the option to purchase a new Solo Stove product for 50% off of our MSRP price on a new identical Solo Stove product listed on the website, excluding web specials. Warranty claims are not applicable to countries outside the U.S. and Canada. All international orders are final.


