
Victrola VC-150 Bluetooth Clock Radio User Manual

IMPORTANT SAFETY INSTRUCTIONS
- Read these instructions – All the safety and operating instructions should be read before this product is operated.
- Keep these instructions –The safety and operating instructions should be retained for future reference.
- Heed all warnings – All warnings on the appliance and in the operating instructions should be adhered to.
- Follow all instructions – All operating and use instructions should be followed.
- Do not use this apparatus near water – The appliance should not be used near water or moisture – for example, in a wet basement or near a swimming pool, and the like.
- Clean only with dry cloth.
- Do not block any ventilation openings. Install in accordance with the manufacturer’s instructions.
- Do not install near any heat sources such as radiations, heat registers, stoves, or other apparatus (including amplifiers) that produce heat.
- Protect the power cord from being walked on or pinched particularly at the plugs, convenience receptacles, and at the point where they exit from the apparatus.
- Only use attachments/accessories specified by the manufacturer.
- Use only with the cart, stand, tripod, bracket, or table specified by the manufacturer, or sold with the apparatus. When a cart or rack is used, use caution when moving the cart/apparatus combination to avoid injury from tip-over.
- Unplug the apparatus during lightning storms or when unused for long periods of time.
- Refer all servicing to qualified personnel. Servicing is required when the apparatus has been damaged in any way, such as power supply cord or plug is damaged, liquid has been spilled or objects have fallen into the apparatus has been exposed to rain or moisture, does not operate normally, or has been dropped.
- This lightning flash with arrowhead symbol within an equilateral triangle is intended to alert the user to the presence of non-insulated “dangerous voltage” within the product’s enclosure that may be of sufficient magnitude to constitute a risk of electric shock.
- Warning: To reduce the risk of electric shock, do not remove cover (or back) as there are no user-serviceable parts inside. Refer servicing to qualified personnel.
- The exclamation point within and equilateral triangle is intended to alert the user to the presence of important operating and maintenance instructions in the literature accompanying the appliance.
- This equipment is a Class Ⅱ or double insulated electrical appliance. It has been designed I in such a way that it does not require a safety connection to electrical earth.
- The mains plug is used as disconnect device, the disconnect device shall remain readily operable.
- WARNING
To reduce the risk of fire or electric shock, do not expose this apparatus to rain or moisture. The apparatus shall not be exposed to dripping or splashing and that no objects filled with liquids, such as vases, shall not be placed on apparatus. - The use of the equipment in moderate climate.
- The ventilation should not be impeded by covering the ventilation openings with items such as, newspapers, tablecloths, curtains, etc.
- No naked flame sources, such as lighted candles, should be placed on the apparatus.
- The symbol with Indication AC voltage.
- The symbol with indicate DC voltage.
- The batteries (battery pack or batteries installed) shall not be exposed to excessive heat such as sunshine, fire or the like.
- Attention should be drawn to the environmental aspects of battery disposal.
- CAUTION: These servicing instructions are for use by qualified service personnel only. To reduce the risk of electric shock, do not perform any servicing other than that contained in the operating instructions unless you are qualified to do so.
- Correct Disposal of this product. This marking indicates that this product should not be disposed with other household wastes throughout the EU.
- To prevent possible harm to the environment or human health from uncontrolled waste disposal, recycle it responsibly to promote the sustainable reuse of material resources.
- To return your used device, please use the return and collection systems or contact the retailer where the product was purchased. They can take this product for environmental safe recycling.
ACCESSORIES INCLUDED:
- INSTRUCTION MANUAL
- WARRANTY
- DETACHABLE POWER CORD (2 PC)
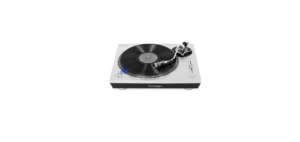
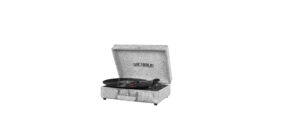
PRODUCT OVERVIEW
Front View

- OFF/VOLUME: Rotate clockwise to turn the unit ON. Rotate counter-clockwise to turn OFF. When unit is ON, rotate to adjust the volume.
- ANALOG RADIO
- RADIO TUNER KNOB: In FM mode, turn knob to tune to desired station.
- CLOCK DISPLAY
Top View

- SNOOZE/DIMMER:
SNOOZE: When the alarm sounds, press to snooze alarm.
DIMMER: Touch lightly to adjust the brightness of the LED clock display.
Rear View

- CLOCK KNOB: Push in and rotate dial to set the clock time.
- USB CHARGING PORT: In OFF or Bluetooth mode, it will charge an external device.
- FM-BT: Slide to select function. (FM Radio, Bluetooth)
- ON/OFF: Slide to turn on or off the alarm time.
- ALARM: Rotate to set the alarm time.
- FM WIRE ANTENNA While tuned to a station in FM mode, extend the wire and reposition to adjust for best reception.
- BATTERY COMPARTMENT
- AC SOCKET: Connect the AC power cord into AC connection socket and then insert the AC plug into a wall outlet. It is strongly recommended that this product be operated only from the type of power source indicated on the marking label.
- FEET
SETUP / BASIC OPERATION
BATTERY OPERATION
- Remove the battery compartment door at the back of unit.
- Insert two (2) AAA batteries (not included) into the battery compartment, making sure that the batteries are installed in the designated numerical order and that the proper polarities (+ and -) are maintained.
Note: The batteries are used for memory backup function only.
Battery Precautions
- Be sure to insert the batteries with correct positive “+” and negative “-” orientation.
- ALWAYS use batteries of the same type. Never mix different types of batteries together.
- When using rechargeable batteries, refer to the precautions on their labels.
- Do not heat or disassemble batteries, and NEVER dispose of old batteries by throwing them in a fire.
- Do not dispose device into standard garbage disposal sites. Dispose of device at available Battery Recycling Sites after fully discharging battery. Not doing so may violate disposal laws and regulations. Please refer to local regulations for proper battery disposal.
Setup
- Remove any packaging materials from the unit.
- Connect the AC power cord into AC connection socket and then insert the AC plug into a wall outlet.
Note:
- It is strongly recommended that this product should be operated only from the type of power source indicated on the marking label.
- To prevent interference, avoid bundling audio signal cables together with the AC power cord.
Standby
The main unit will switch to economic standby mode when the speaker is idle for approximately 15 minutes, except for Radio mode. Once the unit turns into standby mode, rotate the OFF/VOLUME knob counter-clockwise to turn off the unit and then rotate the OFF/VOLUME knob clockwise to turn on the unit again.
Basic Operation
- Rotate the OFF/VOLUME knob clockwise to turn on the unit.
- Select the source by sliding the FM-BT button.
- Rotate the VOLUME knob to adjust to the desired sound level.
CONDENSATION WARNING:
When the unit is moved from a cold or warm place, or is used following a sudden temperature change, there is the danger that water vapor in the air may condense on the unit, preventing proper operation. In such cases, leave the unit for 1-2 hours after plugging it into an AC outlet to allow it to stabilize at the temperature of its surroundings.
LISTENING TO FM RADIO
- Slide the FM-BT switch on FM function.
- Tune to the desired station by using the Radio Tuner Knob.
- Rotate the OFF/VOLUME knob to adjust your desired volume.
LISTENING TO AN EXTERNAL AUDIO DEVICE (BT MODE)
In BT (Bluetooth) mode, this unit can play music from an external device with the Bluetooth feature.
GETTING CONNECTED USING BLUETOOTH
- Rotate the OFF/VOLUME knob clockwise to turn on the unit.
- Slide the FM-BT switch to the BT function.
- On your external device, turn the Bluetooth function ON.
NOTE: The effective distance between your external device and this apparatus is 10 meters (33ft).
- Wait a moment for “VC-150” to appear on the devices list. Press “VC-150” to connect to the unit. If asked for a password. Use “0000”, then press OK on your external device.
- Skip to the previous/next track from your external device.
- You can adjust the sound level by rotating OFF/VOLUME knob or control on your external device.
SETTING THE TIME
- Push in and rotate the CLOCK knob counter-clockwise to adjust the clock time. (The minute pointer will vary with the adjustment of the hour pointer).
- Once you have set the time successfully, release the knob.
NOTE: Once the power cord is connected or batteries are installed, the clock will work.
SETTING THE ALARM
- Slide the ON/OFF switch to ON to activate the alarm.
- Rotate the ALARM knob to set the alarm time.
- When the alarm sounds, slide the alarm switch to OFF to turn off the alarm. alarm switch to OFF to turn off the alarm.
SNOOZE FEATURE
- To snooze the alarm, touch the SNOOZE/DIMMER button. The alarm will snooze for approximately five (5) minutes.
- To cancel the snooze feature and alarm sound, slide the ON/OFF alarm switch to OFF.
CHARGING AN EXTERNAL DEVICE
- Connect the AC plug to a wall outlet.
- Plug a USB cable (not included) into the USB port of the speaker. Plug the other end of the USB cable into a Smartphone or an external device.
- The unit will charge the device automatically.
NOTE: Charging function only works in Bluetooth mode or when the unit is OFF.
SPECIFICATIONS
- Hereby, Innovative Technology Electronics, LLC, declares that this Bluetooth Clock Radio is in compliance with the essential requirements and other relevant provisions of Directive 2014/53/EU.
- The full test of the EU declaration of conformity is available at the following internet address: www.victrola.com/eudoc
GENERAL
Power Requirements AC 230 V~ 50 Hz
Battery for Clock 2 AAA (LR03) Batteries
Power Consumption 11W
Dimensions (W x H x D) 13 in x 5.51 in x 5.98 in (approx.)
330 x 140 x 152mm (approx.)
Weight 4.17 lbs (approx.)
1.89 kg. (approx.)
AMPLIFIER
Output Power 5W
Frequency Response 60 to 20, 000 Hz
SPEAKER SYSTEM
Type 1-way
Impedance 6 ohms
Input Power Max. 10W
FM RADIO
Range 88 to 108 MHz
BLUETOOTH
Bluetooth Version Bluetooth V2.1+EDR
Bluetooth Profiles A2DP, AVRCP
Bluetooth Frequency range 2.402GHz-2.480GHz
Operating Distance 33 feet / 10 meters
USB
USB port for charging 5V 1A
TROUBLESHOOTING GUIDE
Please note: As a result of continual improvements, the design and specifications of this product are subject to change without notice.
This product is manufactured and sold by Innovative Technology Electronics LLC. Victrola and the Victrola logo are trademarks of Technicolor or its affiliates and are used under license by Innovative Technology Electronics LLC. Any other product, service, company, trade or product name and logo referenced herein are neither endorsed nor sponsored by Technicolor or its affiliates.
Symptom Possible Cause Solution
- Unit will not power on.
- Unit is unplugged.
- Connect the unit to the AC power supply.
- No sound output from speakers.
- The volume level is set too low.
- The input selector does not match the playback source.
- Adjust the volume.
- Select the correct input source.
- Noise/Distortion in sound output.
- The unit is too close to a TV set or another interfering device.
- Turn off the TV or other appliance, and relocate the unit.
GENERAL
- Unit fails to respond.
- It might result from external factors such as ESD (Electro-static discharge).
- Disconnect the power cord and external audio device. Re-plug the power cord after one minute.
- Cannot listen to any station, or signal appears weak.
- The station is not tuned-in properly.
- A TV set is being used nearby and is interfering with the radio reception.
- Properly tune-in the desired station.
- Turn-off the interfering TV set.
FM RADIO
- The sound is distorted.
- The antenna is not oriented properly.
- Re-orient the antenna until reception improves.
- No sound.
- The unit is not switched to Bluetooth mode.
- Your device’s and/or the unit’s volume is not turn up.
- Your device is too far from the unit or there’re some obstacle between your device and the unit.
- Ensure the unit is switched to BT mode.
- Move your Bluetooth device closer to unit
- Turn up the volume on your portable device and/or the unit.
- Turn OFF your Bluetooth device and unit. Then power them both back ON.
- Sound has a lot of static.
- Your device is too far away. • Bring your device closer to the turntable.
BLUETOOTH
- Unable to pair with a Bluetooth device.
- Your device doesn’t have Bluetooth connectivity.
- The Bluetooth pairing is not successful.
- Confirm that your device is Bluetooth compatible.
- Re-pair the unit and device again.
REFRENCE LINK

 Afrikaans
 Albanian
 Amharic
 Arabic
 Armenian
 Azerbaijani
 Basque
 Belarusian
 Bengali
 Bosnian
 Bulgarian
 Catalan
 Cebuano
 Chichewa
 Chinese (Simplified)
 Chinese (Traditional)
 Corsican
 Croatian
 Czech
Czech Danish
 Dutch
Dutch English
 Esperanto
 Estonian
 Filipino
 Finnish
 French
 Frisian
 Galician
 Georgian
 German
 Greek
Greek Gujarati
 Haitian Creole
 Hausa
Hausa Hawaiian
 Hebrew
 Hindi
Hindi Hmong
Hmong Hungarian
 Icelandic
 Igbo
Igbo Indonesian
 Irish
Irish Italian
 Japanese
 Javanese
 Kannada
 Kazakh
 Khmer
Khmer Korean
 Kurdish (Kurmanji)
 Kyrgyz
 Lao
Lao Latin
Latin Latvian
 Lithuanian
 Luxembourgish
 Macedonian
 Malagasy
 Malay
Malay Malayalam
 Maltese
 Maori
Maori Marathi
 Mongolian
 Myanmar (Burmese)
 Nepali
 Norwegian
 Pashto
 Persian
 Polish
 Portuguese
 Punjabi
 Romanian
 Russian
 Samoan
 Scottish Gaelic
 Serbian
 Sesotho
 Shona
Shona Sindhi
 Sinhala
 Slovak
 Slovenian
 Somali
 Spanish
 Sundanese
 Swahili
 Swedish
 Tajik
Tajik Tamil
Tamil Telugu
 Thai
Thai Turkish
 Ukrainian
 Urdu
Urdu Uzbek
Uzbek Vietnamese
 Welsh
Welsh Xhosa
Xhosa Yiddish
 Yoruba
 Zulu
Zulu