
Orion SkyScanner Reflector Telescopes Manual
Congratulations on your purchase of the Orion SkyScanner BL Dobsonian Reflector telescope. Your new Skyscanner BL Dobsonian Reflector Telescope is designed for easy yet eye-opening exploration of the heavens. If you have never owned a telescope before, we would like to welcome you to amateur astronomy. Take some time to familiarize yourself with the night sky. Learn to recognize the patterns of stars in the major constellations. With a little practice, a little patience, and a reasonably dark sky away from city lights, you’ll find your telescope to be a never-ending source of wonder, exploration, and relaxation.
These instructions will help you set up and use your Skyscanner BL telescope. Please read them thoroughly before getting started. Please save all original packaging. This will help protect your Skyscanner BL in the unlikely event to need to return it. The list of Included Items and the Assembly instructions are provided separately for the SkyScanner BL 102 and the SkyScanner BL 135. Please refer to the relevant sections for your particular telescope.
Skyscanner BL 10

Included Items
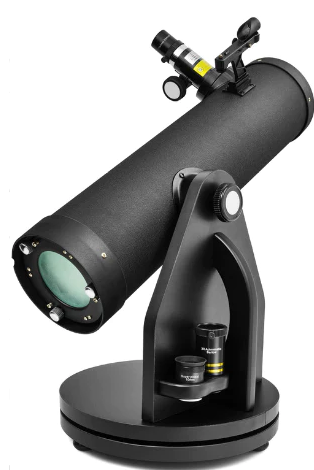
Unpack and identify all included items, using the list below and Figure 1 for reference.
- Skyscanner BL 102mm optical tube
- Red dot finder scope
- 25mm Kellner eyepiece
- 10mm Plossl eyepiece
- 3x Barlow lens
- MoonMap 260
- Bottom ground plate (with feet and azimuth axis bolt pre-installed)
- Top ground plate
- Side panel
- Side brace
- Eyepiece rack
- Assembly screw (x7)
- Tension knob (x2)
- Spring washer (x2)
- Flat washer (x2)
- Screwdriver (with interchangeable flat and Philips bit)
- Dust cap
Warning:
Never look directly at the Sun through your telescope—even for an instant—without a professionally made solar filter that completely covers the front of the instrument, or permanent eye damage could result. Young children should use this telescope only with adult supervision.

Assembly of the Skyscanner BL 102mm
- Attach the side brace to the side panel with two assembly screws
- Attach the eyepiece rack to the side panel with two assembly screws
- Attach the side panel assembly to the top side of the top ground plate with three assembly screws
- Place the top portion of the base onto a bottom ground plate, centering the hole in a top ground plate over the pre-installed center bolt in the bottom ground plate
- Place a flat washer followed by a spring washer onto the center bolt. Make sure the spring washer is oriented as shown in
- Now thread a tension knob onto the center bolt (do not over-tighten).
- Remove the tension knob and sleeve from the altitude axis bolt on the side hub of the optical tube
- Install the optical tube on the side panel by inserting the bolt of the optical tube’s altitude hub through the hole in the side panel, as shown in. Make sure the plastic disc is between the hub and the side panel.
- Now place a flat washer followed by a spring washer onto the exposed end of the bolt, the thread on a tension knob (do not overtighten).
- Now install the red dot finder scope by sliding the bracket into the finder base on the optical tube as shown.
- Finally, insert the 25mm eyepiece into the focuser drawtube collar and secure it with the thumbscrew With your telescope now fully assembled, you can skip to the section titled “Getting Started”.
Skyscanner BL 135
Included Items
Unpack and identify all included items, using the list below

With the top portion of the base installed on the bottom ground plate, place a flat washer and then a spring washer onto the center bolt as shown, then thread on a tension knob.
- Skyscanner BL 135mm optical tube
- Red dot finder scope
- 25mm Kellner eyepiece
- 10mm Plossl eyepiece
- 3x Barlow lens
- MoonMap 260
- Bottom ground plate (with feet and azimuth axis bolt pre-installed)
- Top ground plate
- Side panel (x2)
- Side brace (x2)
- Front panel
- Bearing cylinders (x4)
- Eyepiece rack
- Assembly screw (x18)
- Azimuth tension knob
- Spring washer
- Flat washer
- Screwdriver (with interchangeable flat and Philips bit)
- Dust cap

Assembly of the Skyscanner BL 135mm
- Attach a side brace to the outside surface of a side panel with two assembly screws (Figure 12). Do this for both side panels.
- Attach the front panel to the two side panels as shown in Figure 13.
- Now bolt the top ground plate onto the panel assembly using 8 assembly screws, as shown in Figure 14.
- Place the top portion of the base onto a bottom ground plate, centering the hole in a top ground plate over the pre-installed center bolt in the bottom ground plate (Figure 15). Then place the flat washer followed by the spring washer over the center bolt. Then thread on the tension knob (16).
- Remove the nut and washer from each of the threaded ends of the carry handle. Then insert the handle into the two holes from the outside of the front panel. Place a washer on each exposed threaded end of the handle, followed by a nut. Tighten the nuts with a small adjustable wrench or pair of pliers ( 17).
- Attach the eyepiece rack to the front panel with two assembly screws (Figure 17).
- Install two altitude-bearing cylinders on the inside surface of each side panel using assembly screws (Figure 18). The screws should be inserted from the outside of the panel. .
Getting Started
The SkyScanner BL telescopes were designed specifically for visual observation of astronomical objects in the night sky. Like all Newtonian reflector telescopes, they are not suited for daytime terrestrial usage because the image in the eyepiece is rotated or upside-down. One of the great assets of Skyscanner BL telescopes is their compact size and portability. For the 102mm model especially, due to its overall short height, you will find that viewing while sitting or kneeling next to the telescope is the most comfortable.
Altitude and Azimuth (Aiming the Telescope)
The SkyScanner BL’s altazimuth base permits motion along two axes: altitude (up/down) and azimuth (left/right) (Figure 21). Simply grasp the front of the optical tube and move the telescope left or right so that the base rotates. Move the optical tube up or down in the same manner. Both motions can be made simultaneously and in a continuous manner for easy aiming. This way you can point to any position in the night sky, from horizon to horizon.

However, if you apply too much tension the telescope will be difficult to move smoothly and in small increments needed to center an object in the eyepiece for viewing.
Focusing the Telescope
Both Skyscanner BL telescopes come equipped with a rack and pinion focuser. The SkyScanner BL 102mm has a 1.25″ focuser, which accepts only eyepieces with 1.25″-diameter barrels. The SkyScanner BL 135mm model comes with a 2″ focuser that has a 1.25″ adapter installed in it. This focuser can accept eyepieces with either 2″-diameter barrels or 1.25″ barrels. To use an optional 2″ eyepiece in the Skyscanner BL 135mm, you must first remove the 1.25″ adapter from the focuser (Figure 22). To do so, just loosen the thumbscrew until it is near all the way out, then the adapter can be removed. Place the 2″ eyepiece’s barrel into the drawtube collar and tighten it with the thumbscrew.

Aligning and Using the Red Dot Finder Scope
The included red dot finder scope (Figure 9) makes pointing your telescope almost as easy as pointing your finger. It permits easy object targeting prior to observation in the higher-power main telescope. It superimposes a red dot generated by an internal LED light on the sky, showing right where your telescope is pointed (Figure 23). Before you can use the red dot finder scope, you must remove the small tab sticking out from the battery compartment. Doing so will allow the pre-installed 3V CR-2032 button cell battery to make contact with the finder scope’s electronic circuitry to power the finder’s red LED illuminator. The tab can then be discarded. To use the red dot finder scope properly, it must be aligned with the main telescope. This is easiest to do during daylight hours, before observing at night. Follow this procedure:
- First, remove the dust cover from the front of the telescope.
- With the 25mm eyepiece installed in the focuser, point the telescope at a well-defined land target (e.g., the top of a telephone pole) that’s at least a quarter mile away.
- Center the target in the eyepiece.


- Turn on the red dot finder scope by sliding the power switch to ON (refer to Figure 9B). The power switch actually has two Illuminati that provides dim illumination while pushing the switch all the way to the right provides brighter illumination. Typically the dimmer setting is used under dark skies and the brighter setting is used under light-polluted skies or in daylight. Position your eye at a comfortable distance from the rear of the unit. Look through the rear of the finder scope with both eyes open to see the illuminated red dot. The target object should appear in the field of view somewhere near the red dot.


Using your Telescope
Choosing an Observing Site
When selecting a location for observation, get as far away as possible from direct artificial light such as street lights, porch lights, and automobile headlights. The glare from these lights will greatly impair your dark-adapted night vision. Avoid viewing over rooftops and chimneys, as they often have warm air currents rising from them. Similarly, avoid observing from indoors through an open (or closed) window, because of the temperature difference.

between the indoor and outdoor air will cause image blurring and distortion. If at all possible, escape the light-polluted city sky and head for darker country skies. You’ll be amazed at how many more stars and deep-sky objects are visible in a dark sky!


Cooling the Telescope
All optical instruments need time to reach “thermal equilibrium.” The bigger the instrument and the larger the temperature change, the more time is needed. Allow at least 20 minutes for your telescope to acclimate to the temperature outdoors before you start observing it.


Let Your Eyes Dark-Adapt
Don’t expect to go from a lighted house into the darkness of the outdoors at night and immediately see faint nebulas, galaxies, and star clusters—or even very many stars, for that matter. Your eyes take about 30 minutes to reach perhaps 80% of their full dark-adapted sensitivity. As your eyes become dark-adapted, more stars will glimmer into view and you’ll be able to see fainter details in objects you view in your telescope. To see what you’re doing in the darkness, use a red-filtered flashlight rather than a white light. Red light does not spoil your eyes’ dark adaptation like white light does. A flashlight with a red LED light is ideal. Beware, too, that nearby porch, streetlights, and car headlights will ruin your night vision.
“Seeing” and Transparency
Atmospheric conditions vary significantly from night to night. “Seeing” refers to the steadiness of the Earth’s atmosphere at a given time. In conditions of poor seeing, atmospheric turbulence causes objects viewed through the telescope to “boil.” If you look up at the sky and the stars are twinkling noticeably, the seeing is poor and you will be limited to viewing at lower magnifications. At higher magnifications, images will not focus clearly. Fine details on the planets and Moon will likely not be visible. In conditions of good seeing, star twinkling is minimal and images appear steady in the eyepiece. Seeing is the best overhead, worst at the horizon. Also, seeing generally gets better after midnight,
Tracking Celestial Objects
The Earth is constantly rotating about its polar axis, completing one full rotation every 24 hours; this is what defines a “day”. We do not feel the Earth rotating, but we see it at night from the apparent movement of stars from east to west. When you observe any astronomical object, you are watching a moving target. This means the telescope’s position must be continuously adjusted over time to keep an object in the field of view. This is easy to do with the Skyscanner BL because of its smooth motions on both axes.
As the object moves off towards the edge of the field of view, just lightly nudge or tug the telescope to re-center it. Objects appear to move across the field of view faster at higher magnifications. This is because the field of view becomes narrower.
Magnification Limits
Every telescope has a useful magnification limit of about 2x per millimeter of aperture. This comes to 204x for the SkyScanner BL 102mm, and 270x for the SkyScanner BL 135mm. Some telescope manufacturers will use misleading claims of excess magnification, such as “See distant galaxies at 640X!” While such magnifications are technically possible, the actual image at that magnification would be an indistinct blur. Low and moderate magnifications are what give the best views. A small, but bright and detailed image is always better than a dim, unclear, over-magnified one.
Using the MoonMap 260
Orion’s MoonMap 260 is a great observing aid to use when viewing the Moon with your Skyscanner BL. With it, you will be able to identify a myriad of lunar features. Because the view in the Skyscanner BL is rotated from upright, you may find it useful to rotate the MoonMap so the image on the map matches what you see in the telescope eyepiece.
Concentrate each evening on the “terminator”, where the illuminated portion of the lunar 11 surface meets the dark portion. Due to the low angle at which sunlight strikes this part of the Moon, shadows cast by crater walls and other high-elevation features are elongated, thereby making such features stand out more vividly. Using a red flashlight (sold separately) to read the MoonMap in the dark will be helpful; the red light will not spoil your eyes’ dark adaptation.
What to Expect
So what will you see with your telescope? You should be able to see bands on Jupiter, the rings of Saturn, craters on the Moon, the waxing and waning of Venus, and many bright deep-sky objects. Do not expect to see color as you do in NASA photos, since those are taken with long-exposure cameras and have “false color” added. Our eyes are not sensitive enough to see color in deep-sky objects except in a few of the brightest ones. But remember that you are seeing these objects using your own telescope with your own eyes, in real-time. And that’s pretty cool!
Objects to Observe
Now that you are all set up and ready to go, one critical decision must be made: what to look at?
A. The Moon
With its rocky surface, the Moon is one of the easiest and most interesting targets to view with your telescope. Lunar craters, maria, and even mountain ranges can all be clearly seen from a distance of 238,000 miles away! With its ever-changing phases, you’ll get a new view of the Moon every night. The best time to observe our one and only natural satellite is during a partial phase, that is, when the Moon is NOT full. During partial phases, shadows are cast on the surface, which reveal more detail, especially right along the border between the dark and light portions of the disk (called the “terminator”). A full Moon is too bright and devoid of surface shadows to yield a pleasing view.
Make sure to observe the Moon when it is well above the horizon to get the sharpest images. Use an optional Moon filter to dim the Moon when it is very bright. It simply threads onto the bottom of the eyepiece barrel. You’ll find that a Moon filter improves viewing comfort and also helps to bring out subtle features on the lunar surface.
B. The Sun
You can change your nighttime telescope into a daytime Sun viewer by installing an optional full-aperture solar filter over the front opening of the Skyscanner BL. The primary attraction is sunspots, which change shape, appearance, and location daily. Sunspots are directly related to magnetic activity in the Sun. Many observers like to make drawings of sunspots to monitor how the Sun is changing from day to day.
Important Note
Do not look at the Sun with this telescope without a professionally made solar filter installed on the front opening, or permanent eye damage could result. Do not use the red dot scope when solar viewing, either.
C. The Planets
Planets, being in our own solar system and having their own orbits, do not stay at “fixed” locations as the stars do. So to find them you should refer to Sky Calendar at our website (telescope.com), or to charts published monthly in Astronomy, Sky & Telescope, or other astronomy magazines. Venus, Jupiter and Saturn are the brightest objects in the sky after the Sun and the Moon. Your Sky scanner BL is capable of showing you these planets in some detail. Other planets may be visible but will likely appear star-like.
Because planets are quite small in apparent size, you will need to use high power (the 3X Barlow lens should come in handy here). Not all the planets are generally visible at any one time. JUPITER: The largest planet, Jupiter, is a great subject for observation. You can see the disk of the giant planet and watch the ever-changing positions of its four largest moons – Io, Callisto, Europa, and Ganymede.
The Stars
Stars will appear like twinkling points of light. Even powerful telescopes cannot magnify stars to appear as more than a point of light. You can, however, enjoy the different colors of the stars and locate many pretty double and multiple stars. The gorgeous two-color double star Albireo in Cygnus is a favorite. Defocusing a star slightly can help bring out its color.
Aligning the Mirrors (Collimation)
Collimation is the process of adjusting the optics of a telescope so they are precisely aligned with one another and with the telescope tube. For this reflector telescope, the primary and secondary mirrors must be in precise alignment. Your telescope’s optics were aligned at the factory, and should not need much or any adjustment unless the telescope is handled roughly.
Accurate mirror alignment is important to ensure the sharpest possible images are viewed through your telescope, so it should be checked occasionally. With practice, collimating is relatively easy to do and can be done in daylight. It helps to perform the collimation procedure in a brightly lit room with the telescope pointed toward a bright surface, such as a light-colored wall.
The telescope tube should be oriented horizontally (parallel to the ground). Placing a piece of white paper in the telescope tube opposite the focuser (i.e., on the other side of the secondary mirror from the focuser) will also be helpful (see Figure 28). You will need the included screwdriver with the Philips bit to perform the collimation. To check your telescope’s collimation, remove the eyepiece and look down the focuser.
You should see the secondary mirror centered in the focuser, as well as the reflection of the primary mirror centered in the secondary mirror, and the reflection of the secondary mirror (and your eye) centered in the reflection of the primary mirror, as in Figure 29A. Got all that? Review it again carefully, and compare what you see to Figure 29A. If anything is off-center, proceed with the following collimation procedure.

Aligning the Secondary
Mirror Align the secondary mirror first. Note that for the Skyscanner BL 102mm, the secondary mirror collimation screws are Philips head screws, so you will need to use the Philips screwdriver to adjust them. The SkyScanner BL 135mm model’s secondary mirror collimation screws are thumbscrews, so you use your fingers to adjust them. Look down the focuser at the secondary (diagonal) mirror. If the entire primary mirror reflection is not visible in the secondary

Collimating the optics. (A) When the mirrors are properly aligned, the view down the focuser drawtube should look like this. (B) With the collimation cap in place, (with a collimation cap or Cheshire eyepiece in place). Here, only part of the primary mirror is visible in the secondary mirror, so the secondary mirror needs to be adjusted (tilted). (C) Here the secondary mirror is correctly aligned because the entire primary mirror is visible in it. But the reflection of the secondary mirror is off-center. So the primary mirror still needs adjustment. (D) Now the primary mirror is correctly aligned, so the secondary mirror is a centered

mirror, as in Figure 29B, you will need to adjust the tilt of the secondary mirror. This is done by alternately loosening one of the three secondary mirror alignment screws and then lightly tightening the other two (Figure 28). The goal is to center the primary mirror reflection in the secondary mirror, as in Figure 29C. Don’t worry that the reflection of the secondary mirror (the smallest circle) is off-center. You will fix that in the next step. It will take some trial and error to determine which screws to loosen and tighten to move the reflection of the primary mirror to the center of the secondary mirror. But be patient and you’ll get it.
Aligning the Primary Mirror
First, use a Philips screwdriver to loosen the three lock screws a turn or so. Then tighten one of the collimation knobs about a quarter turn and see if the secondary mirror reflection has moved closer to the center of the primary. If it moved farther away then try loosening the same collimation knob a bit. Repeat this process on the other two sets of collimation screws, if

necessary, adjusting them one way or the other and seeing if the secondary mirror reflection moves closer to the center of the primary mirror reflection. It will take a little trial and error to get a feel for how to tilt the mirror in this way. When the center hole in your collimating tool is centered as much as possible on the reflection of the adhesive dot on the primary mirror, your primary mirror is collimated. The view through the collimation cap should resemble Figure 29D. Then, very lightly tighten the three lock screws so that the primary mirror stays in that position. A simple star test will tell you whether the optics are accurately collimated.
Star-Testing the Telescope
When it is dark, point the telescope at a bright star and accurately center it in the eyepiece’s field of view. Slowly de-focus the image with the focusing knob. If the telescope is correctly collimated, the expanding disk should be a perfect circle (Figure 31). If the image is unsymmetrical, the scope is out of collimation. The dark shadow cast by the secondary mirror should appear in the very center of the out-of-focus circle, like the hole in a donut. If the “hole” appears off-center, the telescope is out of collimation.
If you try the star test and the bright star you have selected is not accurately centered in the eyepiece, the optics will always appear out of collimation, even though they may be perfectly aligned. It is critical to keep the star centered, so over time you will need to make slight corrections to the telescope’s position in order to account for the sky’s apparent motion.
Specifications
BL 102mm
- Primary mirror: 102mm diameter
- Secondary mirror: 25mm minor axis
- Mirror coatings: Aluminum with SiO2 overcoat
- Central obstruction: 31.2mm (30.6%)
- Focal length: 640mm
- Focal ratio: f/6.3
- Focuser: 1.25″ Rack-and-pinion, accepts 1.25″ eyepieces
- Eyepieces: 25mm Kellner and 10mm Plossl, 1.25″
- Magnification: 26x (with 25mm), 64x (with 10mm)
- Barlow lens: 3x magnifying power
- Finder: LED red dot reflex sight, 3V lithium battery
- Mount: Single-arm altazimuth, composite base, laminated
- Weight, assembled: 10 lbs., 6.5 oz.
- Tube Length: 21.5″ (54.6cm)
- Tube Outer Diameter: 5.7″ (145mm)
BL 135mm
- Primary mirror: 135mm diameter
- Secondary mirror: 35mm minor axis
- Mirror coatings: Aluminum with SiO2 overcoat
- Central obstruction: 38mm (28.1%)
- Focal length: 1100mm
- Focal ratio: f/8.1
- Focuser: 2″ Rack-and-pinion, accepts 1.25″ and 2″ eyepieces
- Eyepieces: 25mm Kellner and 10mm Plossl, 1.25″
- Magnification: 44x (with 25mm), 110x (with 10mm)
- Barlow lens: 3x magnifying power
- Finder: LED red dot reflex sight, 3V lithium battery
- Mount: Dobsonian altazimuth, composite base, laminated Weight, assembled: 32 lbs., 9 oz.
- Tube Length: 40″ (101.6cm)
- Tube Outer Diameter: 6.9″ (176mm)
One-Year Limited Warranty
This Orion product is warranted against defects in materials or workmanship for a period of one year from the date of purchase. This warranty is for the benefit of the original retail purchaser only. During this warranty period, Orion Telescopes & Binoculars will repair or replace, at Orion’s option, any warranted instrument that proves to be defective, provided it is returned postage paid. Proof of purchase (such as a copy of the original receipt) is required. This warranty is only valid in the country of purchase. For further warranty information, please visit www.OrionTelescopes.com/warranty.
REFERENCE LINK
https://www.telescope.com/Orion-SkyScanner-BL102mm-TableTop-Reflector-Telescope/p/134763.uts

