Orion SkyQuest XT Classic Dobsonian User Manual

Overview

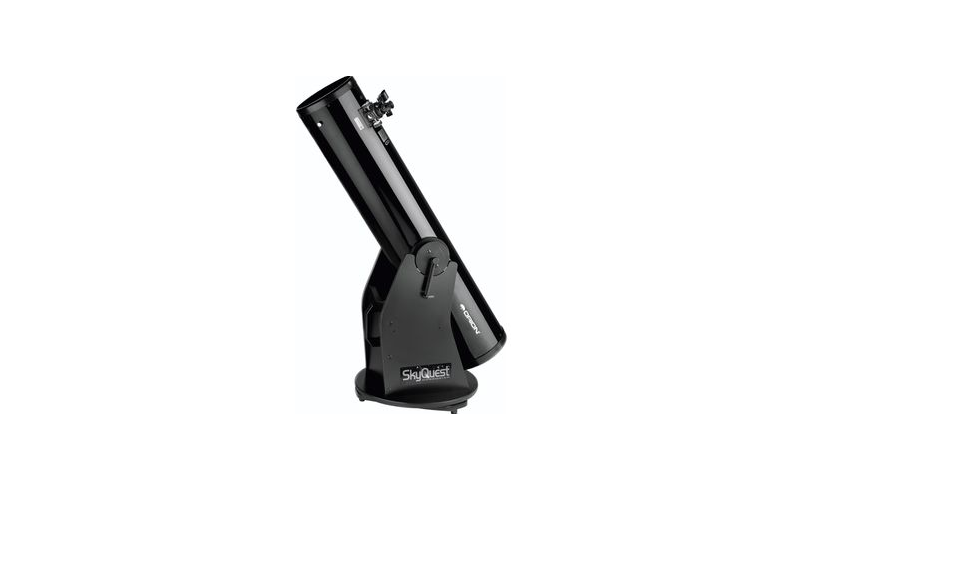
Welcome to an exciting new world of adventure! Your Orion SkyQuest XT Classic Dobsonian is a high-quality optical instrument designed to bring you dazzling views of the outer reaches of our universe. Easy enough for kids to use, and portable enough for anyone to carry, the SkyQuest will provide fun and entertainment for the entire family. Whether you are brand-new to amateur astronomy or a seasoned stargazer, get ready for many evenings of enjoyment and fascination. Before venturing into the night with your new telescope, we recommend that you read through this instruction manual. Not only does it provide accurate directions for assembly and use, but it also serves as a guide for your first explorations in the sky.
Unpacking
The telescope will arrive in two boxes, one containing the optical tube assembly and accessories, and the other containing the unassembled Dobsonian base. Be careful unpacking the boxes. We recommend keeping the original shipping containers. In the event that the telescope needs to be shipped to another location, or returned to Orion for warranty repair, having the proper shipping containers will help ensure that your telescope will survive the journey intact.
Make sure all the parts in the Parts List below are present. Be sure to check the boxes carefully, as some parts are small. If anything appears to be missing or broken, immediately call Orion Customer Support (800-676-1343) for assistance.
Assembly
Now that you have unpacked the boxes and familiarized yourself with all the parts in front of you, it’s time to begin assembly. The optics of the telescope are already installed in the tube, so most of the required assembly concerns the Dobsonian base
Assembly of the Dobsonian Base
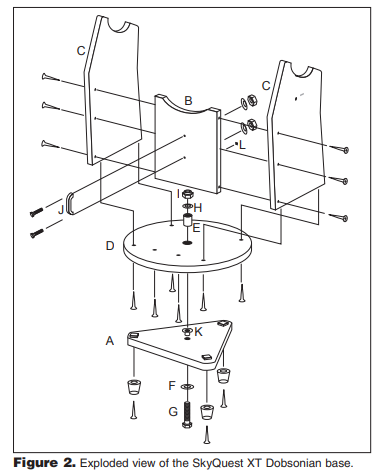
Refer to Figure 2 during base assembly. The base need only be assembled once unless you disassemble it for long-term storage. The assembly process takes about 30 minutes and requires a Phillips screwdriver, an adjustable crescent wrench, and the provided hex keys. Note: When tightening the base assembly screws, tighten them until firm, but be careful not to strip the holes by over-tightening. If you use an electric screwdriver, do the final tightening with a standard screwdriver to avoid stripping
- Screw the plastic feet into the underside of the ground baseplate (A) using the self-tapping wood screws provided, with a Phillips screwdriver. Insert the screws through the feet and thread them into the predrilled starter holes.
- Loosely attach the front brace (B) to the two side panels (C) with six of the base assembly screws in the predrilled holes. Use the 4mm hex key to tighten the screws. The side panels should be oriented so the SkyQuest label is facing outward. Do not completely tighten the screws yet.
 Figure 3. Set the optical tube on the “cradle” of the base so that the altitude side bearings on the tube rest on the white plastic “pads,” and the finder is facing away from the front brace (Part B)
 - Attach the two sides (C) with the front brace attached to the top baseplate (D) with the remaining six base assembly screws in the predrilled holes. Tighten all six screws.
- Tighten the six side panel screws installed earlier.
- Insert the white nylon bushing (E) into the hole in the center of the top baseplate (D). Tap the nylon bushing in so it goes all the way into the top baseplate. The nylon bushing should be flush with the top surface of the top baseplate.
 Figure 3. Set the optical tube on the “cradle” of the base so that the altitude side bearings on the tube rest on the white plastic “pads,” and the finder is facing away from the front brace (Part B)
Installing the EZ Finder II
Using the included dovetail mounting bracket, the EZ Finder II will slip neatly into the dovetail base preinstalled on your SkyQuest optical tube. To attach the dovetail mounting bracket to the EZ Finder II, loosen the two thumbscrews on the bottom rail of the EZ Finder II. Slide the EZ Finder II onto the bracket and tighten the two thumbscrews (See Figure 5). Then simply slide the dovetail mounting bracket into the telescope’s dovetail mounting base and tighten the thumbscrew on the base to secure the mounting bracket.
Operation
The EZ Finder II works by projecting a tiny red dot (it’s not a laser beam) onto a lens mounted in the front of the unit. When you look through the EZ Finder II, the red dot will appear to float in space, helping you locate even the faintest of deep-space objects. The red dot is produced by a light-emitting diode (LED) near the rear of the sight. A 3-volt lithium battery provides the power for the diode. Turn the power knob (see Figure 5) clockwise until you hear the “click” indicating that power has been turned on. Look through the back of the reflex sight with both eyes open to see the red dot. Position your eye at a comfortable distance from the back of the sight. In daylight, you may need to cover

the front of the sight with your hand to be able to see the dot, which is purposefully quite dim. The intensity of the dot is adjusted by turning the power knob. For best results when stargazing, use the dimmest possible setting that allows you to see the dot without difficulty. Typically a dimmer setting is used under dark skies and a bright setting is used under light-polluted skies or daylight. At the end of your observing session, be sure to turn the power knob counterclockwise until it clicks off. When the white dots on the EZ Finder II’s body and power knob are lined up, the EZ Finder II is turned off.
Installing the CorrecTension (XT) Friction Optimization System
Perhaps the most exciting feature of the SkyQuest Dobsonians is the CorrecTension Friction Optimization system. Because of their lightweight, 10″ and smaller Dobsonians have always been plagued by insufficient friction on altitude-bearing surfaces. As a result, such telescopes move up and down much too freely. This causes problems when the observer tries to accurately center and track an object for viewing, especially at higher powers. Also, the telescope becomes very sensitive to balance, requiring additional equipment such as counterweight systems or adjustable side bearings to compensate.
SkyQuest Dobsonians employs a simple yet effective remedy for the friction problem that obviates the need for such cumbersome countermeasures. CorrecTension Friction Optimization utilizes a spring coil to “pull” the tube assembly down onto the altitude bearing pads, thereby increasing the friction by just the right amount. With CorrecTension, you can change eyepieces, or add a Barlow lens or solar filter without having to tediously adjust the telescope’s balance as you would with other Dobsonians. The altitude friction will roughly equal the azimuth friction, ensuring optimal performance. To install the CorrecTension assembly, follow these steps while referring to Figure 6:
Details
- Put one of the black nylon spacers on a black Phillips-head screw. The spacer should be oriented so the narrow end seats against the head of the screw. Slip one of the black 1/4″ washers over the end of the screw. Now, thread the screw into the hole in the base side panel just below the
 cradle. The screw will thread into the preinstalled insert in the hole. Use a Phillips screwdriver to tighten the screw. Repeat this procedure on the opposite side panel.
 - Next, insert one of the screws with a round plastic knob attached through the end ring of one of the springs. Slip a black nylon spacer onto the screw. Orient the spacer so the narrow end is closest to the knob. Thread the entire assembly into the hole in the center of the telescope’s altitude side bearing until tight. The end ring of the spring should seat on the narrow end of the spacer.
- procedure for the other altitude side bearing. 3 Attach a pull loop to the free end of each spring. Slide the loop through the opening in the ring at the end of the spring.
- Now, pull each spring down using the pull loop, and position the spring’s end ring over the head of the Phillips screw (installed in Step 1) and onto the narrow part of the nylon spacer, as shown in Figure 7b. You needn’t attach both springs simultaneously; one at a time is fine.
 cradle. The screw will thread into the preinstalled insert in the hole. Use a Phillips screwdriver to tighten the screw. Repeat this procedure on the opposite side panel.
The CorrecTension system is now installed and engaged. If you wish to remove the telescope from the base, you will first need to disconnect the springs from the “posts” on the Dobsonian base. The springs will remain captive on the altitude side bearings, so they will not get lost.
Using Your Telescope
It is best to get a feel for the basic functions of the SkyQuest Dobsonian during the day, before observing astronomical objects at night. This way you will not have to fumble around trying to orient yourself in the dark! Find a spot outdoors where you have plenty of room to move around the telescope, and where you have a clear view of some object or vista that is at least 1/4 mile away. It is not critical that the base be exactly level, but it should be placed on somewhat flat ground or pavement to ensure smooth movement of the telescope.


Focusing the Telescope
Insert the 25mm eyepiece into the focuser and secure it with the thumbscrew(s). Move the telescope so the front (open) end is pointing in the general direction of an object at least 1/4 mile away. Now, with your fingers, slowly rotate one of the focusing knobs until the object comes into sharp focus. Go a little bit beyond sharp focus until the image just starts to blur again, then reverse the rotation of the knob, just to make sure you’ve hit the exact focus point. If you have trouble focusing, rotate the focusing knob so the drawtube is in as far as it will go.
Now look through the eyepiece while slowly rotating the focusing knob in the opposite direction. You should soon see the point at which focus is reached. The 2″ Crayford focuser of the XT8 and XT10 models features a thumb screw on the bottom of the focuser body (Figure 9) which will lock the focuser drawtube in place once the telescope is properly focused. If you find the drawtube tension when focusing is either too tight (the focus knob is difficult to turn) or too loose (the image shifts when focusing or the drawtube moves inward by itself), the tension can be adjusted for optimal performance.
On the XT8 & XT10, the focusing tension adjustment set screw is a 3mm socket head set screw located below the focus lock thumb screw (Figure 9). A 3mm hex key is required for adjustment of focus tension. Due to the rack-and-pinion focuser design on the XT6, tension adjustment should not normally be needed as it has been pre-adjusted at the factory. Note: The image in the main telescope will appear upsidedown (rotated 180°). This is normal for reflector telescopes (see Figure 10).
Aligning the EZ Finder II
When the EZ Finder II is properly aligned with the telescope, an object that is centered on the EZ Finder II’s red dot should also appear in the center of the field of view of the telescope’s eyepiece. Alignment of the EZ Finder II is easiest during daylight, before observing at night. Aim the telescope at a distant object such as a telephone pole or roof chimney and center it in the telescope’s eyepiece. The object should be at least 1/4 mile away. Now, with the EZ Finder II turned on, look through the EZ Finder II.
The object should appear in the field of view. Without moving the main telescope, use the EZ Finder II’s azimuth (left/right) and altitude (up/down) adjustment knobs (see Figure 5) to position the red dot on the object in the eyepiece.
When the red dot is centered on the distant object, check to make sure that the object is still centered in the telescope’s field of view. If not, recenter it and adjust the EZ Finder II’s alignment again. When the object is centered in the eyepiece and on the EZ Finder’s red dot, the EZ Finder II is properly aligned with the telescope. Once aligned, EZ Finder II will usually hold its alignment even after being removed and remounted. Otherwise, only minimal realignment will be needed.
Replacing the Battery
Should the battery ever die, replacement 3-volt lithium batteries are available from many retail outlets. Remove the old battery by inserting a small flat-head screwdriver into the slot on the battery casing (Figure 5) and gently prying open the case. Then carefully pull back on the retaining clip and remove the old battery. Do not overbend the retaining clip. Then slide the new battery under the battery lead with the positive (+) end facing down and replace the battery casing.
Aiming/Pointing the Telescope
Now that the EZ Finder II is aligned, the telescope can be quickly and accurately pointed at anything you wish to observe. The EZ Finder II has a much wider field of view than the telescope’s eyepiece, and therefore it is much easier to first center an object in the EZ Finder II. Then, if the EZ Finder II is accurately aligned, the object will also be centered in the telescope’s field of view. Start by once again moving the telescope until it is pointed in the general direction of the object you want to see. Some observers find it convenient to sight along the tube to do this. Now, look in the EZ Finder II. If your general aim is accurate, the object should appear somewhere in the EZ Finder II.
Tube Balance
Dobsonians are designed to balance with standard supplied accessories, such as an eyepiece and EZ Finder II. But what if you want to use a larger finder scope or a heavier eyepiece? The telescope will no longer be properly balanced, and will not hold its position properly. This makes the telescope difficult to use since it is critical that it holds its position (when not purposefully moved) to keep objects centered in the field of vision.
Traditional Dobsonian designs expect the user to compensate for heavier accessories by adding weight to the opposite end of the telescope tube. Such counterweighting systems can be expensive and unwieldy.
The CorrecTension Friction Optimization system of the SkyQuest Dobsonians, however, solves the finicky balance problem. The spring coils pull the tube down onto the base, thereby increasing the friction on the altitude-bearing pads. With CorrecTension, the added weight of small front-end loads will not adversely affect the balance of the telescope. If you install an array of heavier accessories onto your SkyQuest’s optical tube, you may need at some point to counterbalance the telescope with a counterweight system.
Carrying the Telescope
Moving the SkyQuest is easy to do. Because the springs of the CorrecTension system hold the optical tube captive on the base, the entire telescope can be carried as one unit (6″ and 8″ models only). This requires some caution, however. If the telescope is lifted improperly, the front of the tube could swing down and hit the ground. First, point the optical tube straight up (vertical). Remove any eyepieces from the telescope and optional eyepiece rack, and place them in an eyepiece case.
Grasp the handle on the front of the base with one hand while supporting the telescope tube vertically with the other (see Figure 11). Now, lift the telescope from the handle. Once the telescope is in the horizontal position, you can carry the entire unit with one hand. The handle position properly balances the load for easy carrying.
If you wish to carry the optical tube and base separately, simply disengage the CorrecTension springs by unhooking them from the posts on the base, using the pull loops. The springs remain captive on the telescope side bearings. Now the base and tube are disengaged and can be transported separately.
Note:
The SkyQuest may be too heavy for some users to lift and carry as one unit. Do not strain yourself! If the load seems too heavy, disengage the springs and carry the base and tube separately. When putting the SkyQuest into a vehicle, common sense prevails. It is especially important that the optical tube does not knock around; this can cause the optics to become misaligned and could dent the tube. We recommend transporting and storing the tube assembly in a padded case for proper protection.
Specifications
XT6
- Primary mirror
- focal length: 1200mm
- Primary mirror diameter: 150mm
- Focal Ratio: f/8.0
- Focuser: Rack and pinion, accepts 1.25″ eyepieces
- Optical tube material: Rolled steel
- Eyepiece: 25mm Sirius Plössl, fully coated with multi-coatings, 1.25″ barrel diameter Magnification with
- supplied eyepiece: 48x
- Reflex Sight: EZ Finder II
- Reflex Sight Bracket: Plastic bracket with dovetail base
- Mirror coatings: Enhanced aluminum (94% reflectivity) with SiO2 overcoat Minor axis of
- secondary mirror: 34.5mm
- Optical tube weight: 13.5 lbs.
- Base weight: 20.9 lbs.
- Tube length: 45.5″
- Tube outer diameter: 7.25″
XT8
- Primary mirror
- focal length: 1200mm
- Primary mirror diameter: 203mm
- Focal Ratio: f/5.9
- Focuser: Crayford, accepts 2″ eyepieces and 1.25″ eyepieces with adapter
- Optical tube material: Rolled steel
- Eyepiece: 25mm Sirius Plössl, fully coated with multi-coatings, 1.25″ barrel diameter Magnification with
- supplied eyepiece: 48x
- Reflex Sight: EZ Finder II
- Reflex Sight Bracket: Plastic bracket with dovetail base
- Mirror coatings: Enhanced aluminum (94% reflectivity) with SiO2 overcoat Minor axis of
- secondary mirror: 47.0mm
- Optical tube weight: 20.3 lbs.
- Base weight: 20.7 lbs.
- Tube length: 46.5″
- Tube outer diameter: 9.25″
XT10
- Primary mirror
- focal length: 1200mm Primary mirror diameter: 254mm
- Focal Ratio: f/4.7
- Focuser: Crayford, accepts 2″ and 1.25″ eyepieces with included adapter, collimatible
- Optical tube material: Rolled steel
- Eyepiece: 25mm Sirius Plössl, fully coated with multi-coatings, 1.25″ barrel diameter Magnification with
- supplied eyepiece: 48x
- Reflex Sight: EZ Finder II
- Reflex Sight Bracket: Plastic bracket with dovetail base
- Mirror coatings: Enhanced aluminum (94% reflectivity) with SiO2 overcoat Minor axis of
- secondary mirror: 63.0mm
- Optical tube weight: 30.8 lbs.
- Base weight: 22.6 lbs.
- Tube length: 47.25″
- Tube outer diameter: 12.0″
One-Year Limited Warranty
This Orion product is warranted against defects in materials or workmanship for a period of one year from the date of purchase. This warranty is for the benefit of the original retail purchaser only. During this warranty period, Orion Telescopes & Binoculars will repair or replace, at Orion’s option, any warranted instrument that proves to be defective, provided it is returned postage paid. Proof of purchase (such as a copy of the original receipt) is required. It is not intended to remove or restrict your other legal rights under applicable local consumer law; your state or national statutory consumer rights governing the sale of consumer goods remain fully applicable. For further warranty information, please visit www.OrionTelescopes.com/warranty
REFERENCE LINK
https://www.telescope.com/Orion-SkyQuest-XT6-Classic-Dobsonian-Telescope/p/102004.uts

