Keurig K-Cafe Smart Use and Care User Manual
Get connected with the Keurig® app.
You will need this to set up and control your brewer.

Connect Your Brewer
PLUG IT IN
Remove the packing tape from the brewer and plug it into a grounded outlet. The brewer will automatically power on, or press any button to power on.
GET CONNECTED
Open the Keurig® app and select Get Connected, then create an account. Once completed, press the right arrow on the brewer to Connect.
SET UP
Follow the instructions in the app to link the brewer to your smartphone, then connect to your home Wi-Fi®. You will see a message that says SUCCESS.
Before You Brew
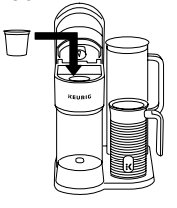
Rinse & Fill
Rinse the reservoir with fresh water and fill it to the Max fill line. If you have a Keurig® Water Filter, install it now. NOTE: Do not use distilled water.
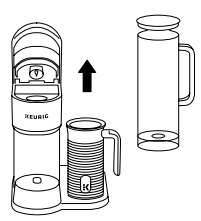
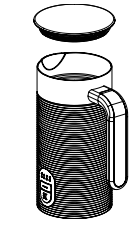
Clean the Frothed
Remove the lid and whisk from inside the frothed. Wash the interior of the frothed, lid, and whisk with warm, soapy water. Dry all parts thoroughly using a soft, non-abrasive cloth, then reassemble. NOTE: Frothed is not dishwasher safe. Do not submerge the frothed in water. Only use nonabrasive cleaning materials to prevent damage to the inner surface of the frother. Dry the interior of the frother and base with a soft cloth after cleaning.
Cleansing Brew

Press any button to power it on. Place a large mug (10 oz minimum) on the drip tray. Follow the instructions on the brewer screen to perform a cleansing brew. Do not remove the water reservoir once the brew button has been pressed until the brew has been completed. The one-time setup process is now complete and you are ready to brew!
Place Mug & Insert Pod
Lift the handle and place a K-Cup® pod in the K-Cup® pod holder. Lower the handle completely to close the lid. Do not remove the foil lid on the K-Cup® pod. NOTE: Remove the drip tray to accommodate a travel mug up to 7” tall.
Brew & Enjoy!
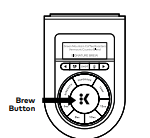
Enjoy the Signature Brew or customize your settings, choose a size, and press the blinking BREW button. Once the brew is completed, dispose of the used K-Cup® pod. Brewing is complete when the ”Enjoy” screen is displayed. CAUTION: While brewing, there is extremely hot water in the K-Cup® pod holder. To avoid injury, do not lift the handle during the brewing process.
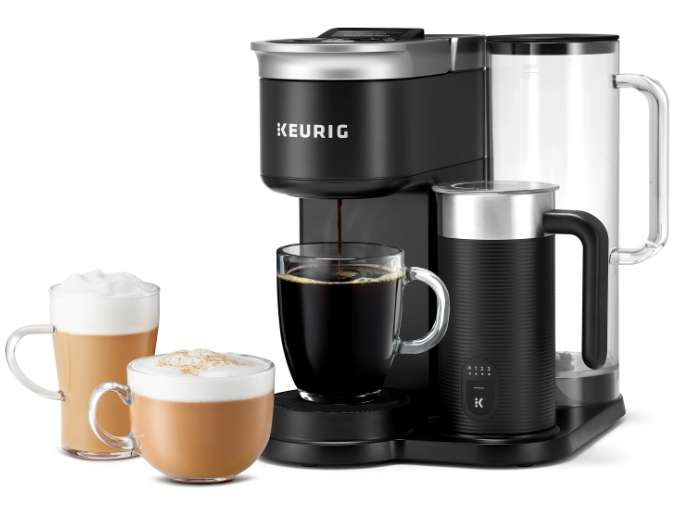
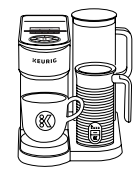
Brew a Café Beverage
Go to Café Creations in the app for access to a full menu and easy, step-by-step instructions. Froth Milk Fill the frothed to the Min line for a cappuccino or Max line for a latte. Attach the lid and place it on the base. The higher the number, the more froth. Filling to Min will produce more froth than Max. The frothed will also retain the settings chosen from the previous usage. Press the K to begin frothing. Frothing is complete when the button is no longer illuminated.
CAUTION: Frothed is not microwave or dishwasher safe.
NOTE: Do not under or overfill frothed. Do not operate before adding milk.
Queue Your Brewer
Press the SHOT button to choose a 2 oz or 4 oz shot, then press the blinking BREW button. When frothing is completed, the shot will automatically brew next. NOTE: The brewer cannot brew coffee and froth milk at the same time. Create Your Café Beverage When a shot is complete, pour or spoon the frothed milk over your shot of coffee. NOTE: Clean the frothed immediately after use.
Queue Your Brewer Press the SHOT button to choose a 2 oz or 4 oz shot, then press the blinking BREW button. When frothing is completed, the shot will automatically brew next. NOTE: The brewer cannot brew coffee and froth milk at the same time. 3. Create Your Café Beverage When a shot is complete, pour or spoon the frothed milk over your shot of coffee.
NOTE: Clean the frothed immediately after use.
Brewer Features
Signature Brew:
When using a Keurig® K-Cup® pod recognized by the brewer, the Signature Brew light will illuminate to signal the brewer has been set to the strength and temp settings recommended by the expert roaster. If you decide to customize the settings once the K-Cup® pod has been recognized, you will no longer be using the recommended brew settings and the light will no longer be illuminated. If you want to get back to the recommended brew, press the Signature Brew button and the settings will revert back to the recommended brew.
Customize Your Brew:
Use the Strength button to toggle between 5 strength settings: balanced, rich, robust, strong, and intense. When the stronger brew settings are selected, the water flows through the pods more slowly in order to extract more coffee flavor and deliver a stronger taste. Use the Temperature button to toggle between 6 temperature settings: warm, warmer, hot, hotter, extra hot, and max hot. Create a Favorite: To save a customized brew as a favorite, press and hold the Favorites button; you can save up to 10 favorites. Favorites can be renamed in the Keurig® app by tapping Settings, then selecting a favorite to rename.
The Keurig® app can also be used to reorder favorites. In the app, tap Settings, then Favorites, then ↑↓ Icon, and then drag the favorites into the preferred order. A favorite can be deleted via the brewer or the Keurig® app. To delete via the brewer, select the favorite you wish to delete, then press and hold the Favorites button, and then confirm the deletion. Hot Water Brew: On the home screen with no K-Cup® pod inserted in the brewer, press the K to access hot water. Then choose the size and press the blinking K to brew hot water.
Power On/Auto Off:
To power your brewer on, simply press any button or lift the brew handle. Your brewer will automatically turn off after 5 minutes. You can also press and hold the K button to turn the brewer off. Settings: When the brewer is plugged in and powered on, press both arrows at the same time to open the Settings menu. Use the right arrow to scroll through the different features within the menu, including:
- Wi-Fi®: Connect to your Wi-Fi® network, modify your password, and change the Wi-Fi® settings.
- High Altitude: Ensure your brewer works properly at higher altitudes (5,000 feet).
- Language: Choose your preferred language.
- Water Filter Reminder: Set the water filter reminder to ensure you always have quality water for your coffee.
- Brewer Information: Provides the latest software version installed on the coffee maker.
- Support: Provides contact information to get help when you need it.
- Factory Reset: Resets to the original manufactured state.
Voice Control (Alexa & Google Home): Open the Keurig® app, tap Settings, tap My Account, tap Voice Control. Follow the prompts in the app. Alexa and all related logos are trademarks of Amazon.com, Inc. or its affiliates. Google Home and all related logos are trademarks of Google LLC. Remote Brew: First, place a pod in the brewer and lower the handle. Then place a sufficiently sized mug on the drip tray. This may be done at any point before a remote brew. When you are ready to brew remotely, open the Keurig® app, ensure you are on the Brew tab, select your brew settings, and tap the app’s brew button. To override remote brew, you can cancel via the app or power off the brewer.
Schedule a Brew
Allows you to schedule a brew in advance. From the Brew tab in the app, tap the calendar icon in the top right corner. Then choose the day and time you would like to schedule a brew. Make sure you have enough water in the reservoir, place a pod in the brewer and lower the handle, and place a sufficiently sized mug on the drip tray. You will get a reminder before your next scheduled brew. Smart Auto-Delivery: Keeps track of how many pods you are using and automatically sends you an order when your remaining inventory is down to 10 days, so you won’t run out of pods. My Brew Style:
Tracks your brewing activity within the app and provides recommendations on favorites we think you will enjoy based on what you’ve been brewing. Café Creations: Provides curated recipes to make your favorite coffeehouse creations at home. Simple, step-by-step instructions will make you a barista in no time.
ATTENTION!
This brewer is only compatible with the newly designed Keurig® My K-Cup® Universal Reusable Coffee Filter. Do not attempt to use any other reusable filter or previous versions of Keurig® My K-Cup® Universal Reusable Coffee Filter; may cause damage to the brewer
Caring For Your Brewer
Regular cleaning keeps your brewer running smoothly. Always be sure to turn off and unplug your brewer before cleaning.
Brewer Exterior
Keep your Keurig® brewer looking its best by cleaning the exterior from time to time. Just clean the plastic with a damp, soapy, lint-free, nonabrasive cloth. Never immerse the brewer in water or other liquids.
Drip Tray
The drip tray can hold up to 4 ounces of overflow and should be emptied and cleaned occasionally. To remove it, slide it toward you, keeping it level to avoid spilling. Rinse and clean with a damp, soapy, lint-free, nonabrasive cloth.
To Clean:
- Remove the frother from the base, remove the silicone ring from the lid, and remove the whisk.
- Wash the inner frother, silicone ring, lid, and whisk with warm, soapy water. Use a soft, nonabrasive material to prevent damage. NOTE: Do not put the frother or frother parts into the dishwasher. Do not immerse the frother in water for cleaning. Do not wash the bottom part of the frother, which contains the electrical plug.
- Dry all parts thoroughly and reassemble for next use.
Water Reservoir

The water reservoir should be cleaned periodically by wiping the inside of the reservoir and the underside of the lid with a damp, nonabrasive, lint-free cloth. Do not dry the inside of the water reservoir with a cloth, as lint may remain. Allow the reservoir to dry completely.
K-Cup® Pod Holder
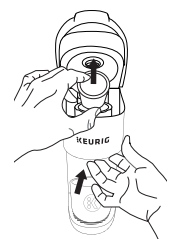
To remove the K-Cup® pod holder from the brewer, lift the handle and grasp the top of the K-Cup® pod holder with one hand while pushing up on the bottom of the K-Cup® pod holder from underneath with the other until it releases. After cleaning, align the K-Cup® pod holder with the opening using the two front ribs as a guide and snap it into place from the top.
CAUTION:
There are sharp needles that puncture the K-Cup® pod above the K-Cup® pod holder and in the bottom of the K-Cup® pod holder. To avoid the risk of injury, do not put your fingers in the K-Cup® pod holder. NOTE: Always remove and dispose of the used K-Cup® pod after brewing.
Funnel

Washing the funnel ensures a fresh beverage experience. The funnel should be washed regularly and can be removed from the K-Cup® pod holder by pulling on it until it pops off. To replace it, orient the snaps to the indent and just snap it back onto the K-Cup® pod holder.
Exit Needle
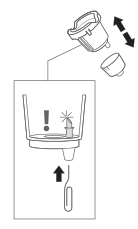
Remove the pod holder assembly and detach the funnel. Locate the exit needle on the inside bottom of the K-Cup® pod holder. Insert a straightened paper clip into the exit needle to loosen any coffee grounds.
Entrance Needles

Lift the brewer handle and locate the entrance needles on the underside of the lid. To clean the holes in the needles, hold the brewer handle in the upward position, and with your other hand, carefully insert a straightened paper clip into all the holes. Gently move it around to loosen any coffee grounds. Lower the handle completely and run a cleansing brew two times. Do not insert a K-Cup® pod.
Descaling Your Brewer
You should descale your brewer every 3 months or when the descale notification turns on. Properly follow the descaling procedure in order to turn off the notification. Depending on the mineral content of your water, calcium deposits or scale may build up in your brewer. Scale is non-toxic, but if left unattended can hinder brewer performance. Regularly descaling your brewer every 3 months helps maintain the heating element and other internal parts that come in contact with water. Calcium deposits may build up faster, making it necessary to descale more often.
Descaling Procedure
Before you begin, you will need a large ceramic mug, fresh water, Keurig® Descaling Solution, and access to a sink. Do not use a paper cup. Ensure that there is no beverage pod in the K-Cup® pod holder. Please allow approximately 15-20 minutes for the descaling procedure.
STEP 1: Prepare the Brewer
When the Descale notification appears on the screen, press the left arrow, then choose CONTINUE. Select your descaling product: 2 oz pouch or 14 oz bottle. Next, follow the prompts on the screen to complete the descaling process. If you would like to descale your brewer but don’t see the descale notification on the display, press both arrows at the same time to open Settings, then select Descale Mode.
STEP 2: Descale the Brewer
Empty the water reservoir and add the Keurig® Descaling Solution to the water reservoir. If using the bottle, fill the empty bottle with water and pour it into the water reservoir. If using the pouch, add 3 cups of water (24 oz) to the reservoir. Do not insert a K-Cup® pod. Place a large mug on the drip tray. Press the flashing BREW button to dispense 12 oz of hot water. Discard the hot water and replace the mug on the drip tray. Repeat until the water reservoir is empty and the screen says ADD WATER.
STEP 3: Fresh Water Rinse Rinse
the water reservoir and refill it to the Max fill line with fresh water. Make sure the mug is on the drip tray. When the BREW button flashes, press it to begin the fresh water rinse. Once the brew is complete, pour the hot liquid into the sink. Repeat this step until the screen says DESCALE COMPLETE. Now the brewer is ready for use.STEP 3: Fresh Water Rinse Rinse the water reservoir and refill it to the Max fill line with fresh water. Make sure the mug is on the drip tray. When the BREW button flashes, press to begin the fresh water rinse. Once the brew is complete, pour the hot liquid into the sink. Repeat this step until the screen says DESCALE COMPLETE. Now the brewer is ready for use.
Troubleshooting
Frother:
- If you are brewing coffee, you will not be able to use the frother at the same time. Wait until your brew has been completed before pressing the frother button.
- For best froth performance, be sure the whisk is seated properly on the post at the bottom of the froth.
- Some separation of milk and froth can occur, especially if the froth is not poured right away. Pour the milk and scoop the froth into your beverage with a spoon if needed.
- If you are frothing the same milk twice, you may experience a shorter froth time, as the milk will have already reached the target temperature.
- If your milk frother is overflowing, be sure you are filling below the Max fill line inside the frother.
- If your milk frother is scalding or burning the milk, be sure you are filling above the Min fill line inside the frother. Additionally, be sure to clean residual milk at the bottom of the frother after each froth to avoid scalded milk.
- If the milk frother is not turning on, unplug your brewer, wait 30 seconds, plug it back in, and try again. If it still does not work, call Customer Service. Note: Froth time will vary depending on the temperature of the milk.
Grounds in Your Coffee
Grounds may have gathered in the exit or entrance needles and can be cleaned using a straightened paper clip or similar tool.
- Clean the exit needle of the K-Cup® pod holder. Refer to the exit needle care instructions.
- Clean the brewer entrance needles. Refer to the entrance needle care instructions. For optimal enjoyment and to limit grounds in your cup during hot water brews or when transitioning from brewing a coffee pod to a non-coffee pod (e.g., tea or cocoa), clean the exit and entrance needles per the instructions provided and perform two cleansing brews.
Recommended Brew Settings Are Not Provided or a Keurig® K-Cup® Pod Is Not Recognized
First, make sure your brewer is connected to Wi-Fi® to enable BrewIDTM. Next, ensure the pod that was used was a genuine Keurig® K-Cup® pod by finding the Keurig® logo on the pod’s lid. If a Keurig® pod’s lid is already punctured, it may not be recognized. Try again with an unpunctured pod. If the brewer continues not to recognize Keurig® pods, contact Customer Service.
Warranty
LIMITED ONE-YEAR WARRANTY
Keurig Green Mountain, Inc. (Keurig) warrants that your brewer will be free of defects in materials or workmanship under normal home use for one year from the date of purchase. It is recommended that you register your brewer on keurig.com/new so that your purchase information will be stored in our system. Keurig will, at its option, repair or replace a defective brewer without charge upon its receipt of proof of the date of purchase. If a replacement brewer is necessary to service this warranty, the replacement brewer may be new or reconditioned.
If a replacement brewer is sent, a new limited one-year warranty will be applied to the replacement brewer. This warranty only applies to brewers operated in the United States and Canada. This warranty gives you specific legal rights, and you may also have other rights that vary from state to state and, in the case of Canada, from province to province. Only the use of Keurig® K-Cup® brand pods and accessories will guarantee the proper functioning and lifetime of your Keurig® brewer. Any damage to or malfunction of your brewer resulting from the use of non-Keurig® pods and accessories may not be covered by this warranty or may result in a service fee if the damage or malfunction is determined to be caused by such use.
REFERENCE LINK
DOWNLOAD PDF
Keurig K-Cafe Smart Use and Care User Manual