BREVILLE Toast Select™ Luxe User Manual
IMPORTANT SAFEGUARDS
READ ALL INSTRUCTIONS BEFORE USE AND SAVE FOR FUTURE REFERENCE
- Carefully read all instructions before operating for the first time and save for future reference.
- Remove and safely discard any packaging materials and promotional labels before using the toaster for the first time.
- To eliminate a choking hazard for young children, remove and safely discard the protective cover fitted to the power plug of this appliance.
- Always ensure the appliance is properly assembled before use. Follow the instructions provided in this book.
- Do not touch hot surfaces. Appliance surfaces are hot during and after operation. To prevent burns or personal injury, always use protective hot pads or insulated oven mitts, or use handles or knobs where available.
- Do not place the appliance near the edge of a bench or table during operation. Ensure that the surface is dry, level, clean and free of any liquid and other substances.
- Always operate the appliance on a stable and heat resistant surface. Do not use on a cloth covered surface, and position the appliance at a minimum distance of 8″ (20cm) away from walls, curtains, cloths and other heat sensitive materials.
IMPORTANT
Never operate the toaster on its side. Never add any food substance to the bread, bagel or any other item prior to toasting (such as butter, jelly or marmalade). This may cause a fire as well as lead to electrocution. This toaster is for toasting bread, bagels, English muffins and toaster pastries only. Placing other food items in the toaster can cause a fire as well as lead to electrocution.
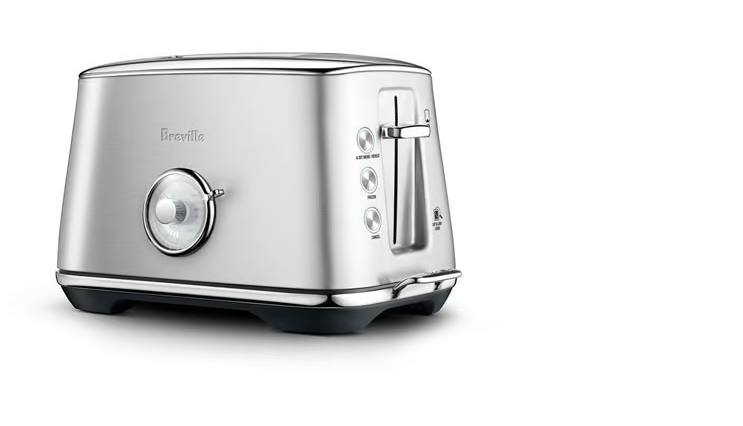
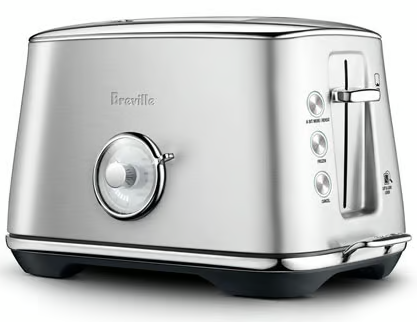
Components

- A. Brownness Indicators LEDs to indicate the brownness setting and progress of your toasting.
- B. Bread Selection Ring Select your bread type to ensure comparable brownness across all bread types without the guess work. The time taken to toast your bread depends on the bread type. Select from Whole Wheat, White, Bagel, Waffles, Pastries or English Muffins to ensure you get the same brownness level every time.
- C. Brownness Selection Dial Select how brown you like your toast, setting ‘0’ (lightest) to ‘6’ (darkest).
- D. ‘LIFT & LOOK™’ / High lift lever Use the lever during the toasting cycle to raise and lower the carriage so you can check the toasting progress without interrupting the toasting cycle. High lift feature makes it easier to remove small items such as bagels or English muffins.
- E. ‘A BIT MORE®’
If your toast comes up too light, one press adds a little extra toasting time. - REHEAT button
If your toast has popped up and gone cold, Press ‘reheat’ to warm it up again. - F. FROZEN button
Activates additional toasting time required to toast frozen bread. - G. CANCEL button
Cancels the toasting cycle.
NOT SHOWN
Breville Assist™ Plug
Rating Information
120 V~ 60 Hz 1000 W
Functions
NOTE This toaster is electronically controlled and will not operate until the toaster is plugged into a 110 or 120V power outlet. Before first use, remove any packaging material or promotional labels attached to your toaster.
Insert the power plug into a 110 or 120V power outlet. The Brownness Indicators will illuminate from ‘0’ to ‘6’, and then align to the selected browning setting (indicated by the position of the Brownness Dial and Brownness Indicators). The toaster will revert to stand-by mode (Brownness Indicators will dim) after a few minutes if a button is not pressed or the dial is not adjusted.
WARNING
Do not leave the toaster unattended when in use as toast may jam. In the unlikely event that bread, bagels, English muffins or toaster pastries become jammed in the toasting slots, all the buttons and the LED toasting indicators will flash and the elements will turn off. Remove the power plug from the power outlet and allow the toaster to cool completely before carefully easing the bread out of the slots. Take care not to damage the heating elements. Do not use metal utensils.
LIFT & LOOK™ LEVER
This feature allows you to raise and lower the carriage so you can check the toasting progress without interrupting the toasting cycle. During the toasting cycle, simply lift the lever to view the toasting progress. Lower the lever to continue the cycle or press the CANCEL button to stop the cycle at any time.
HIGH LIFT LEVER
The lever can be lifted approximately 2cm above the starting position. This raises the carriage making it easier to remove smaller items such as English muffins or bagels.
Care & Cleaning
- Remove the power plug from the power outlet. Allow the toaster to cool completely before cleaning.
- To clean any crumbs from the toaster, remove the crumb tray (located under the left hand side handle) by pulling it outwards. Empty and replace the crumb tray before using the toaster again. Replace the crumb tray by sliding it inwards until it locks into position.
- To remove any additional crumbs caught inside, turn the toaster upside down over a bin and shake gently to free the crumbs. DO NOT bang the toaster, this may damage the elements or carriage mechanism.
- Wipe the outside of the toaster with a slightly dampened soft cloth and then dry it with a soft dry cloth to dry completely.
NOTE
Do not clean with metal scouring pads. Pieces can break off the pad and touch electrical parts creating an electric shock hazard and damage the finish of the toaster.
STORAGE
Remove the power plug from the power outlet. Allow the toaster to cool completely before storing. Follow the directions for cleaning and store in an upright position on a flat surface on a bench top or in an accessible cupboard. Do not store anything on top of the toaster.
WARNING
Do not use the toaster without the slide-out crumb tray in position. Do not allow crumbs to build up in the crumb tray. Failure to clean the crumb tray regularly may result in a fire hazard.
REFRENCESS LINK
DOWNLOAD PDF
https://assets.breville.com/Instruction-Booklets/USCM/BTA735_USCM_IB_C21_FA_WEB.pdf


 Afrikaans
 Albanian
 Amharic
 Arabic
 Armenian
 Azerbaijani
 Basque
 Belarusian
 Bengali
 Bosnian
 Bulgarian
 Catalan
 Cebuano
 Chichewa
 Chinese (Simplified)
 Chinese (Traditional)
 Corsican
 Croatian
 Czech
Czech Danish
 Dutch
Dutch English
 Esperanto
 Estonian
 Filipino
 Finnish
 French
 Frisian
 Galician
 Georgian
 German
 Greek
Greek Gujarati
 Haitian Creole
 Hausa
Hausa Hawaiian
 Hebrew
 Hindi
Hindi Hmong
Hmong Hungarian
 Icelandic
 Igbo
Igbo Indonesian
 Irish
Irish Italian
 Japanese
 Javanese
 Kannada
 Kazakh
 Khmer
Khmer Korean
 Kurdish (Kurmanji)
 Kyrgyz
 Lao
Lao Latin
Latin Latvian
 Lithuanian
 Luxembourgish
 Macedonian
 Malagasy
 Malay
Malay Malayalam
 Maltese
 Maori
Maori Marathi
 Mongolian
 Myanmar (Burmese)
 Nepali
 Norwegian
 Pashto
 Persian
 Polish
 Portuguese
 Punjabi
 Romanian
 Russian
 Samoan
 Scottish Gaelic
 Serbian
 Sesotho
 Shona
Shona Sindhi
 Sinhala
 Slovak
 Slovenian
 Somali
 Spanish
 Sundanese
 Swahili
 Swedish
 Tajik
Tajik Tamil
Tamil Telugu
 Thai
Thai Turkish
 Ukrainian
 Urdu
Urdu Uzbek
Uzbek Vietnamese
 Welsh
Welsh Xhosa
Xhosa Yiddish
 Yoruba
 Zulu
Zulu