AmazonBasics B00B7GV4JC Wireless Keyboard & Mouse Guide

Contents
- Wireless Keyboard
- Wireless Mouse with receiver (inside battery compartment)
- 4 AAA batteries
- Quick start guide
- This instruction manual
Setup:
Keyboard
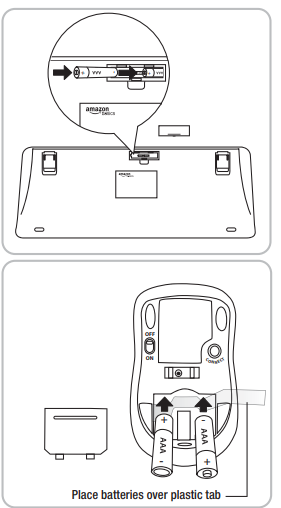
- Remove the battery cover on the bottom of the keyboard.
- Insert two batteries. Make sure that the + and – symbols on the batteries align with the + and – symbols inside the battery compartment.
- Replace the battery cover.
- Place the keyboard near the computer.
Mouse
- Remove the battery cover on the bottom of the mouse.
- Insert two batteries over the plastic tab. This tab will help you remove the batteries.
- Remove the receiver stored between the two batteries.
- Replace the battery cover.
- Insert the receiver into a USB port on your computer.
Note: The LED on top of the mouse lights when the batteries need to be replaced.

To Use:
On the bottom of the mouse, switch the button to ON. The optical sensor lights, the computer detects the mouse and the keyboard. The keyboard and mouse are ready to use.
Note:
When not in use, turn the mouse OFF and store the receiver inside the battery compartment.
Keyboard Hot Keys Function

Mouse Overview

Troubleshooting
The mouse does not operate or is not recognized and the optical sensor on the bottom of the mouse does not light
- Make sure the batteries are installed correctly. Match the +/- symbols on the battery to the +/- symbols in the battery compartment.
- Make sure the power switch is in the ON position.
- Try plugging the receiver into a different USB port.
- Move the mouse to a different surface. Transparent surfaces like glass, dark surfaces, reflective surfaces like mirrors, and rough surfaces are not recommended.
- Press the CONNECT button on the bottom of the mouse to reestablish a connection between the mouse and the receiver.
- If the optical sensor does not light, turn the mouse off, and then on. If the optical sensor still does not light, replace the batteries.
The cursor moves erratically or misses button clicks
- Remove metal objects between the mouse and the receiver.
- Try moving the receiver to a different USB port.
- Check battery power by turning the mouse off, and then on. If the optical sensor does not light, replace the batteries.
The LED on the top of the mouse is lit
- This indicates the batteries are low. Replace the batteries.
The keyboard is not working
- Position the keyboard closer to the receiver.
- Replace the batteries.
Cleaning the keyboard and mouse
Use a damp cloth or gentle cleaning wipes intended for keyboard/mouse cleaning.
Specifications
- Supported operating system—Windows® 8/Windows®7/ Windows® XP/Windows Vista®/Windows® 2000
- Operating temperature—0°C ~ 40°C
- Battery life—Mouse: 300 hours; Keyboard: 900 hours
- Operating distance—32 feet (10 meters)
Battery Warning Statement:
- Keep batteries out of the reach of children.
- Insert the batteries in the proper direction as indicated by positive (+) and negative (-) markings in the battery compartment.
- Do not mix old and new batteries or batteries of different types (for example, carbon and alkaline batteries).
- Always remove old, weak, or worn-out batteries promptly and recycle or dispose of them following Local and National Disposal Regulations.
- If the battery leaks, remove all batteries and recycle or dispose of them per the battery manufacturer’s instructions and Local and National Disposal Regulations. Before inserting new batteries, thoroughly clean the compartment with a damp paper towel or follow the battery manufacturer’s recommendations for cleanup. If fluid from the battery comes into contact with skin or clothes, flush with water immediately.
- Remove batteries if your device is to be stored for an extended period without being used.
FEDERAL COMMUNICATIONS COMMISSION (FCC) STATEMENT
This equipment has been tested and found to comply with the limits for a Class B digital device, Under Part 15 of the FCC rules. These limits are designed to provide reasonable protection against harmful interference in a residential installation. This equipment generates, uses, and can radiate radio frequency energy and, if not installed and used following the instructions, may cause harmful interference to radio communications.
However, there is no guarantee that interference will not occur in a particular installation. If this equipment does cause harmful interference to radio or television reception, which can be determined by turning the equipment off and on, the user is encouraged to try to correct the interference by one or more of the following measures:
- Reorient or relocate the receiving antenna.
- Increase the separation between the equipment and the receiver.
- Connect the equipment to an outlet on a circuit different from that to which the receiver is connected.
- Consult the dealer or an experienced radio/TV technician for help.
This device complies with part 15 of the FCC rules. Operation is subject to the following two conditions: (1) This device may not cause harmful interference, and (2) This device must accept any interference received, including interference that may cause undesired operation. Changes or modifications not expressly approved by the party responsible for compliance could void the user’s authority to operate the equipment. Responsible party: AmazonBasics
- 410 Terry Avenue North, Seattle, WA 98109-5210, U.S.A. 1-866-216-1072