

Black & Decker JS350 Variable Speed Scroll Jig Saw User Manual

READ ALL INSTRUCTIONS
General Safety Warnings and Instructions for All Tools
- KEEP THE WORK AREA CLEAN. Cluttered areas and benches invite injuries.
- CONSIDER THE WORK AREA ENVIRONMENT. Don’t expose power tools to rain. Don’t use power tools in damp or wet locations. Keep the work area well-lit. Do not use tools in the presence of flammable liquids or gases.
- GUARD AGAINST ELECTRIC SHOCK. Prevent body contact with grounded surfaces. For example; pipes, radiators, ranges, and refrigerator enclosures.
- KEEP CHILDREN AWAY. Do not let visitors contact the tool or extension cord. All visitors should be kept away from the work area.
- STORE IDLE TOOLS. When not in use, tools should be stored in dry, and high or locked-up places — out of reach of children.
- DON’T FORCE TOOL. It will do the job better and safer at the rate for which it was intended.
- USE RIGHT TOOL. Don’t force small tools or attachments to do the job of a heavy-duty tool. Don’t use tools for purposes not intended.
- DRESS PROPERLY. Do not wear loose clothing or jewelry. They can be caught in moving parts. Rubber gloves and non-skid footwear are recommended when working outdoors. Wear a protective hair covering to contain long hair.
- USE SAFETY GLASSES. Also, use a face or dust mask if the cutting operation is dusty.
- DON’T ABUSE CORD. Never carry the tool by cord or yank it to disconnect it from the receptacle. Keep cord from heat, oil, and sharp edges.
- SECURE WORK. Use clamps or a vise to hold the work. It’s safer than using your hand and it frees both hands to operate the tool.
- DON’T OVERREACH. Keep proper footing and balance at all times.
Safety Warnings and Instructions:
Double Insulation Double-insulated tools are constructed throughout with two separate layers of electrical insulation or one double thickness of insulation between you and the tool’s electrical system. Tools built with this insulation system are not intended to be grounded. As a result, your tool is equipped with a two-prong plug which permits you to use extension cords without concern for maintaining a ground connection. NOTE: Double insulation does not take the place of normal safety precautions when operating this tool. The insulation system is for added protection against injury resulting from a possible electrical insulation failure within the tool.
CHECK DAMAGED PARTS.
Before further use of the tool, a guard or other part that is damaged should be carefully checked to determine that it will operate properly and perform its intended function. Check for alignment of moving parts, binding of moving parts, breakage of parts, mounting, and any other conditions that may affect its operation. A guard or other part that is damaged should be properly repaired or replaced by an authorized service center unless otherwise indicated elsewhere in this instruction manual. Have defective switches replaced by the authorized service center. Do not use the tool if the switch does not turn it on and off.
Safety Warnings and Instructions: Polarized Plugs
Polarized plugs (one blade is wider than the other) are used on equipment to reduce the risk of electric shock. When provided, this plug will fit in the polarized outlet only one way. If the plug does not fit fully into the outlet, reverse the plug. If it still does not fit, contact a qualified electrician to install the proper outlet. Do not change the plug in any way WARNING: Some dust created by power sanding, sawing, grinding, drilling, and other construction activities contains chemicals known to cause cancer, birth defects, or other reproductive harm. Some examples of these chemicals are:
- lead from lead-based paints,
- crystalline silica from bricks and cement, and other masonry products, and
- arsenic and chromium from chemically treated lumber (CCA).
Your risk from these exposures varies, depending on how often you do this type of work. To reduce your exposure to these chemicals: work in a well-ventilated area, and work with approved safety equipment, such as those dust masks that are specially designed to filter out microscopic particles.
Safety Warnings and Instructions: Jig Saws
CAUTION:
When cutting into walls, floors, or wherever live electrical wires may be encountered, DO NOT TOUCH ANY METAL PARTS OF THE TOOL! Hold the tool only by insulated grasping surfaces to prevent electric shock if you cut in the live wire.
SAVE THESE INSTRUCTIONS FOR FUTURE USE
Motor
Be sure your power supply agrees with the nameplate marking. 120 volts, AC only means your tool may be operated only with alternating current and never with direct current. A voltage decrease of more than 10% will cause loss of power and overheating. All tools are factory tested; if this tool does not operate, check the power supply.
ASSEMBLY/ADJUSTMENT
SET-UP
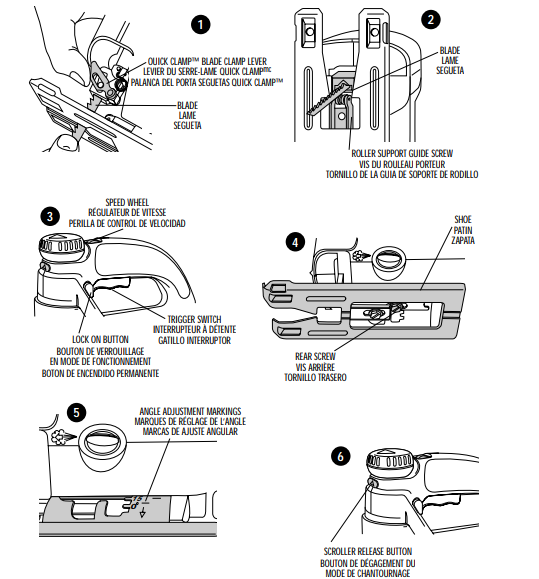
Installing Blades BEFORE INSTALLING BLADES, TURN OFF AND UNPLUG TOOL. Your jig saw uses the Quick Clamp™ blade changing system. To install a blade, lift the Quick Clamp™ lever (Figure 1). Insert the saw blade shank fully into the blade clamp. Release the lever and the blade will be clamped securely in place. The back of the blade should be almost touching the roller support guide. Ensure the blade teeth are facing forward.
Roller Support Guide
The roller support guide on your jig saw improves its performance when cutting tough materials by adding support to the blade. Adjust the support roller by loosening the screw on the bottom of the shoe, as shown in Figure 2, and moving the roller so that it almost, but not quite, touches the blade. Tighten the screw securely to lock the roller in place
Switch
Your jigsaw has a variable speed switch. To turn the saw on, squeeze the trigger switch, as shown in Figure 3. Hold the trigger switch in as you rotate the speed wheel to the desired setting. The selected speed will be maintained, under reasonable loading, as you cut.
NOTE:
The numbers on the speed wheel are for reference only. They do not represent any particular speed. To turn the tool off, release the trigger switch. The tool can be locked on for continuous operation at any speed by squeezing and holding the trigger switch while you depress the lock-on button. With the lock-on button depressed, release the trigger switch and the tool will continue to run.
To release from the lock position, squeeze and release the trigger switch once. Although your saw will maintain speed and power, don’t overload it as this could damage the motor. Use your saw only for its intended purpose. If it should overheat, turn it on at its highest speed and run it without a load until it cools down.

Bevel Adjustment
TURN OFF AND UNPLUG TOOL.
Raise or remove the dust shield before bevel cutting. To adjust the bevel angle, loosen the rear screw on the bottom of the shoe, as shown in Figure 4. Pull the show backward slightly and set the shoe to the desired angle. Angle adjustment is indicated on the raised portion of either side of the shoe (Figure 5).
It is also possible to push the shoe forward to set fixed positions of 0°, 15°, 30° or 45°. A protractor is recommended when very accurate cuts are required. To reset the shoe for a square cut, loosen the rear screw and move the shoe until it is approximately 90° to the blade. While applying slight forward pressure to the shoe, retighten the rear screw.
General Cutting
Be sure the board is firmly secured. Hold the jig saw by the handle and operate the switch to turn the unit on. Don’t attempt to turn on the unit when the blade is against the material to be cut. This could stall the motor. Place the front of the shoe on material to be cut and hold the jigsaw shoe down firmly against the work surface while cutting. Don’t force the tool; let the blade cut at its own speed. Whenever possible, clamp or support work close to the line of cut; when the cut is completed, shut off power and lay the saw aside before loosening the work.
Scrolling
Your jig saw is equipped with a manual scrolling feature which permits the saw blade to completely rotate without rotating the entire saw.
NOTE:
Before scrolling, retract the roller support guide and ensure the shoe is in the forward position. Push the scroller release button, as shown in Figure 6. The scrolling knob will pop up from the tool housing. Pull the knob up to confirm it has fully released. Using one hand to guide the jig saw, turn the scroller knob to guide the blade along the line of the cut. The blade will turn 360°. The angle of the blade can be locked into one of four positions: 0°, 90°, 180° or 270°.
To lock the blade in any of the four positions, push the scroller release button, and push the scrolling knob down. When the button is released, the blade is locked into position. To reset, push the scroller release button. To return to straight-line (non-scrolling) cutting, press the scroller release button and push the knob down. Readjust the roller support guide so it is almost touching the back of the blade.
Dust Extraction/Vacuum Attachment
Your jig saw is equipped with a dust extraction system which greatly reduces clean-up time. To extract dust:
- Insert the end of the supplied vacuum adapter into the dust extraction opening at the rear of the saw. Attach a standard vacuum cleaner hose.
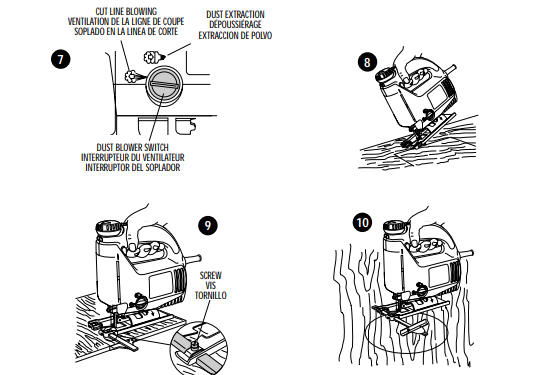
- Turn the dust blower switch (Figure 7) to the right.
- Turn on the vacuum. Turn on the jig saw and begin cutting.
Metal & Plastic Cutting
In cutting thin gauge sheet metals, it is best to clamp wood or plywood to the bottom of the metal sheet; this will ensure a clean cut without the danger of vibration or tearing of metal. Use a fine-tooth blade for ferrous metals (for those that have an iron content), and use a coarser blade for nonferrous metals (those that do not have an iron content).
Cutting thin metal will take longer than cutting relatively thick wood so do not be tempted to speed up the process by forcing the saw. Spread a thin film of cutting lubricant along the cutting line, (any lightweight oil) and consult the blade chart in this manual to select the proper saw blade for your application. Use low speeds for cutting metals, plastics, and composition tiles. When cutting laminated plastic, place the finished side down and use a fine tooth hollow ground blade.
Pocket Cutting
- Measure the surface to be cut and mark clearly with a pencil. Next tip the saw forward until the front edge of the shoe sits firmly on the work surface, Figure 8.
- Switch the tool on and allow it to attain maximum speed.
- Grip the handle firmly and lower the back edge of the tool until the blade cuts smoothly into the material. Always be sure the blade reaches its complete depth before starting to cut. For pocket cutting the selector should be kept in the straight cutting position.
Rip & Circle Cutting
Ripping and circle cutting without a pencil line are easily done with the rip fence and circle guide (available at extra cost). Use the screw supplied with the accessory. Position as shown in Figure 9 and thread the screw into the shoe to clamp the fence securely. Slide the rip fence under the screw from either side of the saw. Set the crossbar at the desired distance from the blade and tighten screw. For ripping, the crossbar should be down as shown in Figure 9.
For circle cutting, the crossbar should be up, as shown in Figure 10. When circle cutting, adjust rip fence so that distance from the blade to the hole in the crossbar is the desired radius, and tighten the screw (use the hole which lines up best with the saw blade). Place saw so that hole in crossbar is over center of circle to be cut (make pocket cut, drill hole for blade or cut inward from edge of material to get blade into position). When saw is properly positioned, drive a small nail through the hole in the crossbar. Using the rip fence as a pivot arm, begin cutting a circle.
Maintenance
Use only mild soap and a damp cloth to clean the tool. Never let any liquid get inside the tool; never immerse any part of the tool into a liquid. IMPORTANT: To assure product SAFETY and RELIABILITY, repairs, maintenance, and adjustment should be performed by authorized service centers or other qualified service organizations, always using identical replacement parts.
Accessories
Recommended accessories for use with your tool are available from your local dealer or authorized service center. If you need assistance regarding accessories, please call: 1-800-54-HOW-0TO (544-6986) WARNING: The use of any accessory not recommended for use with this tool could be hazardous.
SERVICE INFORMATION
Black & Decker offers a full network of company-owned and authorized service locations throughout North America. All Black & Decker Service Centers are staffed with trained personnel to provide customers with efficient and reliable power tool service. Whether you need technical advice, repair, or genuine factory replacement parts, contact the Black & Decker location nearest you. To find your local service location, refer to the yellow page directory under “Tools— Electric” or call: 1-800-54-HOW TO (544-6986)
FULL TWO-YEAR HOME USE WARRANTY
Black & Decker (U.S.) Inc. warrants this product for two years against any defects in material or workmanship. The defective product will be replaced or repaired at no charge in either of two ways. The first, which will result in exchanges only, is to return the product to the retailer from whom it was purchased (provided that the store is a participating retailer).
Returns should be made within the time period of the retailer’s policy for exchanges (usually 30 to 90 days after the sale). Proof of purchase may be required. Please check with the retailer for their specific return policy regarding returns that are beyond the time set for exchanges. The second option is to take or send the product (prepaid) to a Black & Decker owned or authorized Service Center for repair or replacement at our option. Proof of purchase may be required.
Black & Decker-owned and authorized Service Centers are listed under “Tools-Electric” in the Yellow Pages of the phone directory. This warranty does not apply to accessories. This warranty gives you specific legal rights and you may have other rights which vary from state to state. Should you have any questions, contact the manager of your nearest Black & Decker Service Center.
REFERENCE LINK
https://www.partswarehouse.com/Black-Decker-JS350-Variable-Speed-Scroll-Jig-Saw-Type-1-s/159036.htm


