
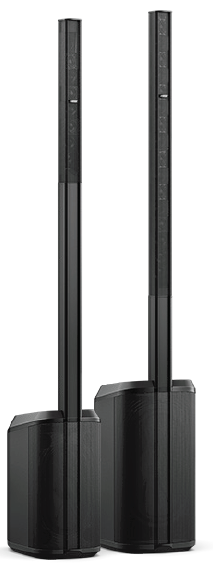
Bose L1 Pro8 Portable Line Array System Manual
Package Contents
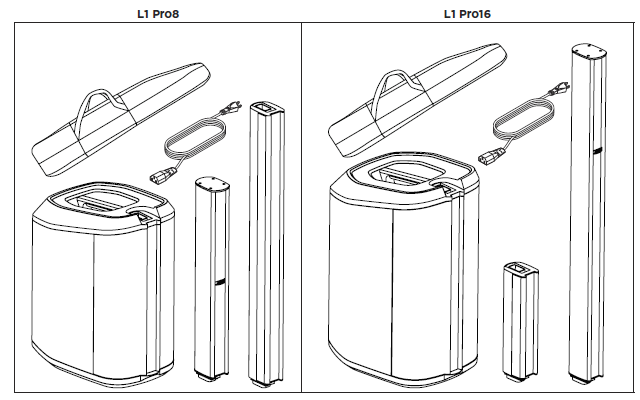
Optional Accessories
- L1 Pro8 System Bag
- L1 Pro16 System Roller Bag
- L1 Pro8/Pro16 Slip cover
System Setup
Connections and Controls

- Channel Parameter Control: Adjust the level of volume, treble, bass, or reverb for your desired channel. Press the control to switch between parameters; rotate the control to adjust the level of your selected parameter.
- Signal/Clip Indicator: The LED will illuminate green when a signal is present and will illuminate
red when the signal is clipping or the system is entering limiting. Reduce the channel or signal volume to prevent signal clipping or limiting. - Channel Mute: Mute the output of an individual channel. Press the button to mute the channel.While muted, the button will illuminate white.
- Channel ToneMatch Button: Select the ToneMatch preset for an individual channel. Use MIC for microphones and use INST for acoustic guitar. The corresponding LED will illuminate
white while selected. - Channel Input: Analog input for connecting microphone (XLR), instrument (TS unbalanced), or line level (TRS balanced) cables.
- Phantom Power: Press the button to apply 48- volt power to channels 1 and 2. The LED will illuminate white while phantom power is applied.
- USB Port: USB-C connector for Bose service use.
Note: This port is not compatible with Thunderbolt 3 cables. - XLR Line Output: Use an XLR cable to connect the line-level output to a Sub1/Sub2 or another bass module.
Assembling the System
Before connecting the system to a power source, assemble the system using the array extension and mid-high array.
- Insert the array extension into the subwoofer power stand.
- Insert the mid-high array into the array extension.
Connecting Power
- Plug the power cord into the Power Input on the L1 Pro.
- Plug the other end of the power cord into a live electrical outlet.
Note: Do not power on the system until after you’ve connected your sources. See Connecting Sources
below. - Press the Standby Button. The LED will illuminate white while the system is on.
Note: Press and hold the Standby Button for 10 seconds to reset the system to factory settings.
Auto Off/Low-power Standby
After four hours of no use, the L1 Pro will enter Auto Off/Low-power Standby mode to save power.
To wake the system from Auto Off/Low-power Standby mode, press the Standby Button.

Connecting Sources
Channel 1 & 2 Controls
1 and 2 Channel are for use with microphones, guitars, keyboards, or other instruments.
- Connect your sound source to the Channel Input with the appropriate cable.
- Apply a ToneMatch preset—to optimize the sound of your microphone or instrument—by pressing the Channel ToneMatch Button until the LED for your chosen preset is illuminated.Use MIC for microphones and use INST for acoustic guitars and other instruments. Use OFF if you do not want to apply a preset
Note: Use the L1 Mix app to choose custom presets from the ToneMatch library. The corresponding LED will illuminate green when a custom preset is selected.
- Press the Channel Parameter Control to choose a parameter to modify. The parameter name will illuminate white while it is selected.
- Rotate the Channel Parameter Control to adjust the level of the selected parameter. The parameter LED will indicate the level of the selected parameter.

Channel 3 Controls
Channel 3 is for use with Bluetooth® enabled devices and line-level audio inputs
Bluetooth Pairing
The following steps describe how to manually connect a Bluetooth enabled device to stream audio.You can use the L1 Mix app to access additional device control. For more information on the L1 Mix app, see L1 Mix App Control below.
- Turn on the Bluetooth feature on your mobile device.
- Press and hold the Bluetooth Pair Button for two seconds. When ready to pair, the LED will flash blue.
 Your L1 Pro will be visible in your device list on your mobile device. Select your L1 Pro from the device list.
When the device pairs successfully, the LED will illuminate solid white.
 Your L1 Pro will be visible in your device list on your mobile device. Select your L1 Pro from the device list.
 Note: Some notifications may be audible through the system while in use. To prevent this, disable notifications
on your connected device. Enable airplane mode to prevent call/message notifications from interrupting audio.
TRS Line Input A mono input. Use a 6.4-millimeter (1/4-inch) TRS cable to connect line-level audio sources, such as mixers or instrument effects.
Aux Line Input
A stereo input. Use a 3.5-millimeter (1/8-inch) TRS cable to connect a line-level audio source, such as mobile devices or laptops.
L1 Mix App Control
Download the Bose L1 Mix app for additional device control and audio streaming. Once downloaded, follow the instructions in the app to connect your L1 Pro. For specific information on how to use the L1 Mix App, see the in-app help.

Features
- Adjust channel volume
- Adjust channel mixer parameters
- Adjust system EQ
- Enable channel mute
- Enable reverb mute
- Enable phantom power
- Access to ToneMatch preset library
- Save scenes
Musician with Mobile Device

Band

Care & Maintenance
Cleaning Your L1 Pro
Clean the product enclosure using only a soft, dry cloth. If necessary, carefully vacuum the grille of the L1 Pro.
CAUTION: Do not use any solvents, chemicals, or cleaning solutions containing alcohol, ammonia, or
abrasives.
CAUTION: Do not use any sprays near the product or allow liquids to spill into any openings.
Troubleshooting
| Problem | What to do |
| No power | • Make sure you have power at the AC outlet. Try operating a lamp or other equipment from the same AC outlet or test the outlet using an AC outlet tester. |
| No sound | • Make sure your L1 Pro is turned on. • Make sure your instrument is plugged into the Channel Input. • Make sure the volume is turned up on your source. volume is turned up on the L1 Pro. • Make sure the L1 Pro isn’t in AutoOff/Low-power Standby mode. • Plug your instrument into a different amplifier to make sure the source is working. • Make sure the Channel Mute button is not engaged. |


