Table of contents
show
Brand-Stand CubieBlue Charging Alarm Clock User Manual
Important Safeguards
- The use of incorrect outlets could cause the unit to malfunction or catch fire.
- To reduce the risk of fire or electrical shock, do not use this device with a receptacle in which the slot openings do not align with the blades.
- Do not allow children to operate the unit without adult supervision.
-
- Always ensure the product is unplugged from the electrical outlet before relocating or cleaning it.
- Keep the power cord and product away from heated surfaces.
- The unit should not be exposed to dripping or splashing and no objects filled with liquids, such as vases,
should be placed on or around the product.
Product Features
- Combination Bluetooth Speaker, Power & Alarm
- Bluetooth Music Play Through
- User-friendly Alarm Clock with Single Day Alarm (Optional)
- Convenient Connections for AC and USB-Powered Devices
- Display Dimmer – 3 Levels and Off
- Auto- Update for Daylight Saving Time
- 24 hour / 12 hour clock switch
- Surge Protection Through All AC Outlets and/or USB Ports
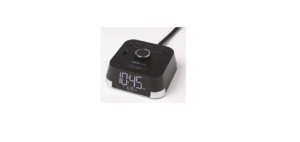
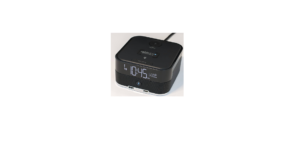
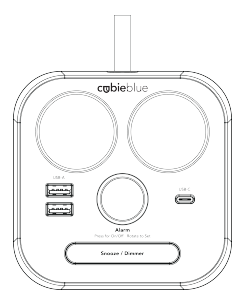
Product Description
- Bluetooth Speaker
- 2 AC Outlets
- 2 USB-A Charging Ports
- 1 USB-C Charging Port
- Single Day Alarm Clock
- Surge Protection
- 6ft 15A Power Cord
- Security C-Clamp with 2 Wood Screws (included)
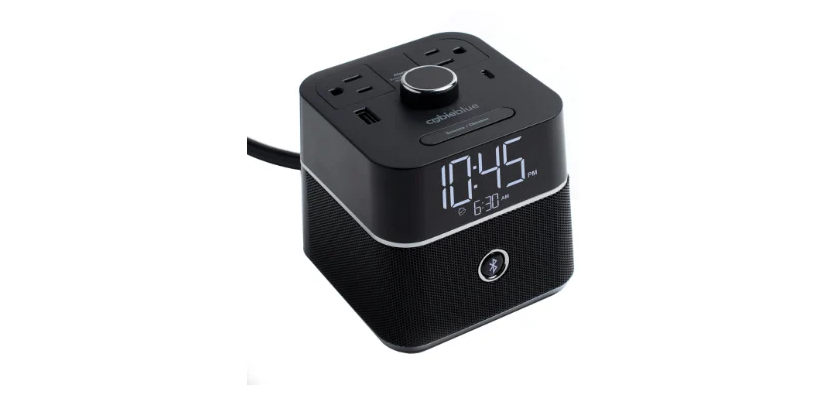
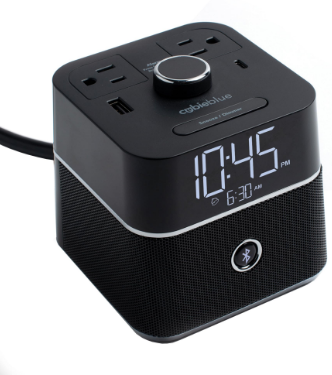
CubieBlue Top View
Unpacking and Set Up
- Carefully remove from packaging. Verify that you have all necessary components before you dispose of display carton.
- Place in desired location. This product is designed to be used on a level, stable, flat surface such as a table, desk, shelf or stand, convenient to an AC outlet, out of direct sunlight and away from sources of excess heat, dust, moisture or vibration.
- Plug directly into wall AC outlet. Do not plug into another surge protector or extension cord.
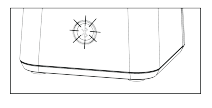
- Secure cord with C-Clamp to back of nightstand or desk. Wood screws are included.
Setting the Time
- Press and hold SNOOZE/DIMMER button for 6 seconds
- Year will begin to flash, adjust by rotating knob, press knob to select
- Month will begin to flash, adjust by rotating knob, press knob to select
- Day will begin to flash, adjust by rotating knob, press knob to select
- Time will begin to flash, adjust by rotating knob, press knob to select

Setting the Alarm
- Press knob to turn ON alarm
- Alarm time will begin to flash, adjust by rotating knob, press knob to select.
- Press knob to turn OFF alarm
-
- In Single Day Alarm On Mode: alarm time will reset to 6:00 with every activation of the alarm.
- In Single Day Alarm Off Mode: the alarm time will default back to the last set alarm time with every activation.

Bluetooth Pairing
- Open the Bluetooth setting on your device.
- Press the CubieBlue Bluetooth button.
- The Bluetooth button flashes and CubieBlue becomes discoverable.
- Connect your device to CubieBlue and enjoy your music.
Secure Battery Door/Hidden Switches
Single Day Alarm Switch (Preset to ON)
- ON: Alarm time will reset to 6:00 with every activation of the alarm.
- OFF: the alarm time will default back to the last set alarm time with every activation.
Daylight Saving Time Switch (Preset to OFF)
- ON: Time will automatically update +1 or -1 hour based on the pre-set Daylight Saving Time Calendar. Year, Month and Day must be set correctly for this feature to work properly
- OFF: Time will not automatically update for Daylight Saving Time. Any changes to the time must be manually updated.
24 hour or 12 hour Switch (Preset to 24 hr)
Time display may be set to 24 hour clock or 12 hour clock.
Other Features
Back Up Battery Function
The back up battery will not support the Alarm Settings.
Snooze/Dimmer Button
When in standby mode, press SNOOZE/DIMMER button to change brightness (off, dimmest, medium, brightest). When the display is turned off, user can also press or rotate the knob to turn display on. When alarm is sounding, press SNOOZE/DIMMER button to go to snooze status, the alarm symbol will flash and the alarm will resound after 9 minutes.
Gradual Awake
Alarm will sound in a low volume and gradually increase to a higher volume.
Battery Handling and Usage
- Follow the battery manufacturer’s safety and usage instructions.
- Keep batteries away from children and pets.
- Do not mix a new and a used battery or mix batteries of different chemistries or sizes.
- Insert the batteries observing the proper polarity (+/-) as indicated inside the battery compartment. Failure to properly align the battery polarity can cause personal injury and/or property damage.
- Never throw batteries into a fire. Do not expose batteries to fire or other heat sources.
- Dispose or recycle spent/discharged batteries in compliance with all applicable laws. For detailed information, contact your local solid waste authority.
Technical Specifications:
- Continuous Duty Electrical Rating: 250VAC 13A 50/60Hz 3250 W
- Maximum Energy Dissipation: 600J L-N 200J L-G 200J N-G 200J
- Maximum Spike Current: 36000A L-N 12000A L-G 12000A N-G 12000A
- AC Outlets Output: 250 V 13A
- USB Input: 220-240V AC 50/60Hz 1.0A
- Powered USB-A Output: 5V/2.4A shared
- Powered USB-C Output: 5V/3A 9V/2A 15V/1.2A