
Cocoon HE180101 FPV HD Camera Drone User Manual
Warranty Details
The product is guaranteed to be free from defects in workmanship and parts for a period of 12 months from the date of purchase. Defects that occur within this warranty period, under normal use and care, will be repaired, replaced, or refunded at our discretion. The benefits conferred by this warranty are in addition to all rights and remedies in respect of the product that the consumer has under the Competition and Consumer Act 2010 and similar state and territory laws. Our goods come with guarantees that cannot be excluded under the Australian Consumer Law. You are entitled to a replacement or refund for a major failure and for compensation for any other reasonably foreseeable loss or damage. You are also entitled to have the goods repaired or replaced if the goods fail to be of acceptable quality and the failure does not amount to a major allure.
Safety Instructions
Follow all instructions and take notice of all warnings to reduce the risk of fire or electric shock
- Read the instructions in this manual thoroughly before operating your Cocoon Voyager Quadcopter FPV.
- This Cocoon Voyager Quadcopter FPV must be operated safely at all times. It is the operator’s responsibility to always the in-cate conditions component of the Voyager Quadcopter FPV is operating correctly before.
- Always follow local aviation rules and regulations when flying the Voyager Quadcopter FPV. This Cocoon Voyager Quadcopter FPV is designed for ages 14%. Adult supervision is always desirable with any form of flying toy.
- Always ensure your tight area is safe. If a problem occurs with the Cocoon Voyager Quadcopter FPV, always contact the supplier before attempting to fly again Do not fly in windy, rainy, or low light conditions Nor-rechargeable batteries are not to be recharged Rechargeable batteries are to be removed from the toy before being charged. Rechargeable batteries are only to be charged under adult supervision. Exhausted batteries are to be removed from the toy.
- The supply terminals are not to be short-circuited. Winplus Australasia will not take any responsibility for the incorrect use of the Cocoon Voyager Ovadcooter Fry.
Rules & Regulations
The following regulations must be followed when operating your Cocoon Voyager Quadcopter FPV in Australia.
- You must only operate this aircraft in your line of sight in daylight.
- You must not fly closer than 30 meters to vehicles, boats, buildings, or people.
- You must not fly over populous areas, such as beaches, other people’s backyards, heavily populated parks, or sports ovals where there is a game in progress.
- If you are in controlled airspace, which covers most Australian cities, you must not fly higher than 120 meters (400 feet).
- You should not fly within 5.5 km of an airfield. It’s illegal to fly for money or economic reward unless you have an unmanned operator’s certificate issued by the Civil Aviation Safety Authority (CASA).
Source: http://www.casa.gov.au/wcmswr/_assets/main/lib100071/flying_with_control_model.pdf It is the Voyager Quadcopter FPV operator’s responsibility to regularly check and abide by the current rules and regulations.
Incorrect operation of this Cocoon Voyager Quadcopter FPV may result in severe injury, loss of property, or fines. Winplus Australasia does not take any responsibility if local rules and regulations are not followed.
Warnings
- This drone is not a toy and can cause severe damage or injury if used incorrectly. If you have never flown a drone before, read the full manual before attempting to fly.
- Propellers are hazardous moving parts, when they are operational keep fingers and other body parts away from them
- Incorrect operation of the drone may result in severe injury, loss of property, or fines. Winplus Australasia does not take any responsibility if local rules and regulations are not followed
- Winplus Australasia does not take any responsibility for the loss of the Cocoon FPV HD Camera Drone and it is NOT covered by warranty. We recommend that users test their drone in a safe indoor environment before attempting to fly the drone outdoors
- Do not attempt to repair, open, or alter any components. In the case of improper usage or if you have opened, altered, or repaired the product yourself, all warranties and guarantees are void.
Battery Care and Storage
How to Maintain Lithium Battery
- Charge new batteries following the charging instructions
- Only use the provided USB charging cable to recharge the rechargeable battery
- Avoid frequently overcharging
- Avoid touching metal contacts
- Avoid using often in high or low-temperature environments.
- Avoid long periods without using or recharging.
- Avoid using lithium-ion batteries which are hot after being fully charged.
Battery Storage
- Charge or discharge the battery to approximately 50% of capacity before storage.
- Charge the battery to approximately 50% of capacity at least once every six months.
- Remove the battery and store it separately from the product. Store the battery at temperatures between 5 °C and 20 °C.
Maintenance and Storage
The maintenance of drones should be conducted by skilled persons only. Always unplug the battery before doing maintenance. Please follow below safety/deterioration checks during maintenance:
- Check the conditions of the Drone Body, Propeller Guards, Landing Gear, and Propellers to ensure
they are intact - Check the condition of the Battery to ensure it is intact
- Check the conditions of all screws to ensure they are screwed tight
- Check the conditions of the wiring to ensure nothing is pinched or damaged
Disposal
At the end of its working life, do not throw this product out with your household rubbish. Electrical and electronic products contain substances that can have a detrimental effect on the environment and human health if disposed of inappropriately Observe any local regulations regarding the disposal of electrical consumer goods and dispose of it appropriately for recycling. Contact your local authorities for advice on recycling facilities in your area.
Observe local regulations regarding the disposal of waste products. Contact your local authorities for advice on recycling facilities in your area Please keep the original packaging carton and materials in a safe place. It will help to prevent any damage if the product needs to be transported in the future. In the event it is to be disposed of, please recycle all packaging material where possible. If you require another copy of this instruction manual, please contact customercare@winplus.com.au to obtain an electronic copy.
Parts List
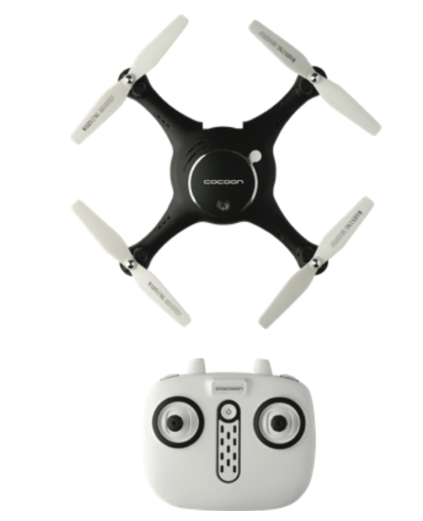
- 1x Cocoon FPV HD Camera Drone
- 1x 2.4GHz Remote Control
- 1x USB Charging Cable
- 1x Rechargeable Battery
- 1x Phone Mount
- 1x Screwdriver
- 1x Detachable HD 720P Camera
- 4x AA Activ Energy Batteries
- 4x Propeller Guards
- 4x Landing Skids (On the drone)
- 4x Spare Blades
- 1x Instruction Manual (Not shown)
- 1x Getting Started Guide (Not shown)
- 1x Warranty Card (Not shown)
- 1 x Flight Safety Card (Not shown)
Features
- High Definition (720P) camera records high-quality video & photos
- FPV (First Person View) wireless transmission to iOS or Android smartphone*
- Hover feature and headless mode
- Light yet robust construction
- 360-degree built-in flip stunt feature
- 4 channel 2.4GHz remote control
- 6-Axis gyroscope for stability
Technical Specifications
- Rechargeable battery for drone: 3.7V DC 500mA Lithium Battery
- Charging time: Approx. 130 minutes
- USB charger input: 5V DC
- Fly time: Up to 8 mins per charge depending on usage*
- Frequency: 2.4GHz
- Gyro: 6 Axis
- Battery for remote control: 4 X AA batteries (included)
- Control distance with remote control: Up to 45 meters+
- Control distance with a smartphone: Up to 25 meters+
- NOTE: Flight times will vary depending on proper care of the batter and flight conditions +
- NOTE: Strong magnetic fields could reduce the working distance
Product Overview
Cocoon FPV HD Camera Drone
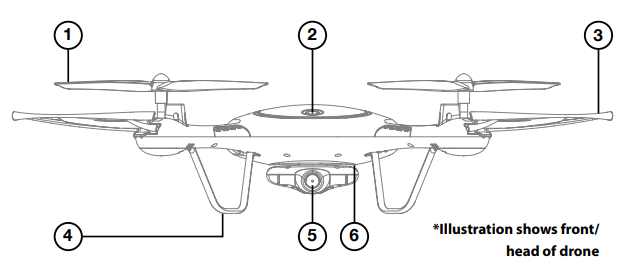
- Propeller
- ON/OFF Button
- Propeller Guard
- Landing Skid
- Camera/MicroSD Card Slot (Rear)
- Battery (Behind)
NOTE:
MicroSD Card not included. Maximum card capacity 32GB.
Remote Control

- Phone Holder
- ON/OFF Button
- Left Thumb Stick – Fly Up/ Down, Turn Left/Right, Depress for Fine Tuning,
- Right Thumb Stick – Headless mode, Slow/ Fast Speed Control, Fly Forwards/Backwards, Sideways Flying
- Photo
- Video
- 360º Flip Stunt
- B Button – Short press for auto take-off and landing
Operation
WARNING:
Incorrect operation of the Cocoon FPV HD Camera Drone may result in severe injury, loss of property, or fines. Winplus Australasia does not take any responsibility if local rules and regulations are not followed. Winplus Australasia does not take any responsibility for the loss of the Cocoon FPV HD Camera Drone and it is NOT covered by warranty. We recommend that users test their drones in a large, safe indoor environment before attempting to fly the drone outdoors. Do not fly above 3 meters until you can accurately and confidently control the Cocoon FPV HD Camera Drone.
Turning ON and Pairing the Remote Control with the Drone
To commence pairing, make sure you have switched both the remote control and drone ON by pressing the ON/OFF button on both devices. You will notice the ON/OFF buttons on both devices will flash red. To pair:
- a. Move the left thumb stick up and then down. You will hear two beeps
- b. The ON/OFF buttons on both devices will then change to solid red once paired
- c. The LED lights underneath the drone will also flash. Orange indicates the head of the drone, while green indicates the tail of the drone
Engaging the Propellers
To start the propellers and fly the drone, there are three methods that can be used, however, each operates slightly differently.
Method 1

Push the left thumbstick up to the highest point and then allow the thumbstick to reset to the center.
Method 2

Move the left and right thumb sticks inwards and hold for 1-2 seconds as illustrated.
Method 3

Press the B Button. This will start the propellers and raise the drone automatically off the ground.
Switching OFF the Propellers & Drone
To power down the drone and its propellers, there are three methods that can be used. Each method is different and should be used based on the situation at hand:
Method 1: Slow Shutdown

Push the left thumb stick down to the lowest level and hold for approximately 5 seconds until the drone has landed and powered down. In this method, the drone will slowly come back to the ground and then the propellers will power down. Use this function if you do not want the motor and propellers to cut out immediately.
Method 2: Immediate Shut Down
Move the left and right thumb sticks inwards and hold for 1-2 seconds as illustrated to immediately shut down the motor and propellers. This method differs from methods 1 and 3 as the drone will not slowly land, the propellers will immediately shut off and the drone will fall to the ground.
NOTE:
This method should only be used for emergency landings OR when the drone is close to the ground (approximately 30cm)
Method 3: Auto-Land
Press the B button on the top of the remote control to auto-land the drone. Like method 1, the drone will slowly come back to the ground and the propellers will power down.
NOTE:
- In methods 1 and 3, the propellers will not immediately power down. If the drone is already close to the ground and you use one of these methods, you may need to use the thumb sticks to direct and control the drone as necessary until the propellers power down and the drone has landed
- To turn OFF the drone completely, press the ON/OFF button on both the drone and the remote control
- Never leave your drone unattended while powered ON
Hovering Height Adjustment
To auto-hover at your desired height, maneuver the drone up and down using the left thumb stick. At your desired height, simply remove your thumb from the thumbstick and the drone will auto-hover. You can continue to use the right thumbstick to control the direction of flight, whilst maintaining the hover. NOTE: Auto-hover will be affected by flying conditions. Fine-tune/trim the drone if necessary.
Headless / Normal Modes
The drone can be operated in Headless and Normal Modes. Headless mode enables you to fly the drone without having to focus on the drone’s orientation i.e. where the head of the drone is in relation to your position. This means that regardless of whether the head, one of the sides, or the tail of the drone is facing you, moving sideways to the left will always be left for example.
In Normal Mode, however, the drone’s direction will be dependent upon the tail of the drone in relation to your position. For example, if the drone’s tail is facing you and you maneuver it to the left, the drone will move left. However, if the head of the drone is facing you and you perform the same maneuver, you will find the drone will move right.
‘Drone Go’ Application Interface

- Take Photo
- WiFi Signal
- Engage/Switch off Propellers
- Take Video
- Left Thumbstick
- Auto Take Off
- Right Thumbstick
- Fine Tune – Forwards/Backwards
- Fine Tune – Turn Left/Right
- Auto Land
- Fine Tune – Move Sideways Left/Right
- Hide Toolbar
- Show/Hide Thumbsticks
- Level Calibration
- High/Low-Speed Mode
- Check SD Card (SD Card not included)/ Phone Memory
- Gravity Induction Mode – Uses phone movement to control drone rather than using thumbsticks
- Headless Mode
- Waypoint Mode (see note below)
- Back
NOTE:
- For information regarding thumbstick use, refer to the remote control instructions on page 16
- When fine-tuning there is no need to depress the left thumbstick with the App. Simply press the arrows
- Using the ‘Drone Go’ App allows you to view the camera in real-time using First Person View
- The waypoint function allows you to draw a pathway on the right hand side of the application, for the drone to follow. For example, a straight line, circle or triangle could be drawn which the drone will follow. Please note that this waypoint function does not use GPS, this means that the drone’s pathway can be affected by airflow and will not be as accurate as a GPS-controlled drone.
- If in Normal Mode (i.e. Headless Mode is off), take note of the head of the drone and therefore the direction the drone will take.
Repair and Refurbished Goods or Parts Notice
Unfortunately, from time to time, faulty products are manufactured which need to be returned to the Supplier for repair. Please be aware that if your product is capable of retaining user-generated data (such as files stored on a computer hard drive, telephone numbers stored on a mobile telephone, songs stored on a portable media player, games saved on a games console, or files stored on a USB memory stick) during the process of repair, some or all of your stored data may be lost.
We recommend you save this data elsewhere prior to sending the product for repair. You should also be aware that rather than repairing goods, we may replace them with refurbished goods of the same type or use refurbished parts in the repair process. Please be assured though, refurbished parts or replacements are only used where they meet ALDI’s stringent quality specifications. If at any time you feel your repair is being handled unsatisfactorily, you may escalate your complaint. Please telephone us on 1300 663 907 or write to us at:
- Winplus Australasia
- PO BOX 537
- Bayswater Business Centre
- Bayswater, VIC 3153
- Winplus Help Desk 1300 663 907
- (Operating Hours: Mon-Fri 08:30 AM to 6:00 PM)
- customercare@winplus.com.au
- www.winplus.com.au


