Dell AW720M Alienware Tri-mode Wireless Gaming Mouse User Manual
What’s in the box
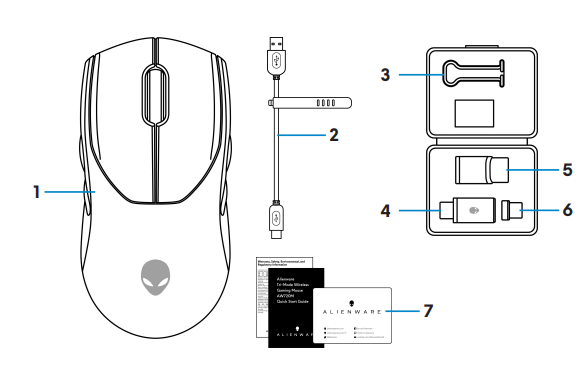
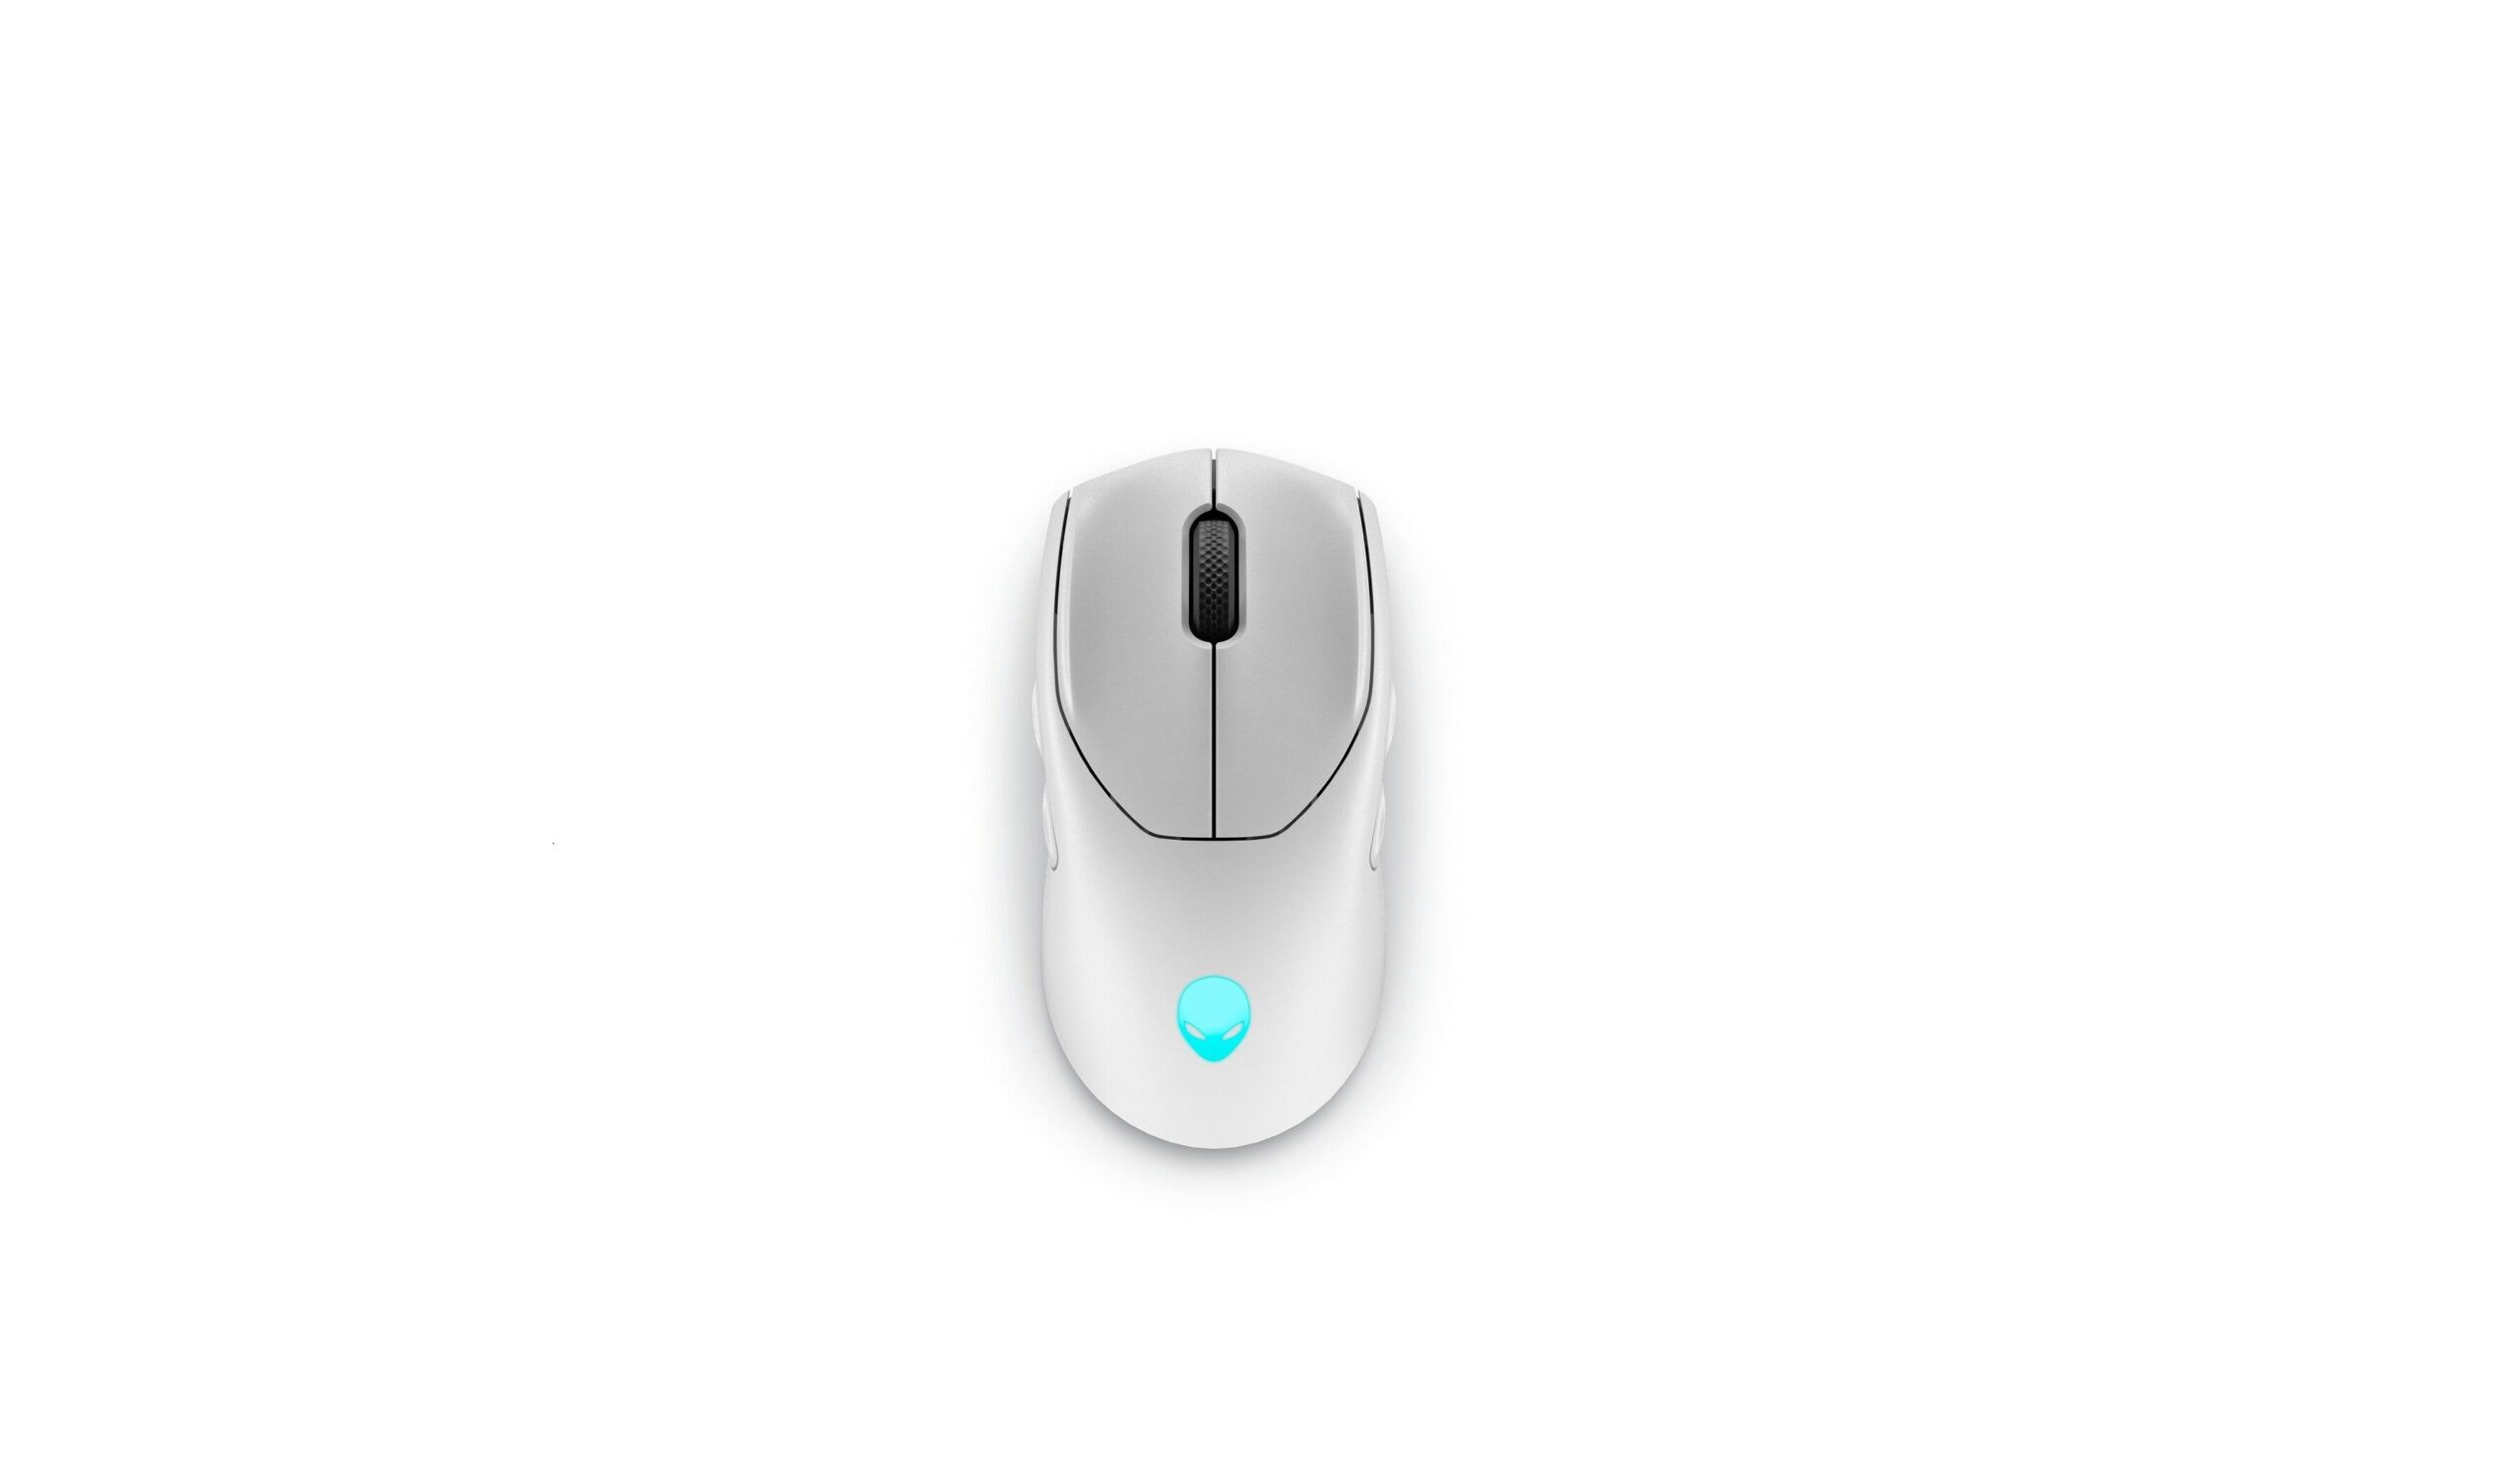
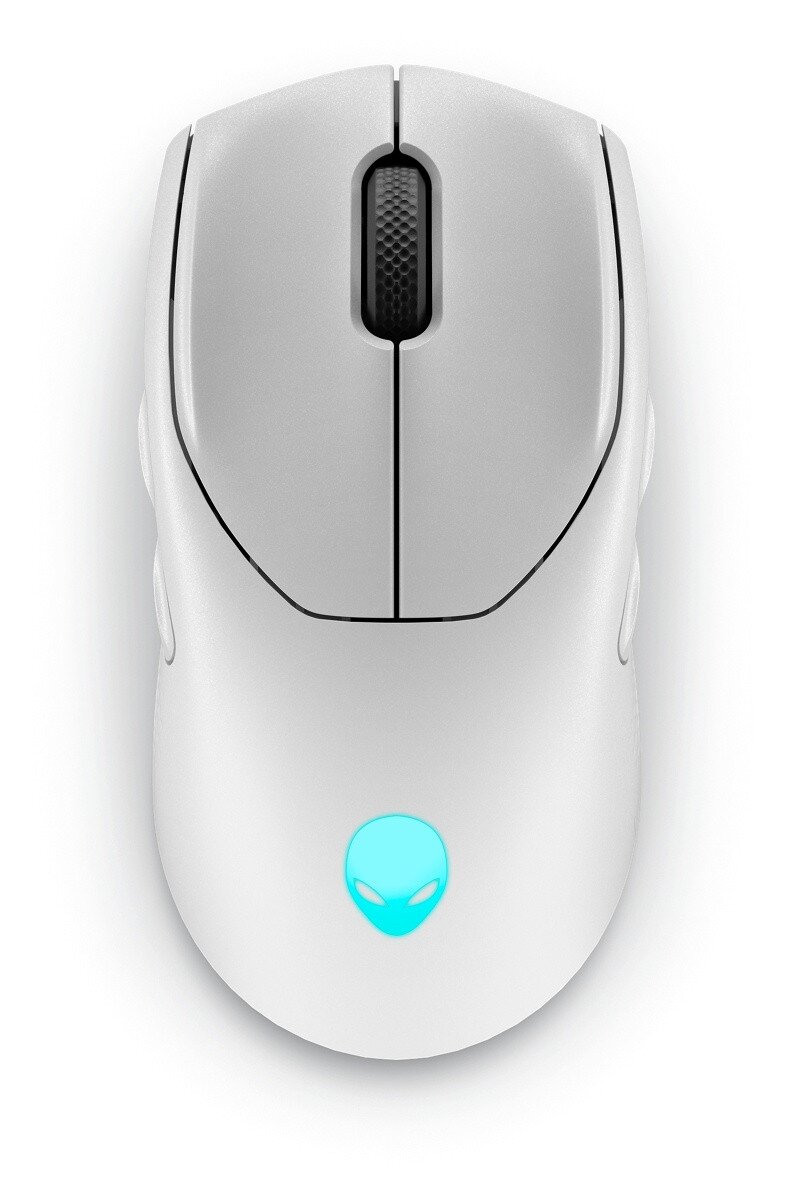
- Mouse
- USB charging cable
- Clip
- USB wireless dongle
- Dongle extender
- USB-C magnetic dongle for charging
- Documents
Features
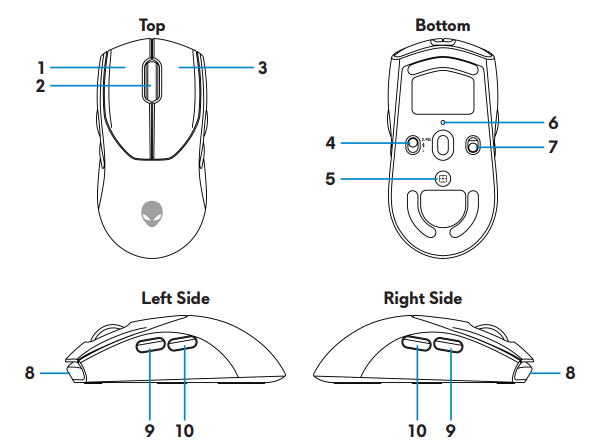
- Left button
- Scroll wheel
- Right button
- Mode button
- DPI adjustment button
- DPI indicator
- Power button
- USB-C port
- Forward button
- Backward button
Magnetic Snap Charging Function
The magnetic snap head supports fast charging (5V 900mA).
Adjustable Dots Per Inch (DPI)
Press the DPI adjustment button to instantly change the mouse tracking resolution.
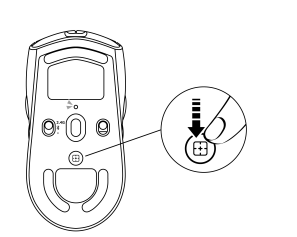
DPI setting is indicated by the DPI indicator color. The default five DPI settings available are as follows:
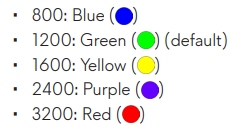
You can change the default DPI settings and customize the DPI stages with the Alienware Command Center (AWCC) application.
Setting up your gaming mouse
Connecting the mouse
![]() NOTE:
NOTE:
- The mouse supports both wired mode and wireless mode.
- Your mouse has a rechargeable battery. For best results, ensure that the battery is fully charged before using it for the first time.
- To improve battery life, turn off the power switch when the mouse is not used.
- When using magnetic charging, turn on the power switch to ensure seamless connectivity.
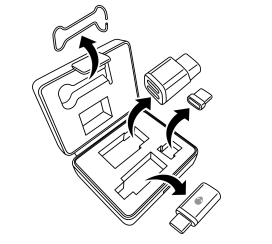
- Remove the clip, dongle extender, USB wireless dongle, and USB-C magnetic dongle from the accessory box.
- Remove the protective sheet from the mouse.
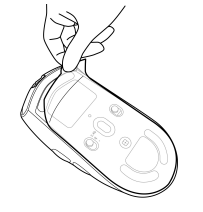
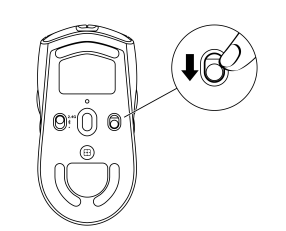
- Slide the power button down to switch on the mouse.
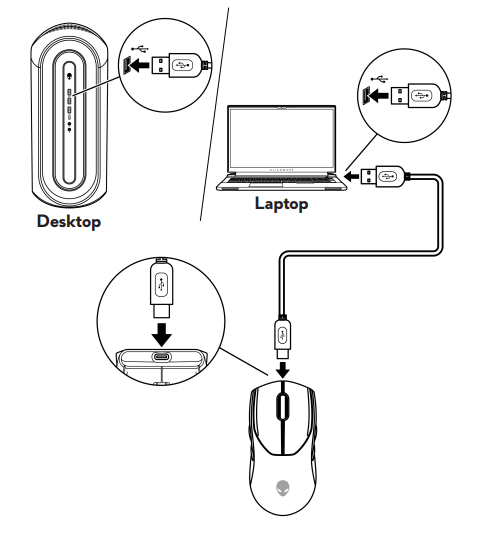
Wireless mode (2.4GHz)
Laptop
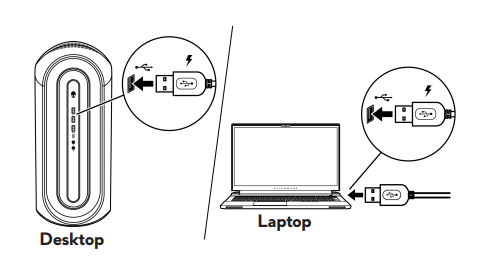
- Slide the mode button to “2.4G”.
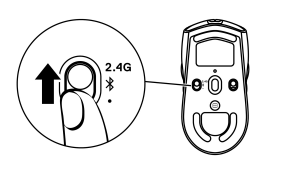
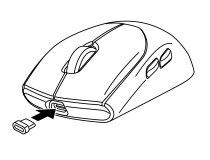
- Connect the USB wireless dongle to a USB port on your laptop.

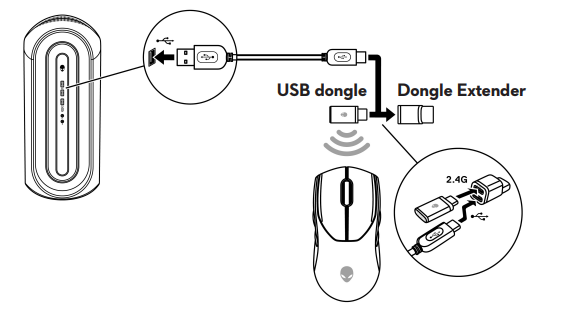
Desktop
- Slide the mode button to “2.4G”.
- Connect the USB-C end of the USB charging cable to the bottom port of the dongle extender. Insert the USB wireless dongle to the top port of the dongle extender.
- Connect the other end of the USB charging cable to an available port on your computer.
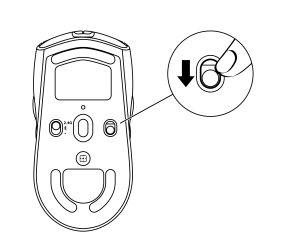
Wireless mode (Bluetooth)
- Slide the mode button down to then continue to slide the button down and hold it for three seconds. The DPI LED will blink indicating your wireless mouse is in pairing mode.

- Pair your wireless mouse with your Bluetooth-enabled computer.
Swift Pair:
- In Windows Search, type Bluetooth.
- Click Bluetooth and other devices settings. The Settings window appears.
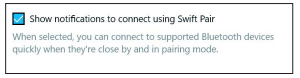
- Ensure that the “Show notifications to connect using Swift Pair” box is checked.
- Ensure that the Bluetooth is turned on.
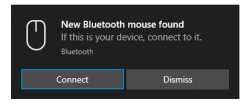
- Place your wireless mouse near your computer. The New Bluetooth mouse found window appears.
- Click Connect and confirm the pairing process on both wireless mouse and your computer.
Add Device:
- In Windows Search, type Bluetooth.
- Click Bluetooth and other devices settings. The Settings window appears.
- Ensure that the Bluetooth is turned on.
- Click Add Bluetooth or other device > Bluetooth.
- From the list of available devices, click Alienware AW720M.
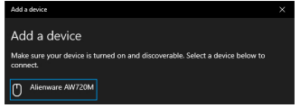
![]() NOTE: If Mouse AW720M is not listed, ensure that the pairing mode is enabled on the wireless mouse.
NOTE: If Mouse AW720M is not listed, ensure that the pairing mode is enabled on the wireless mouse.
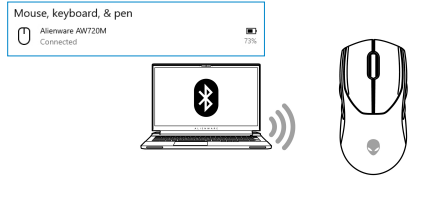
- Confirm that both the wireless mouse and the device are paired. After the wireless mouse and a device are paired, they connect automatically when Bluetooth is enabled and they are within Bluetooth range.
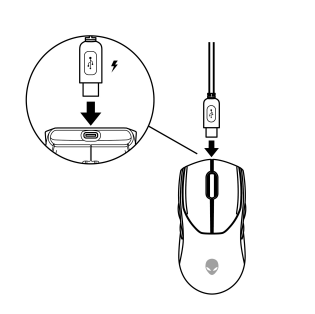
Wired mode
![]() NOTE: The battery starts charging automatically in wired mode.
NOTE: The battery starts charging automatically in wired mode.
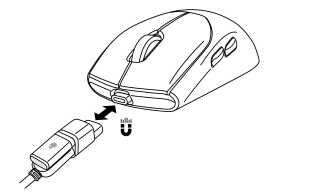
- Connect the USB-C end of the USB charging cable to the USB-C port on the mouse.
- Connect the other end of the USB charging cable to an available USB port on your desktop or laptop.
Turning on the mouse
Slide the power button down to switch on the mouse.
Charging the battery
Wired mode
- Connect the USB-C end of the USB charging cable to the USB-C port on the mouse.
- Connect the other end of the USB charging cable to an available USB port on your desktop or laptop.
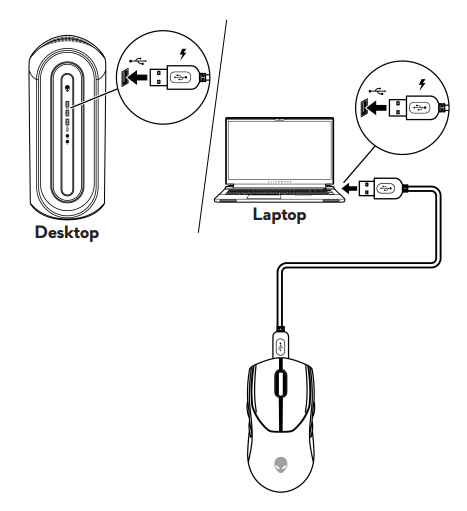
- When the battery is fully charged, the battery indicator blinks in green for 2 seconds and then stays static green for 10 seconds. After 12 seconds, it reverts to the user default lighting.
Wireless mode
- Connect the USB-C end of the USB charging cable to the bottom port of the dongle extender. Insert the USB wireless dongle to the top port of the dongle extender.
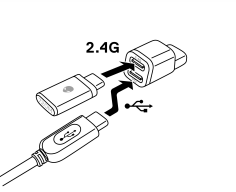
- Connect the other end of the USB charging cable to an available USB port on your desktop or laptop.
- Connect the USB-C magnetic dongle to the USB-C port of the mouse.
- Snap the magnetic end of the USB-C magnetic dongle to the magnetic port of the dongle extender.
- When the battery is fully charged, the battery indicator blinks in green for 2 seconds and then stays static green for 10 seconds. After 12 seconds, it reverts to the user default lighting.
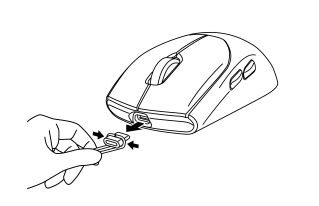
![]() NOTE: Use the clip to remove the USB-C magnetic dongle from the mouse.
NOTE: Use the clip to remove the USB-C magnetic dongle from the mouse.
Battery indicator colors

Alienware Command Center (AWCC)
Alienware Command Center (AWCC) application provides a single interface to customize and enhance the gaming experience. This application enables you to perform the following functions:
![]() NOTE: You will experience limited functionality in AWCC when your device is connected by Bluetooth Low Energy (BLE).
NOTE: You will experience limited functionality in AWCC when your device is connected by Bluetooth Low Energy (BLE).
In the FX menu, you can access the following features:
- View device connection type when it is connected by BLE.
- View battery level and charging status.
- Change lighting color and animation in the Lighting tab.
- Assign program shortcuts to device programmable buttons or keys in the Macros tab.
In the Settings tab, you have access to the following settings:
- Change power saving modes in the Settings tile.
- Change mouse button click and scroll bar responses in the Settings tile.
- Swap mouse button in the Settings tile.
- Change DPI levels in the DPI Settings tile.
- Select Lift-Off Distance in the Calibration tile.
- View firmware version and upgrade the device firmware to the latest version in the Update tile.
- Reset the device settings to factory default.
![]() NOTE: For more information, see the Alienware Command Center (AWCC) application Online Help.
NOTE: For more information, see the Alienware Command Center (AWCC) application Online Help.
Installing AWCC through Windows Update
- Connect your Alienware peripheral to your computer through the USB port. The AWCC application is downloaded and installed automatically. AWCC installation takes up to 10 minutes to complete.
- Navigate to the program folder to ensure that the AWCC installation is complete.
- Launch AWCC and perform the following steps to download the additional software components:
- In the Settings window, click Windows Update, and then click Check for updates to check the Alienware driver update progress.
- If the driver update is not responding in your computer, install AWCC from the Dell Support website.
Installing AWCC from the Dell Support website
- Download the latest version of the following applications from www.dell.com/support/drivers.
- Alienware Command CenterUpdating the mouse firmware automatically through AWCC
- Alienware Gaming Peripheral driver
- Navigate to the folder where you saved the setup files.
- Double-click the setup file and follow the on-screen instructions to install the application.
![]() NOTE: You can customize the mouse features and lighting effects by using the Alienware Command Center (AWCC) application.
NOTE: You can customize the mouse features and lighting effects by using the Alienware Command Center (AWCC) application.
Updating the firmware
![]() NOTE: For best performance, update your mouse and USB wireless dongle firmware to the latest version.
NOTE: For best performance, update your mouse and USB wireless dongle firmware to the latest version.
Updating the mouse firmware automatically through AWCC
- Connect your mouse to your computer through the USB cable.
- Launch AWCC software and click the FX tab.
- Under SETTINGS, select Alienware AW720M Tri-Mode Wireless Gaming Mouse from the EDIT DEVICE SETTINGS drop-down list.
- Click the Settings tab.
- In the Update tab, and then click the Update button. Once the firmware update is complete, the “Firmware updated successfully” message is displayed.
- Click OK.
![]() NOTE: Disconnecting the USB cable from the computer, closing the AWCC software, or shut down of computer during firmware update may damage the mouse.
NOTE: Disconnecting the USB cable from the computer, closing the AWCC software, or shut down of computer during firmware update may damage the mouse.
Updating the USB wireless dongle firmware automatically through AWCC
- Connect your mouse to your computer through 2.4GHz Wireless mode.
- Launch AWCC software and click the FX tab.
- Under SETTINGS, select Alienware AW720M Tri-Mode Wireless Gaming Mouse from the EDIT DEVICE SETTINGS drop-down list.
- Click the Settings tab.
- In the Update tab, and then click Update button. Once the firmware update is complete, the “Firmware updated successfully” message is displayed.
- Click OK.
![]() NOTE: Disconnecting the USB wireless dongle, closing the AWCC software, or shut down of computer during firmware update may damage the USB wireless dongle.
NOTE: Disconnecting the USB wireless dongle, closing the AWCC software, or shut down of computer during firmware update may damage the USB wireless dongle.
Updating the mouse firmware manually
- Go to www.dell.com/support and search for AW720M.
- From the Drivers & Downloads tab, download AW720M Mouse FW update tool.
- Connect your mouse to your computer through the USB cable.
- Open the downloaded AW720M Mouse FW update tool file.
- Click on the Update Mouse button. Once the firmware update is complete, the “Update Complete! OK” message is displayed.
- Close the window.
![]() NOTE: Disconnecting the USB cable from the computer, closing the AWCC software, or shut down of computer during firmware update may damage the mouse.
NOTE: Disconnecting the USB cable from the computer, closing the AWCC software, or shut down of computer during firmware update may damage the mouse.
Updating USB wireless dongle firmware manually
- Go to www.dell.com/support and search for AW720M.
- From the Drivers & Downloads tab, download AW720M Dongle FW update tool.
- Connect your mouse to your computer through 2.4GHz Wireless mode.
- Open the downloaded AW720M Dongle FW update tool file.
- Click on the Update Dongle button. Once the firmware update is complete, the “Update Complete! OK” message is displayed.
- Close the window.
![]() NOTE: Disconnecting the USB wireless dongle, closing the AWCC software, or shut down of computer during firmware update may damage the USB wireless dongle.
NOTE: Disconnecting the USB wireless dongle, closing the AWCC software, or shut down of computer during firmware update may damage the USB wireless dongle.
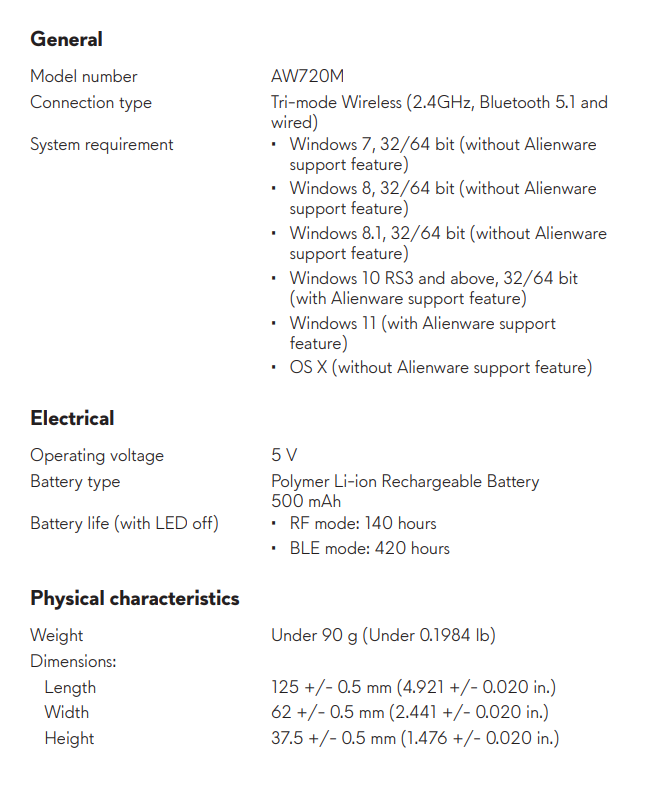
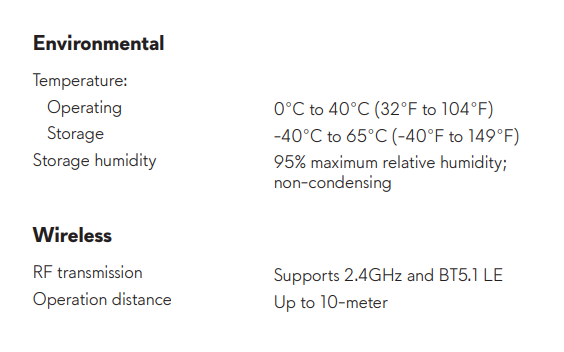
Specifications
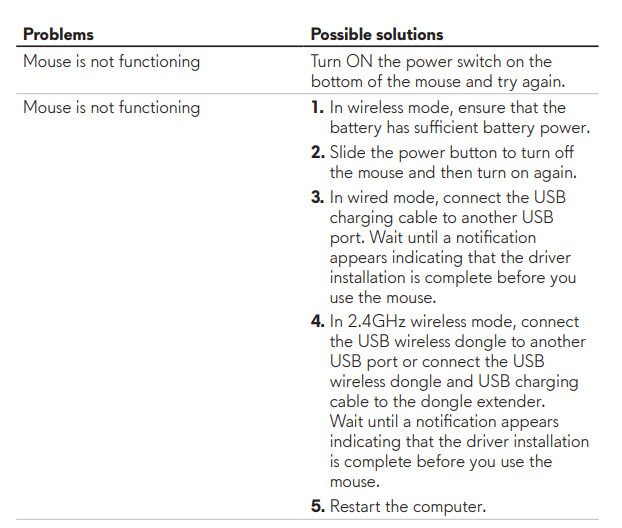
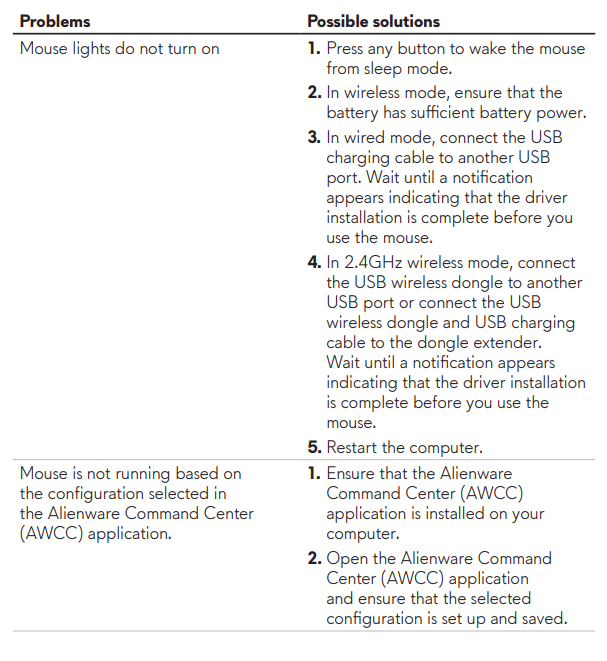
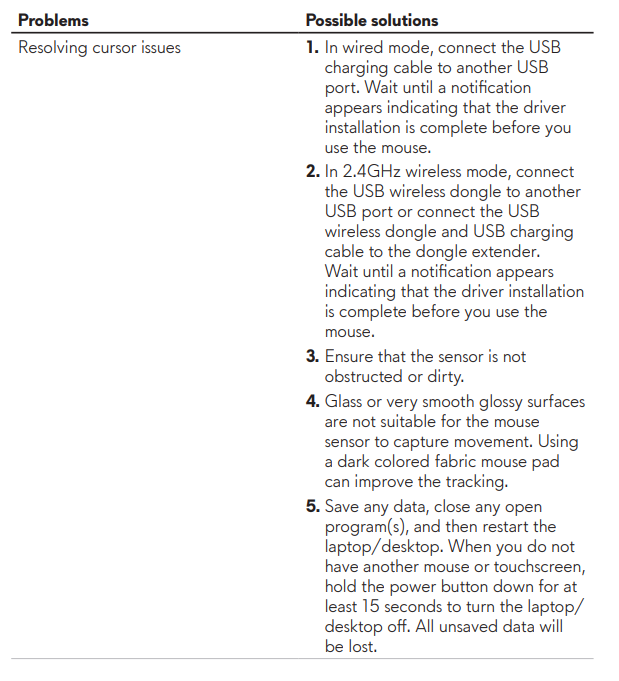
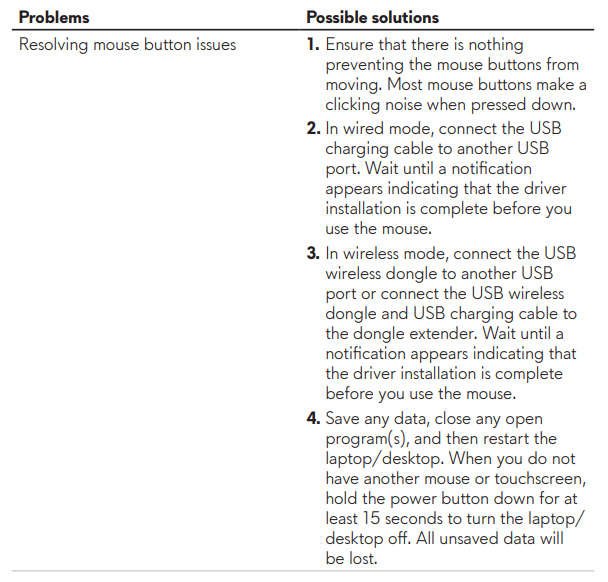
Troubleshooting

Statutory Information
Warranty
Limited warranty and return policies
Dell-branded products carry a two-year limited hardware warranty. If purchased together with Dell system, it will follow the system warranty.
For U.S. customers:
This purchase and your use of this product are subject to Dell’s end user agreement, which you can find at https://www.dell.com/terms. This document contains a binding arbitration clause.
For European, Middle Eastern and African customers:
Dell-branded products that are sold and used are subject to applicable national consumer legal rights, the terms of any retailer sale agreement that you have entered into (which will apply between you and the retailer) and Dell’s end user contract terms. Dell may also provide an additional hardware warranty – full details of the Dell end user contract and warranty terms can be found by going to https://www.dell.com/terms, selecting your country from the list at the bottom of the “home” page and then clicking the “terms and conditions” link for the end user terms or the “support” link for the warranty terms.
For non-U.S. customers:
Dell-branded products that are sold and used are subject to applicable national consumer legal rights, the terms of any retailer sale agreement that you have entered into (which will apply between you and the retailer) and Dell’s warranty terms. Dell may also provide an additional hardware warranty – full details of Dell’s warranty terms can be found by going to https://www.dell.com/terms, selecting your country from the list at the bottom of the “home” page and then clicking the “terms and conditions” link or the “support” link for the warranty terms.
DOWNLOAD PDF LINK