FoxPro Snow Crow Pro Digital Game Call User Guide
Getting Started
Congratulations on your purchase of the FOXPRO SnowPro digital game call! To avoid personal injury and product damage, be sure to read all operating instructions before using the call.
Snow Pro: First Glance
The following picture of the SnowPro corresponds to the table below. Certain aspects of the SnowPro are marked with a number that corresponds to the chart defining that element.
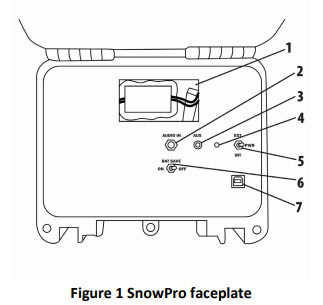
- The battery pack is in the large opening on the face plate.
- The audio input is the first jack on the left, under the battery compartment.
- The auxiliary device jack is located to the right of the audio input jack.
- The pilot light is to the right of the auxiliary jack.
- The power toggle switch is to the right of the pilot light.
- The battery saver switch is under the audio input jack.
- The USB port is located under the power switch.
The following image shows the TX433 transmitter. Certain aspects of the TX433 are marked with a numbered line that corresponds to a list below.
Remote Control
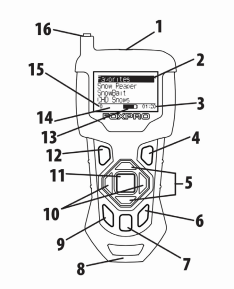
- The sound list upload jack is located on the top center of the TX433.
- The screen consumes the largest upper portion of the TX433.
- In the lower-right corner of the screen is the elapsed stand timer.
- On the lower keypad portion of the TX433, the Back/Menu button is to the upper right.
- In the center of the TX433 is a large button. Directly above and below this button are the Scroll Up and Scroll down buttons.
- The User 2 button is located on the bottom right.
- The Mute button is located to the left of the User 2 button.
- The lanyard loop is located on the bottom of the TX433.
- The User 1 button is located to the left of the Mute button.
- The Volume Up and Volume Down buttons are located to the left and right of the large button in the middle.
- The Play/Select button is the largest button in the middle of the TX433.
- The Power button is located on the upper left of the keypad.
- The Battery Level Indicator is located to the left of the elapsed timer on the screen.
- The Mute Status Indicator is located to the left of the Battery Level Indicator.
- The Volume Level Indicator is located to the left of the Mute Status Indicator.
- The antenna is located on the top left of the TX433.
Snow Pro Requirements
The SnowPro comes with an 11.1V Lithium battery pack and charger. It is recommended to charge the battery pack before using it to ensure the pack is fully charged. To install the battery pack, open the caller’s case. Connect the battery pack to the caller’s power wire by connecting the white connectors. Place the battery pack inside the cavity where the power wire comes out.
TX433 Requirements
The TX433 remote control operates on a single 9V battery. It is recommended that you use a high-quality lithium or alkaline battery for the best performance. To install the 9V battery, access the battery compartment by removing the battery compartment door from the back of the TX433. The door slides down and off the remote. Insert the 9V battery in the back of the remote. Slide the battery compartment door back onto the remote. Push and hold the power button on the TX433 for approximately 1-2 seconds to power it on. The LCD will activate and display the primary screen.
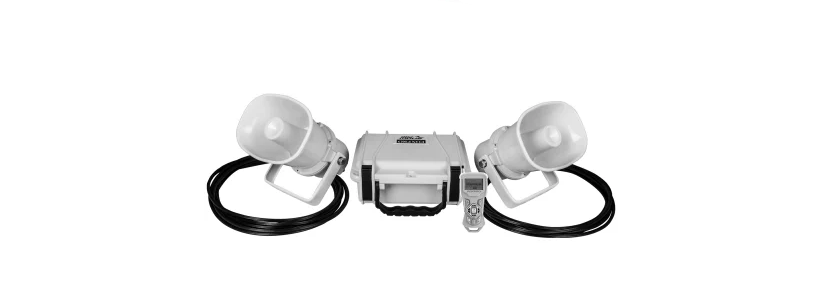
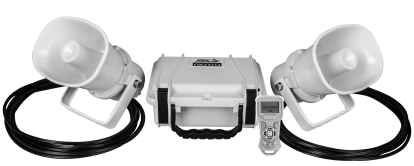
Connecting the Speakers to the Caller
The SnowPro comes standard with 2 speakers that have 12’ of cable, and ¼” speaker jacks. Make sure your caller is turned off when connecting the speaker cables to the speaker jacks on the sides of the SnowPro.
Playing Sounds
NOTE: THE SNOWPRO TRANSMITTER IS NOT INTENDED TO OPERATE THE CALLER AT DISTANCES SHORTER THAN 1 METER (3 FEET). IF THE TRANSMITTER IS LOCATED TOO CLOSE TO THE CALLER, THE PROPER OPERATION CANNOT BE ENSURED. Power on your SnowPro caller and the TX433 as previously described. Move the highlight bar to one of the sound categories and push the “Select” button. Doing this results in displaying all the sounds in that category. To exit the current category, push the “Back/Menu” button. After moving the highlight bar to the sound you wish to play, push the “Select” button a single time to begin playback. Your selected sound will begin playing at low volume.
- To adjust the volume: Use the “Volume Up” button to raise the volume level to your desired setting. Use the “Volume Down” button to decrease the volume level. The transmitter has 20 volume steps. To silence the sound: Push the “Mute” button a single time. When muted, the mute status indicator on the TX433 display shows an “M” and the current sound is silenced. Un-muting is accomplished by pushing the “Mute” button a second time (the “M” will no longer be displayed, and the sound will resume playing).
- To switch sounds: Use the scroll buttons to navigate to a different sound and push the “Select” button.
You can switch sounds while the SnowPro is actively playing a sound or while muted.
Remote Features
Primary Display Area
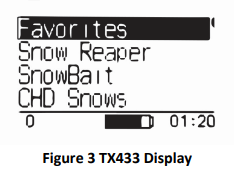
When powered on, the TX433 briefly displays a startup screen (firmware version) and then goes straight to the primary display area (see image to the right). The “Favorites” menu item holds your 10 favorite sounds. Below “Favorites” are your various sound categories. The bottom line of the display is a status bar that shows (in order):
current volume level, mute status, battery level, and elapsed timer.
Favorites
The TX433 allows you to establish a list consisting of 10 of your most frequently used sounds under the “Favorites” menu. These “Favorites” allow for quick selection of your favorite sounds at your predetermined volume level. This section describes the process involved in creating, changing, and using your presets. To create a new Favorite, select the “Favorites” menu item on the TX433. To set a preset, position the black highlight bar on one of the blank preset slots and push the “Select” button a single time.
Main Menu
The main menu provides access to a variety of transmitter configurations. To access the main menu, push the “Back/Menu” button a single time. The available menu options are as follows: “Sound Settings,” “Display/Power,” “Timer/User,” and “Remote Settings.” The following sections cover each of these menu items and their sub-menu items in detail.
Sound Settings: Volume Step
The TX433 has a range of volume steps from 0 – 20. Increasing the volume in the field by increments of 1 may be too slow for some, therefore, this stepping value is configurable. You can choose from 1, 2, and 3.
Sound Settings: Play Mode
The available options are repeat, single play, and jukebox. The default setting is repeat. In Repeat mode, the SnowPro will play the selected sound repeatedly until you interrupt it. In Single play mode the sound will play a single time, then stop. In Jukebox mode the sounds play a single time, incrementally. The Play Mode setting is NOT stored between power cycles.
Caller Features
Power Switch
The SnowPro has a 3-position power switch. The middle position is OFF, the top position is labeled EXT, and the bottom position is labeled INT. The INT position is for use with the included 11.1V Lithium battery pack. If you are looking for extended battery life, you can use a 12V gel cell, SLA, or car battery. To use a 12V battery, you will need to contact FOXPRO to receive the correct power cable that goes from the battery to the caller. If you are using a 12V battery, you will use the top EXT position when powering the caller on. Warning: If you run the switch in the wrong position, the caller will still play. If you are using an external 12V battery and use the INT power position, the caller may put the battery in a state of deep discharge which can ruin the battery.
Speaker Jacks
The SnowPro comes standard with two speakers. Each speaker has 12’ of speaker cable with a ¼” speaker jack. You will also notice that each speaker has a speaker jack built into the housing. These jacks will allow you to connect a second external speaker into each one. This will allow you to run the SnowPro with up to 4 total speakers to increase the area from which your sound will be broadcasted. Note: External speakers come with 12’ of speaker cable. This will give you a calling area with a 48’ diameter.
Auxiliary Jack
The AUX jack is provided primarily for the remote control of FOXPRO decoys and may be suitable for controlling other similar devices.
Audio IN
Your SnowPro game call can be used as an external speaker for audio devices that have an audio output jack. To use the caller’s Audio IN jack, you will need a 3.5mm stereo patch cable. Turn off the SnowPro caller, and your audio device. Connect the 3.5mm stereo patch cable to the audio output jack on your device and connect the other end to the AUDIO IN jack on the SnowPro caller. Turn on your SnowPro, and the audio device, and the SnowPro will now act as an external speaker.
Battery Saver
There may be times when you feel you don’t need to access the full volume potential of the caller to conserve your battery life, so the SnowPro has a battery saver built in. To enable this feature, simply flip the switch labeled “BAT SAVE” from OFF to ON. You will now be able to call for an extended period, although the volume of your caller will be slightly reduced.
Pilot Light/Low Battery Indicator
When you power on the SnowPro, you will notice that the green pilot light will illuminate and stay solid green. This is also your low battery indicator. When the battery life of the caller starts to diminish, the green light will start to flicker. The more it flickers, especially when a sound is playing, the closer your batteries are to dying. You will need to recharge your battery pack according to the battery’s instructions.
USB Port
The SnowPro has a built-in USB port. This port is used to connect the SnowPro caller to a computer to add or change sounds. The USB cable you will need is a USB 2.0 A/B cable.
Programming the SnowPro
The SnowPro can store up to 300 sounds in total. From the factory, it’s loaded with 75 sounds. FOXPRO offers free software for both PC and Mac that assists you in this process. The FOXPRO website contains an extensive library of free sounds and sounds that can be purchased and installed in the SnowPro. The website also contains extensive
information on how to use the programming software. We strongly recommend that you view the online resources to become familiar with the programming process including watching the walkthrough video.
Maximizing Remote Range
To achieve the best possible remote range with your SnowPro digital game call system, it is recommended that the following points be observed:
- Fully extend the telescopic antenna on the TX433 remote control.
- Always use a high-quality alkaline or lithium battery in the remote.
- Always maintain a clear line of sight between the remote control and the SnowPro. Any obstructions—no matter how significant or insignificant—can adversely affect the radio signal.
- Keep the remote control a minimum of six inches away from your body, gun barrel, and metal shooting sticks as these things can detune the remote control.
- Hold the remote control vertically with the antenna pointing skyward.
- Avoid using the device remotely when you are near power lines, cellular phone towers, and radar (such as near airports or military installations).
- Try to elevate the caller off the ground by approximately three feet. This can greatly maximize your overall remote-control range.
Product Care & Maintenance
Avoid exposure to all precipitation and moisture. Moisture can potentially enter the unit or the battery compartment and cause serious problems. Proper care should be taken to mitigate the introduction of moisture into the machine and make sure that no moisture is present during storage. Moisture can quickly lead to corrosion, electrical shorts, and even rust—all of which can render the unit damaged and out of warranty. This type of damage is preventable!
If you are operating in rainy, wet conditions, it is recommended that you place the unit inside of a large plastic storage bag or use a water/weatherproof deployment bag to keep water from getting to it. When storing the unit for prolonged periods, be sure that you keep it in a dry location. Remove batteries prior to storage or extended periods of
inactivity! All batteries, whether alkaline or rechargeable, should be removed from the game calls, decoys, and transmitters prior to storage or periods of inactivity. Batteries left inside of electronic devices can leak over time. Damages caused by this can be severe and potentially destroy the electrical components.
FCC & IC Information
RF Exposure Safety Notice
The SnowPro transmitter is not intended to be operated closer than 20cm (about 8 inches) to your body. The transmitter can produce a radiated RF field like that of a standard cell telephone, although the duty cycle of this RF field is much lower than that of a cell telephone. Using the transmitter closer than 8 inches to your body can increase your exposure to RF energy levels thought by some to be harmful. Additionally, operation near your body can detune the antenna causing a decrease in operating performance. The antenna(s) used for this transmitter must be installed to provide a separation distance of at least 20 cm from all persons and must not be co-located or operating in conjunction with any other antenna or transmitter. End-users and installers must be provided with antenna
installation instructions and transmitter operating conditions for satisfying RF exposure compliance.