Table of contents
show

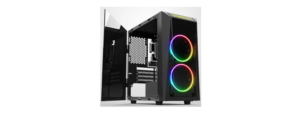
GAMDIAS TALOS-M1B RGB Gaming Case User Manual

SPECIFICATIONS
- Dimensions (H× W xD) 448 × 210 x 466 mm 17.6 × 8.3 x 18.3 inch
- Case Tyne MID Tower
- Material(s) Tempered Glass, SPCC, ABS
- Side Panel 4mm Tempered Glass x 2 (Left & Front)
- Motherboard Support 6.7″ x 6.7″ (Mini IT X), 9.6″ x 9.6″ (Micro ATX), 12″ × 9.6″ (ATX)
- Expansion Slots 7+2
- Drive Bays
- 2 × 3.5″ or 2 × 2.5″(HDD Cage) 2 x 2.5″
- Radiator Support
- Front: 1 x 360mm, 1 x 280mm
Rear: 1 x 120mm - Fan Support
- Front: 3 x 120mm, 2 x 140mm
Top: 2 x 120mm, 2 x 140mm
Rear: 1 x 120mm, 1 x 140mm - PSU ATX PS2
- Clearance
- CPU cooler height limitation: 168mm
VGA length limitation: 350mm
PSU length limitation: 180mm
EXPLODED VIEW PARTS

PARTS
- Chassis Body
- Swing Door
- Tempered Glass Left Side Panel
- Right Side Panel
- Top Dust Filters
- Tempered Glass Front Panel
- Front Panel
- Logo Panel
- IO Port
- HDD Tray
- Rubber Foot
ACCESSORY

SIDEPANEL REMOVAL

Remove the side panel.
MOTHERBOARD INSTALLATION

Lay down the chassis Install the motherboard in a proper location and secure it with screws.
PSUINSTALLATION

Place the PSU in the proper location.
3.5″ 2.5″ HDD INSTALLATION

- A. 3.5″ HDD
Align the HDD into the mounting holes and screw it in. - B. 2.5″ SSD Align the SSD into the mounting holes and screw it in.
PCI-E/PCICARD (s)USAGE

(Optional) Extend in stalling to Motherboard. PCI-E Cable Not Included.
AIR COOLINGCOMPATIBILITY

- Top 120 mm x 2 or 140 mm x2
- Front 120 mm x 3 or 140 mm x2
- Rear 120 mm x 1 or 140 mm
RADIATOR COMPATIBILITY

- Top 240 mm
- Front 360 mm or 280 mm
- Rear 120 mm
I/O PORTS

- Power Button
- Speed Controller
- Fan LED Control
- MIC
- Headphone
- USB 2.0
- USB 3.0

Switchable IO and Logo Plate.
I/O CONNECTORS

See your motherboard’s manual for front panel header locations and pi-outs.
RGB FAN CONTROLLER INSTALLATION
- The fan-led wiring must be connected to the fan hub in the order you want the lighting effects to be displayed.
- Fans must start at “1” and continue in series. 1 > 2 > 3 > 4 > 5 > 6
- Any fan not connected in series will break communication and the RGB lighting function will not work.
- Mount the fan(s) to the location of your choice in the chassis.
- Mind a location for the fan hub that allows connection for all of the fan’s RGB LED cables installed in your system.
- The fan controller will also need to be plugged into the fan hub for control of the RGB LED lighting.
- Mount the fan hub with the provided mounting strips.