HALO AIR BOLT OPERATING USER MANUAL

HALO BOLT AIR
Thank you for choosing HALO!
Powerful and loaded with features including a new, easy to use digital display, the HALO BOLT AIR can be used to safely jump start your vehicle or inflate your tires. The HALO BOLT AIR provides portable power so you can charge your phone, tablet and other electronic devices anywhere! The HALO BOLT AIR also includes a convenient floodlight and emergency light. Compact, versatile and simple to use, the HALO BOLT AIR and all accessories fit neatly in its carrying pouch and is perfect to store in your home or vehicle for every day use or an emergency need. Never be without a charge, a jump start, or with a fat tire again!
INCLUDED ITEMS
- HALO BOLT AIR
- Jumper Cables
- USB to Micro USB Cable
- Carrying Pouch
- Car Charging Adapter
- Wall Charging Adapter
- 4 Interchangeable Air Nozzles
- 12 Inch Air Hose Extension

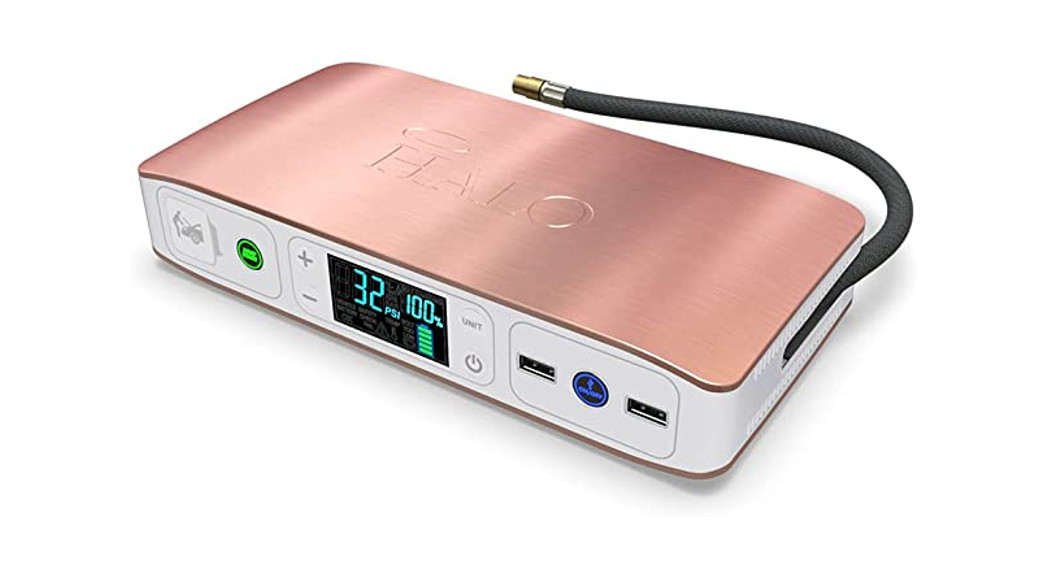
- Jump Start Output
- Jump Start Button
- Digital Screen
- Pressure Unit Button
- USB Outputs
- Pressure Settings (+) and (-)
- Air Compressor ON/OFF Button
- USB ON/OFF Button
- Air Hose
- Charging Input
- Floodlight ON/OFF Button

- Floodlight/Emergency Light
- 12 Inch Air Hose Extension
- Jumper Cable Clamps
- Tapered Adapter (x2)
- Sports Ball Needle Adapter
- Presta Valve Adapter
- Wall Charging Adapter
- Car Charging Adapter

OPERATING INSTRUCTIONS
CHARGING YOUR HALO BOLT AIR
IMPORTANT: Before using your HALO BOLT AIR for the frst time, fully charge it (so that pressing any button, displays 100% on the digital screen).
To charge your HALO BOLT AIR, use the provided Wall Charging Adapter, and plug the AC adapter plug into the charge input. Next,
connect the AC adapter into a wall outlet. The HALO BOLT AIR will automatically begin charging. When the HALO BOLT AIR is fully
charged, all five battery indicator lights will be solid green and the digital screen will indicate 100% charge. (This could take up to 9 hours).

While charging, the digital screen will illustrate the charge percentage of the HALO BOLT AIR. When fully charged, disconnect the cable.

NOTE:
The HALO BOLT AIR is designed to charge between 32°F-113°F (0-45° C). A “TEMP” indicator will be illustrated on the digital display if the HALO BOLT AIR is attempted to be charged outside of this temperature range.

When you’re on the road, you can also use the supplied Car Charging Adapter to charge your HALO BOLT AIR.

JUMP STARTING YOUR VEHICLE WITH THE HALO BOLT AIR
- Plug the jumper cables into the jump start output on the HALO BOLT AIR.

NOTE:
Make sure the jumper cables are fully plugged into the jump start output before trying to jump your vehicle. - Attach the jumper cable clamps to the vehicle battery.
- Red clamp on positive terminal (+)
- Black clamp on negative terminal (-)

- NOTE:
Do not touch red (positive) and black (negative) clamps together at any point. If the jump start button ashes red, the jumper cables have been connected incorrectly. If this fashing red condition occurs, disconnect the jumper cables from the HALO BOLT AIR and vehicle battery and restart the process from Step 1.
- Press the “Jump Start” button and wait for solid green light.

NOTE:
A flashing green light indicates safety checks are in progress. - Start your vehicle.
- Disconnect the jumper cable clamps from the car battery.


JUMP START TROUBLESHOOTING TIPS

NOTE:
If none of these troubleshooting tips work, please consult a certified mechanic for assistance.
HALO BOLT AIR COMPRESSOR
The HALO BOLT AIR comes equipped with a 12 Inch Air Hose Extension and 4 Interchangeable Air Nozzles. Simply twist on the corresponding nozzle to infate balls, pool foaties, bike tires, and more!
- Connect the air hose to the tire or use the appropriate nozzle to connect to your inflatable device
- Press the (+) or (-) button to set the desired pressure. The pressure measuring units can be changed by pressing the UNIT button.
- Once the desired pressure has been set, begin inflating by pressing the Air Compressor ON/OFF button. The air compressor will shut of automatically once the pressure has been reached.


Note: Always check and follow the manufacturer’s recommended pressure. Use caution as the air hose and connectors may get hot after extended use. The HALO BOLT AIR compressor is designed to automatically stop after an extended run-time or if an over-temperature protection set point is reached.
CHARGING AN ELECTRONIC DEVICE USING
5V/2.4A USB OUTPUT PORT
- Connect the Micro USB tip of the supplied Micro USB cable into the Micro USB input of your electronic device and connect the Standard USB end of the supplied Micro USB cable into either one of the HALO BOLT AIR USB 5V/2.4A Output ports.
- Turn on the USB charging by pressing the USB Power ON/OFF Button on the HALO BOLT AIR.
NOTE:
The HALO BOLT AIR USB charging feature will automatically power of after 30 minutes of inactivity.
NOTE:
If your electronic device does not have a Micro USB Input, your HALO BOLT AIR is also compatible with the charging cable provided with your electronic device. To use, plug the Standard USB end of the cable into either one of the two 5V/2.4A USB Output ports located on your HALO BOLT AIR.

HALO SMART CHARGE TECHNOLOGY
Your HALO BOLT AIR contains the HALO SMART CHARGE TECHNOLOGY to achieve higher compatibility for charging standard 5V USB electronic devices. The HALO SMART CHARGE TECHNOLOGY will allow the HALO BOLT AIR to communicate with your electronic device and provide the fastest and safest charge for that device.
COMPATIBILITY
Standard 5V USB electronic devices including: Mobile phones, Tablets, PSP, NDS, MP3, MP4, MP5, Bluetooth, GPS, Cameras, and more.

USING YOUR HALO BOLT AIR FLOODLIGHT
The floodlight can be turned on and of by simply pressing and releasing the floodlight ON/OFF button. The first press will turn on the
floodlight. Second press will turn on the red emergency light. Third press will turn on SOS flashing red light. The floodlight will automatically turn of after 2 hours of inactivity.

NOTE:
Do not look directly into the LED floodlight.
SPECIFICATIONS
- Battery Cells: 3x Li-Polymer 5300mAh
- Battery Pack Energy: 58830 mWh
- Jump Start: 12V/500Amps
- Air Compressor: 100PSI max
- Input: 14V/0.85A
- USB Output: 2x USB 5V/2.4A
- Dimensions: 118 x 242 x 47mm
- Weight: 1150.10 g
SAFETY PRECAUTIONS
- Read all instructions before using the product.
- Your HALO BOLT AIR should not be used to jump start unregistered vehicles.
- Make sure the jumper cables are fully plugged into the jump start output before trying to jumpstart your vehicle.
- Caution: The lithium-ion rechargeable battery used in this charging device may present a risk of fire or chemical burn if mistreated. Do not disassemble, expose to heat above 212°F (100°C) or incinerate.
- Misusing or incorrectly connecting your HALO BOLT AIR may cause electric shock to users and damage equipment.
- BOLT AIR if it has received a sharp blow, or has otherwise been damaged in any way.
- Do not expose your HALO BOLT AIR to moisture, water, rain, or snow.
- Do not insert any object into the ports or openings of your HALO BOLT AIR.
- Only charge your HALO BOLT AIR by the specified method with the specified charging adapter provided with the unit.
COMPLIANCE WITH FCC REGULATION
This device complies with part 15 of the FCC Rules and RSS-Gen of IC Rules. Operation is subject to the following two conditions: (1) This device may not cause harmful interference, and (2) this device must accept any interference received, including interference that may cause undesired operation.
If this equipment does cause harmful interference to radio or television reception, which can be determined by turning the equipment of and on, the user is encouraged to try to correct the interference by one or more of the following measures:
- Reorient or relocate the receiving antenna.
- Increase the separation between the equipment and receiver.
- Connect the equipment into an outlet on a circuit different from that to which the receiver is connected.
- Consult the dealer or an experienced technician for help.
LIMITED WARRANTY
HALO2CLOUD LLC. (HALO) warrants its products to be free from defects in material and workmanship under normal use. Conditions are as follows:
- During the first 90 days from date of purchase, HALO will repair or replace the defective product.
- HALO will, subject to inspection, repair the defective product or replace it with a new or reconditioned unit. The return must be
accompanied by a Return Merchandise Authorization (RMA) number to be issued upon request, and must be shipped prepaid. - Where applicable, all requests for warranty returns must be accompanied by a proof of purchase.
FOR TECHNICAL SUPPORT PLEASE
EMAIL US AT:
- SUPPORT@BESTHALO.COM
- CALL US AT: 8889076274
- HALO 6 CENTRAL ROW HARTFORD, CT 06103
- WWW.BESTHALO.COM