
Holman WS5090W Aspect Wi-Fi Solar Weather Station User Manual
Introduction
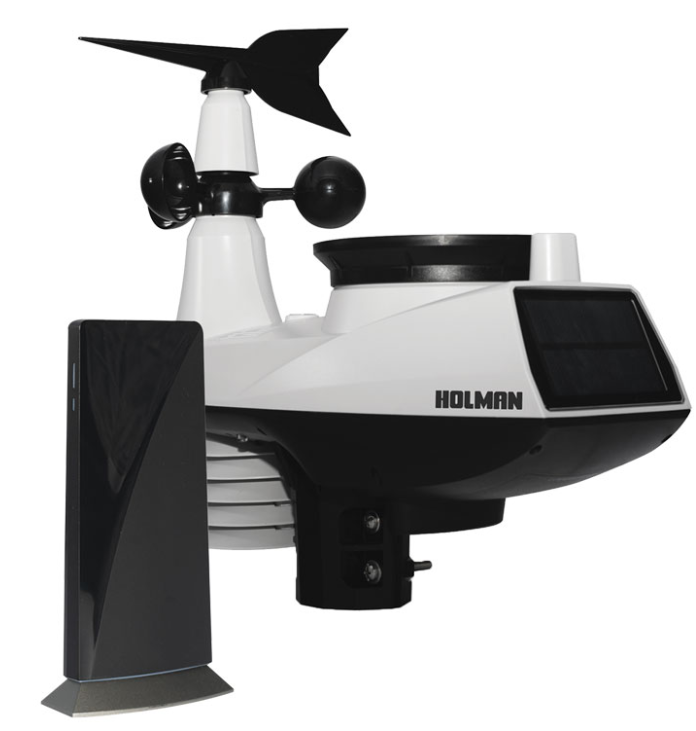
Thank you for choosing our Aspect Wi-Fi Solar. This system gathers and automatically uploads accurate and detailed weather data to Weather Underground, which allows weather observers to upload their local weather data. This product offers professional weather observers or serious weather enthusiasts robust performance with a wide range of options and sensors. Aspect Wi-Fi Solar includes a 6-in-1 Wireless Outdoor Sensor which transmits outdoor temperature, humidity, wind speed, wind direction, rainfall and UV with solar power. A high-speed processor is embedded in the Main Console, which analyses the received weather data. This real-time data can be published to Weather Underground through your home Wi-Fi router. This instruction manual contains useful information on the proper use and care of this product. Please read this manual to fully understand and enjoy its features, and keep it handy for future use.
Overview
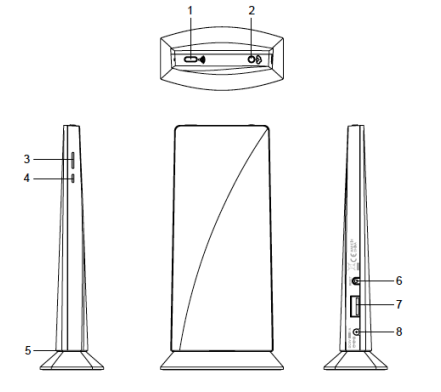
Main Console
- Wi-Fi/SENSOR
- REFRESH/UPLOAD
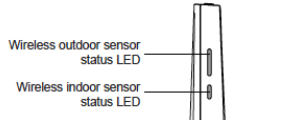
- 6-in-1 Wireless Outdoor Sensor status LED
- Wireless Indoor Sensor status LED
- Status LED
- RESET
- USB socket (for firmware update only)
- Power jack
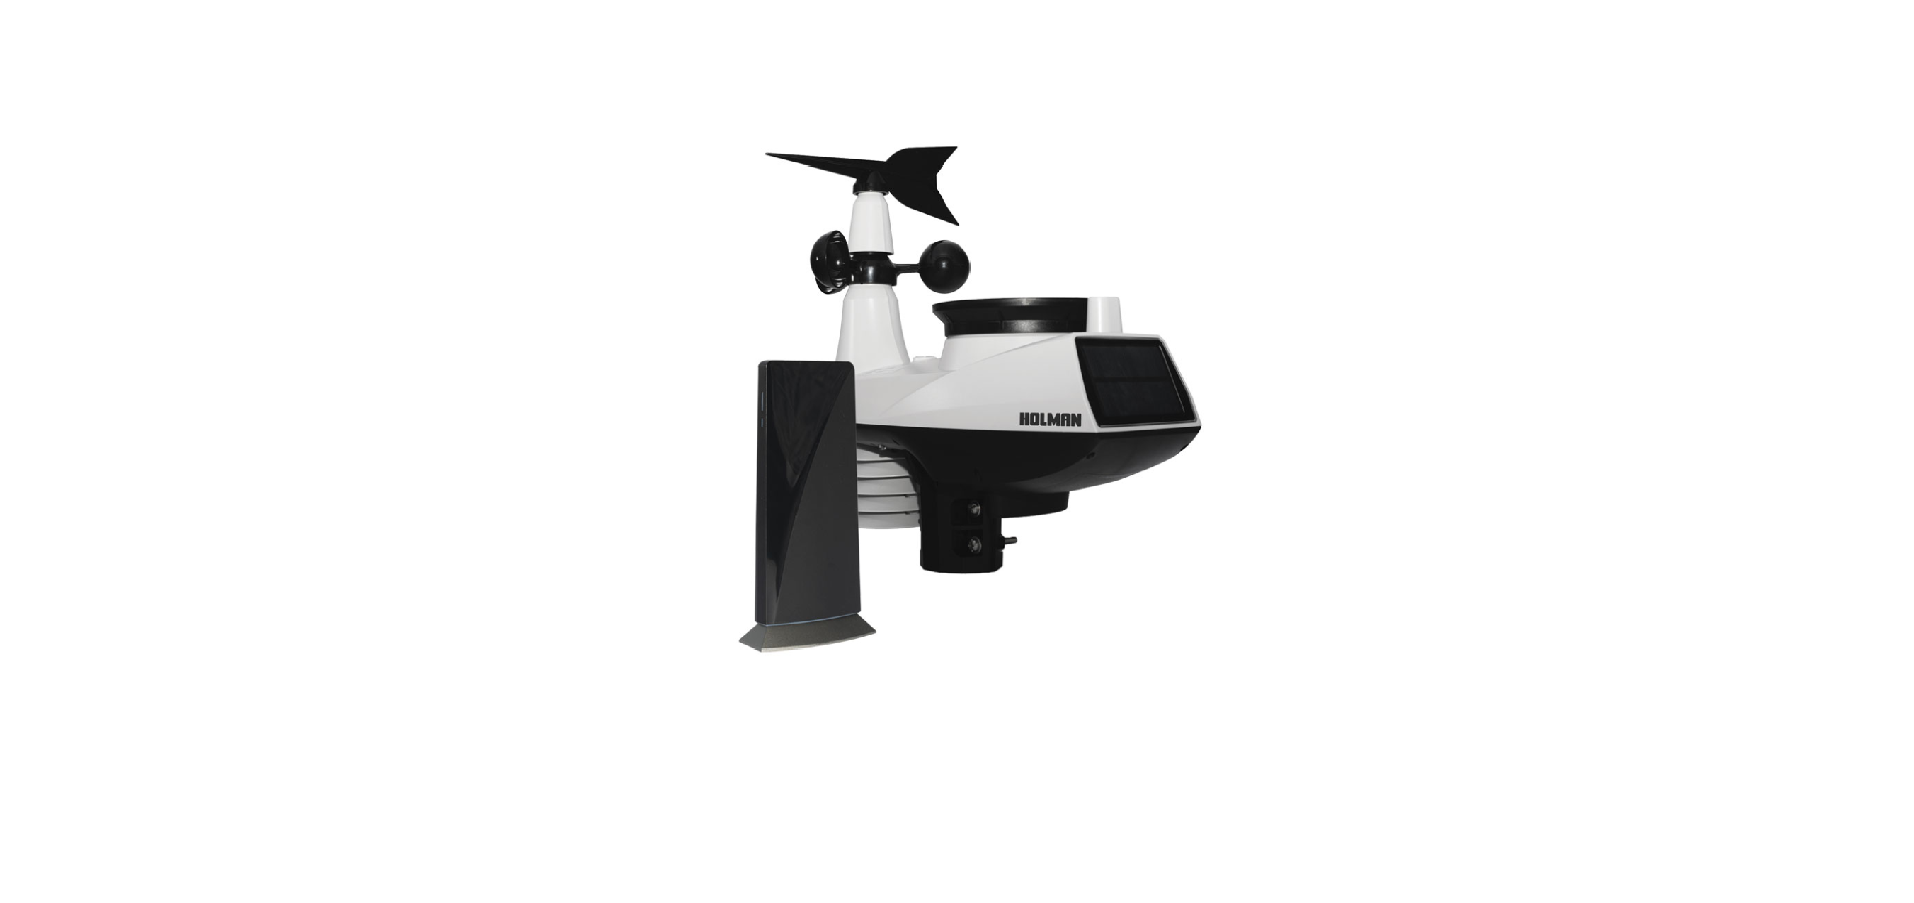
6-in-1 Wireless Outdoor Sensor
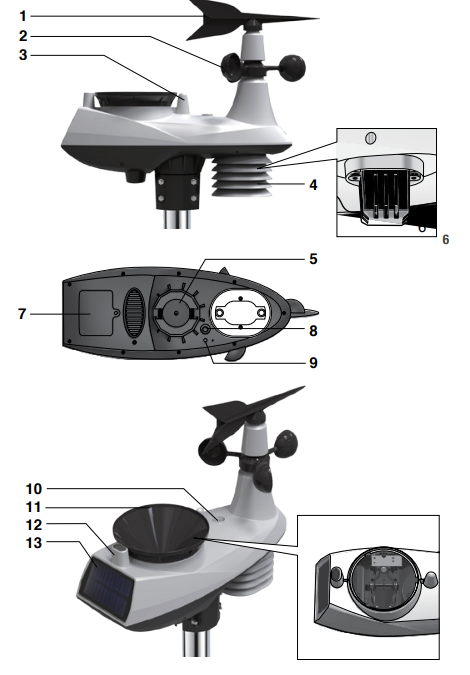
- Wind vane
- Wind cups
- Antenna
- Louvre shield
- Pole mount(fit 35~40mm pole, not included)
- Hygro-Thermo sensor
- Battery door
- RESET
- Transmission status LED
- Level gradienter
- Rain collector
- UV sensor
- Solar panel
Installation and Setup
6-in-1 Wireless Outdoor Sensor
The 6-in-1 Wireless Outdoor Sensor measures Wind-Speed, Wind-Direction, Rainfall, UV Index, Temperature and Humidity
Pairing the 6-in-1 Wireless Outdoor Sensor with the Main Console:
- Unscrew the battery door at the bottom of the 6-in-1 Wireless Outdoor Sensor and insert the batteries according to the polarity information marked on the battery compartment.
- Screw on tightly.
- Once the batteries are installed, the transmission status LED will begin to flash.
- Ensure the battery door screw is locked well.
- Ensure the transmission status LED is flashing every 12 seconds.
Installing the wireless outdoor sensor:
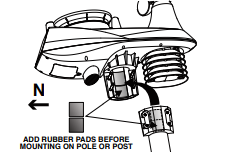
Install the wireless outdoor sensor in an open location with no obstructions above and around the sensor for accurate rain and wind measurement. To insure a tight grip, apply the rubber pads provided before fastening the mounting base to the pole or post (not included).
Mounting guideline:

- Install the 6-in-1 Wireless Outdoor Sensor at least 1.5m off the ground for better and more accurate wind measurements.
- Choose an open area within 150m from the Main Console.
- Install the 6-in-1 Wireless Outdoor Sensor as level as possible to achieve accurate rain and wind measurements. Use the level indicator on the top to ensure a level installation.
- Mount the 6-in-1 Wireless Outdoor Sensor with the solar panel end pointing to North to correctly orient the direction of the wind vane.
Main Console
Powering up the Main Console:
- Plug the adaptor into the DC jack.
- Once the power is connected, the Main Console status LED will be in red and after few seconds, it will show the Wi-Fi connection status of the Main Console:
- If the Main Console hasn’t connected to the router before, it will enter AP (Access Point) Mode and the status LED will turn to green.
- If the Main Console has connected to the router before, it will try to reconnect and the status LED will flash blue.
- The Main Console LED can show the following:
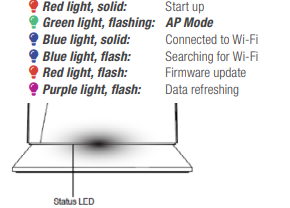
The Main Console can back up the router and weather server settings. The wireless sensor connection status is also stored here. Wi-Fi connection status: As soon as the Main Console successfully connects to the Wi-Fi router, the status LED will change to blue. If the Wi-Fi signal is not stable or the Main Console is trying to connect to the router, the status LED will flash blue. During AP Mode the status LED will flash green. To search for the 6-in-1 Wireless Outdoor Sensor: The Main Console will automatically search and connect to the 6-in-1 Wireless Outdoor Sensor. You can also press Wi-Fi/SENSOR to search for it manually. Once they are paired successfully, the sensor status LED will turn to blue.
Wi-Fi Connection Setup
- To connect the Aspect Wi-Fi Solar to Wi-Fi, it must be registered with Weather Underground. Weather Underground setup instructions are correct as of January 2019. Refer to https://www.wunderground.com/ for details if their registration process has changed. Register with Weather Underground:
- Visit https://www.wunderground.com/ and click JOIN in the top right corner and follow the prompts to create an account. Note that your email address must be validated by Weather Underground before proceeding. If you already have an account with Weather Underground you can simply LOG IN.
- After logging in to your account, click MY PROFILE and select MY WEATHER STATIONS in the menu. On the following page, click ADD A NEW PWS.
- On the next page, note it is essential to jot down the LONGITUDE/LATITUDE for your reference later.
- After noting the LONGITUDE/LATITUDE, follow the prompts to complete registration of the Aspect Wi-Fi Solar with Weather Underground.
- After submitting your details, note it is essential to jot down your STATION ID and STATION KEY/PASSWORD. Connect Main Console to Weather Underground:
- Plug the adaptor into the DC jack to power up the Main Console for initial start-up. The status LED will flash green to signify it has entered AP Mode.
- You can also access AP Mode by holding Wi-Fi/SENSOR for 6 seconds in Normal Mode.
- Use your Wi-Fi enabled device to connect to the Main Console SSID: PWS-XXXXXX.
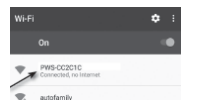
- Once connected, open the web browser on your device, type 192.168.1.1 into the address bar and press ENTER to access the Main Console setup interface.
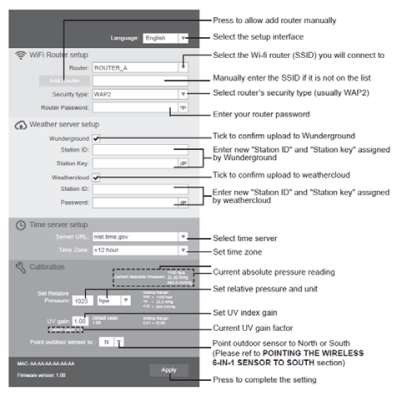
- Fill in the connection information (see below) for the setup interface. The Main Console will use this to connect your Wi-Fi router.
- Interface will differ depending on your web browser.
- Select the time zone, which is based on the location of your Main Console.
Barometric Pressure Setup
Barometric Pressure: Or atmospheric pressure, the pressure at any location of the Earth caused by the weight of the column of air above it. One atmospheric pressure refers to the average pressure and gradually decreases as altitude increases. Meteorologists use barometers to measure atmospheric pressure.
- Absolute Pressure: Absolute atmospheric pressure of your location.
- Relative Pressure: Relative atmospheric pressure base on sea level.
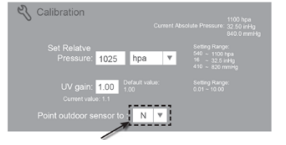
Setting Relative Atmospheric Pressure Value:
- Obtain the atmospheric pressure data of the sea level (it is also the relative atmospheric pressure data of your home area) through the local weather service, internet or any weather information source.
- In setup interface, select required pressure unit and enter the relative pressure value.
- The built-in barometer detects the absolute atmospheric pressure and show on the setup interface for your reference.
- The relative atmospheric pressure is based on the sea level pressure you entered but it will still change with the absolute atmospheric pressure change.
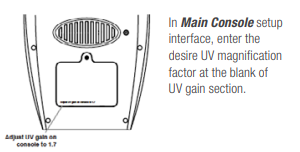
Set UV Index Gain
The UV sensor manufacturer may have included a gain or adjustment for a specific sensor technology or build. Please reference your 6-in-1 outdoor weather sensor battery compartment for any reference to gain adjustment. In the below example, a gain of 1.7 must be entered into the Main Console.
Pointing 6-in-1 Wireless Outdoor Sensor to South
The 6-in-1 Wireless Outdoor Sensor is calibrated to point to North for the maximum accuracy. However, for users in the Southern hemisphere, it is possible to use the sensor with the wind vane pointing South .
- Install the 6-in-1 Wireless Outdoor Sensor with the wind meter end pointing South.
- In the web browser setup interface, select
Viewing Live Weather Data
To view live data from the wireless outdoor sensor in a web browser, visit https://www.wunderground.com/, and enter your STATION ID & KEY in the search box. Weather information will show on the next page.
Maintenance
Cleaning the Rain Collector
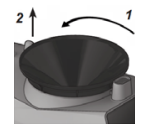
- Unscrew the rain collector by turning it 30° anti-clockwise.
- Gently remove the rain collector and clean and remove any debris or insects
- Install the collector when it is clean and fully dried
Cleaning the Outdoor Thermo-Hygro Sensor
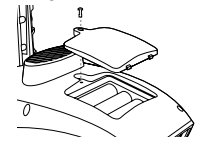
- Remove the two screws at the bottom of the louvre shield.
- Gently pull out the shield and carefully remove any dirt or insects on the sensor casing (do not let the sensors inside get wet).
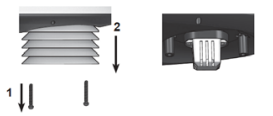
- Clean the shield with water to remove any dirt or insects.
- Install all the parts back when they are clean and fully dried. Cleaning the UV Sensor and Calibration Cleaning the UV sensor cover lens For precise UV measurement, gently clean the UV sensor cover lens with water. UV Sensor Degradation Over time, the UV sensor will naturally degrade. The UV sensor can be calibrated with a utility grade UV meter.
Main Console Firmware Update
- Unzip the Update.zip file and copy the unzipped Update folder to a USB drive.
- Use a USB drive which is in FAT32 format. The Update folder must be in the root directory of the USB drive.
- Disconnect the Main Console DC power from the power outlet. Plug the USB drive to the USB socket on the back of the Main Console.
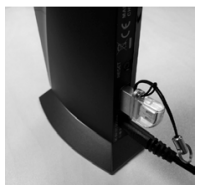
- Reconnect the Main Console DC power to start the firmware update process. During the update process the status LED on the bottom side will flash red.
- Once the update is complete, the Main Console will restart and the status LED will return to blue and connect to your previous connected router.
- Remove the USB from the Main Console.
- The USB port is for firmware update only.
- Please keep the power on and do not press any button during the firmware update process.
- During the update process, do not remove the USB drive.
- If the firmware update does not start, you can try to press the reset key to trigger the update process.
- During the firmware update process, Wi-Fi will be disabled until the update completes. It will reconnect to your Wi-Fi router and upload the data automatically. If the Main Console cannot connect to your router, you will need to re-enter the router and Weather Underground connection information.
Precautions
- Read and keep these instructions.
- Do not subject the unit to excessive force, shock, or dust.
- Do not cover the ventilation holes with any items such as newspapers, curtains etc.
- Do not immerse the unit in water. If you spill liquid over it, dry it immediately with a soft, lint-free cloth.
- Do not clean the unit with abrasive or corrosive materials.
- Do not tamper with the unit’s internal components. This will void the warranty.
- Only use fresh batteries. Do not mix new and old batteries.
- Only use attachments/accessories specified by the manufacturer.
- Images shown in this manual may differ from the actual display.
- Placement of this product on certain types of wood may result in damage to its finishing for which manufacturer will not be responsible.
- The contents of this manual may not be reproduced without the permission of the manufacturer.
- When replacement parts are required, be sure the service technician uses replacement parts specified by the manufacturer that have the same characteristics as the original parts.
- Unauthorised substitutions may result in fire, electric shock, or other hazards.
- Do not dispose old batteries as unsorted municipal waste. Collection of such waste separately for special treatment is necessary.
- The socket outlet shall be installed near the equipment and shall be easily accessible.
- Technical specifications and user manual contents for this product are subject to change without notice.
- Place the Main Console at least 20cm from nearby persons.
REFRENCE LINK