
Holman WS7880 Wireless Soil Moisture Monitor User Manual

Content List

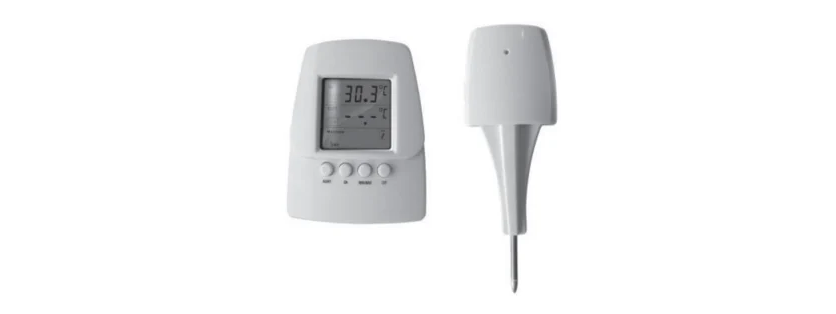
Monitor:
A. Indoor Temperature Trend Arrow
B. RF Signal Icon
C. Outdoor Temperature Trend Arrow
D. Moisture Level
E. Indoor Temperature
F. Outdoor Temperature
G. Channel (3 Channels Available)
H. Auto-Scroll Icon
- Alart Button
- CH (Channel) Button
- Min/Max Button
- °C/°F Button
- Reset Button
- TX Button
- Reset
- Channel Switch
Function Care
Function
The monitor measures the indoor temperature of its surrounding area and receives temperature and moisture level data from the remote sensor.
Care of the Device
- Avoid exposing the unit to extreme temperatures, water or severe shock.
- Avoid contact with any corrosive materials such as alcohol, cleaning agents or perfume.
- Do not subject the thermometer to excessive force, shock, dust, temperature or humidity. Any of these conditions may shorten life of the unit.
- Do not tamper with any of the internal components of this unit. This will void the warranty and may cause damage.
Correct Usage of Batteries
- Do not mix standard and rechargeable batteries.
- Do not mix new and old batteries.
- When the low battery symbol ( ) appears on the display, replace all batteries with new ones.
Set Up Procedure
- Remove the printed vinyl label from the LCD screen of the monitor.
- Position the remote sensor near the monitor.
- Using a screwdriver (not included) remove the screws from the back of the remote sensor and open the battery compartment. Slide the channel selector switch to the desired channel.
- Remove the battery cover from the monitor and insert 2 x AAA batteries according to the polarity indicated.
- The monitor will now display the current indoor temperature and the RF signal will flash for 3 minutes, indicating that the monitor is ready to pick up the transmission from the remote sensor.
- Insert 2 x AAA batteries into the remote sensor according to the polarity indicated
- Once the signal is received, the dashes (–.-°F) on the monitor will change to the current outdoor temperature. If after 3 minutes the screen does not change to show the outdoor temperature, press the RESET button on the monitor and then on the remote sensor.
- Replace the battery covers, if the rubber gasket for the battery compartmentم has become dislodged on the remote sensor, reposition it properly to ensure a watertight seal. Do not over-tighten the screws.
Troubleshooting
Press the RESET button at any time when your monitor shows dashes (–.-°F) and/or ensure that the remote sensor is in direct line to the monitor. If the outdoor temperature cannot be received, check the following:
- The distance between the monitor or remote sensor should be at least 0.9 to 1.2 meters (3 to 4 feet) away from any interfering sources such as computer monitors or TV sets.
- Avoid placing the monitor onto or in the immediate proximity of metal window frames.
- Using other electrical products such as headphones or speakers operating on the same signal frequency (433 MHz) may prevent correct signal transmission and reception.
- Signals from other household devices, such as door bells and home security systems, may temporarily interfere with the units and cause reception failure. The transmission and reception of temperature reading will resume once the interference has stopped.
Mounting the Monitor
The monitor can be placed on any flat surface.
IMPORTANT: do not place the monitor in direct sunlight or any other sources of heat or air conditioning to ensure accurate temperature readings.
Securing the Remote Sensor:
Gently push the ground spike into the soil at your desired location. If you feel strong resistance, try another spot as you may have hit a stone or root. Recommended depths from the surface of the soil to the tip of the spike are 3” for an average lawn and 4” for the average garden. Root depth can vary significantly with different vegetables, shrubbery or plants. Mature plants might have a deeper root system and younger plants a shallower root system.
NOTE: If possible do not place the remote sensor in direct sunlight. Exposure to direct sunlight will affect the outdoor temperature reading.
Soil Moisture Level
The unit will indicate the moisture level of the soil at the tip of the ground spike. The level is displayed in a bar chart on the LCD. The unit measures 3 levels of moisture, they include:
- 0 to 3 bars = DRY soil
- 4 to 7 bars = DAMP soil
- 8 to 10 bars = WET soil
Min/Max Memory
- Press the MIN/MAX button once to display the minimum indoor and outdoor temperatures recorded since last reset.
- Press the MIN/MAX button again to display the maximum indoor and outdoor temperatures recorded since last reset.
- To clear the memory, when the min/max temperature is displayed, press and hold the MIN/MAX button for 2-3 seconds until a beep sounds. The min/max temperature is now cleared
Setting the Air Temperature Alerts
The unit can be programmed to sound an alert when the indoor or outdoor air temperature exceeds the upper or lower pre-set levels. The outdoor alert can be set for all remote channels.
Setting the Indoor Temperature Alert
- Press and hold the ALERT button for 4 seconds. The high temperature limit icon and indoor temperature will start to flash.
- To select the high temperature alert level press °C/°F or MIN/MAX button.
- Press ALERT button and the low temperature limit icon and temperature will start to flash.
- Press the °C/°F or MIN/MAX button to select the low temperature alert level.
- Press the ALERT button to return to normal mode.
- Press the ALERT button to activate or de-activate the alert function. When the alert function is activated, both the will be displayed.
Setting the Outdoor Temperature Alert
- Press and hold the ALERT button for 4 seconds. The high temperature limit icon and indoor temperature will start to flash.
- Press the CH button to select the channel on which you want to set the alert. The high temperature limit icon and outdoor temperature from the selected channel will flash.
- To select the high temperature alert level press °C/°F or MIN/MAX button.
- Follow steps 3-6 in section 10.1 above to set the high and/or low temperature alerts.
Specifications
- Monitor: -10°C to 70°C (14°F to 158°F)
- Remote Sensor: -20°C to 70°C (-4°F to 158°F)
- Temperature Accuracy: +/- 1.1°C (+/- 2°F)
Guarantee
The manufacturer Guarantees to the original purchaser that any product supplied by the manufacturer will be free from defects in materials and workmanship for a period of one year from the date of purchase. Holman offer a 1 year replacement warranty from the original date of purchase. To claim warranty the product must be returned with a
copy of the original receipt.