
HYPER TOUGH HT19-401 Cordless Blower User Manual

SAVE THESE INSTRUCTIONS!
READ ALL THE INSTRUCTIONS!
WARNING:
Some dust created by power sanding, sawing, grinding, drilling, and other construction activities contains chemicals known to the state of California to cause cancer, birth defects, or other reproductive harm. Some examples of these chemicals are:
- Lead from lead-based paints;
- Crystalline silica from bricks cement and other masonry products;
- Arsenic and chromium from chemically treated lumber.
Your risk from these exposures varies, depending on how often you do this type of work. To reduce your exposure to this chemical: work in a well-ventilated area, and work with approved safety equipment, such as dust masks that are specially designed to filter out microscopic particles.
WARNING:
This product can expose you to chemicals including lead, phthalate, or bisphenol A which are known to the State of California to cause cancer, birth defects, or other reproductive harm. Wash your hands after use. For more information go to www.P65Warnings.ca.gov.
FOR ALL APPLIANCES:
- Avoid Dangerous Environment – Don’t use appliances in damp locations.
- Don’t Use In Rain.
- Keep Children Away – All visitors should be kept at a distance from the work area.
- Dress Properly – Do not wear loose clothing or jewelry. They can be caught in moving parts. The use of rubber gloves and substantial footwear is recommended when working outdoors. Wear a protective hair covering to contain long hair.
- Use Safety Glasses – Always use a face or dust mask if the operation is dusty.
- Use Right Appliance – Do not use an appliance for any job except that for which it is intended.
- Don’t Force Appliance – It will do the job better and with less likelihood of a risk of injury at the rate for which it was designed.
- Don’t Overreach – Keep proper footing and balance at all times.
- Stay Alert – Watch what you are doing. Use common sense. Do not operate appliances when you are tired.
- Store Idle Appliances Indoors – When not in use, appliances should be stored indoors in a dry, and high or locked-up place – out of reach of children.
- Maintain Appliance With Care – Keep cutting edge sharp and clean for best performance and to reduce the risk of injury. Follow instructions for lubricating and changing accessories. Keep handles dry, clean, and free from oil and grease.
- Check Damaged Parts – Before further use of the appliance, a guard or other part that is damaged should be carefully checked to determine that it will operate properly and perform its intended function. Check for alignment of moving parts, binding of moving parts, breakage of parts, mounting, and any other condition that may affect its operation. A guard or other part that is damaged should be properly repaired or replaced by an authorized service center unless indicated elsewhere in this manual.
FOR ALL BATTERY–OPERATED GARDENING APPLIANCES:
- Prevent unintentional starting. Ensure the switch is in the off-position before connecting to the battery pack, picking up, or carrying the appliance. Carrying the appliance with your finger on the switch or energizing an appliance that has the switch on invites accidents.
- Disconnect the battery pack from the appliance before making any adjustments, changing accessories, or storing the appliance. Such preventive safety measures reduce the risk of starting the appliance accidentally.
- Recharge only with the charger specified by the manufacturer . A charger that is suitable for one type of battery pack may create a risk of fire when used with another battery pack.
- Use appliances only with specifically designated battery packs. Use of any other battery packs may create a risk of injury and fire.
- When the battery pack is not in use, keep it away from other metal objects, like paper clips, coins, keys, nails, screws or other small metal objects, that can make a connection from one terminal to another. Shorting the battery terminals together may cause burns or a fire.
- Under abusive conditions, liquid may be ejected from the battery; avoid contact. If contact accidentally occurs, flush with water. If liquid contacts the eyes, additionally seek medical help. Liquid ejected from the battery may cause irritation or burns.
- Do not use a battery pack or appliance that is damaged or modified. Damaged or modified batteries may exhibit unpredictable behavior resulting in fire, explosion or risk of injury.
- Do not expose a battery pack or appliance to fire or excessive temperature. Exposure to fire or temperature above 130°C may cause an explosion.
- Follow all charging instructions and do not charge the battery pack or appliance outside of the temperature range specified in the instructions. Charging improperly or at temperatures outside of the specified range may damage the battery and increase the risk of fire.
- Have servicing performed by a qualified repair person using only identical replacement parts. This will ensure that the safety of the product is maintained.
- Do not modify or attempt to repair the appliance or the battery pack (as applicable) except as indicated in the instructions for use and care.
INFORMATION FOR RADIATED EMISSION
This device complies with Canadian ICES-001. This device complies with Part 15 of the FCC Rules. Operation is subject to the following two conditions: (1) This device may not cause harmful interference, and (2) This device must accept any interference received, including interference that may cause undesired operation.
Warning:
Changes or modifications to this unit not expressly approved by the party responsible for compliance could void the user’s authority to operate the equipment.
NOTE:
This equipment has been tested and found to comply with the limits for a Class B digital device, pursuant to Part 15 of the FCC Rules. These limits are designed to provide reasonable protection against harmful interference in a residential installation. This equipment generates, uses, and can radiate radio frequency energy and, if not installed and used in accordance with the instructions, may cause harmful interference to radio communications.
However, there is no guarantee that interference will not occur in a particular installation. If this equipment does cause harmful interference to radio or television reception, which can be determined by turning the equipment off and on, the user is encouraged to try to correct the interference by one or more of the following measures:
- Reorient or relocate the receiving antenna.
- Increase the separation between the equipment and the receiver.
- Connect the equipment to an outlet on a circuit different from that to which the receiver is connected.
- Consult the dealer or an experienced radio/TV technician for help
COMPONENT LIST

| 1. Handle |
| 2. Battery pack |
| 3. Motor housing |
| 4. Tube release button |
| 5. Lower blower tube |
| 6. Upper blower tube |
| 7. Fan housing |
| 8. On/off switch |
Not all the accessories illustrated or described are included in standard delivery.
TECHNICAL DATA
| Rated voltage | 40V | |
| No load speed | 24000/min | |
| Airspeed | 85mph | |
| Air volume | 420cfm | |
|
Battery capacity | ABP118T | 2.5Ah |
| ABP118T7 | 2.0Ah | |
| HT19-401-003-17 | 2.5Ah | |
| Charger rating | HT19-401-003-14 | 120V~60Hz, 50W 20V |
| HT19-401-003-13 | 120V~60Hz, 75W 20V | |
| ACG318W1U | 120V~60Hz, 18W 20V | |
| Charging time | 150mins for 2 batter | |
| Machine weight | 5.7lbs | |
The accessories of the battery charger (HT19-401-003-13 / ACG318W1U) and battery pack (ABP118T7 / HT19-401-003-17 ) illustrated or described are not included in HT19-401-003-05 delivery.
ACCESSORIES
| Battery pack (ABP118T) | 2 |
| Charger ( HT19-401-003-14 ) | 1 |
We recommend that you purchase your accessories from the same store that sold you the tool. Refer to the accessory packaging for further details. Store personnel can assist you and offer advice
OPERATION INSTRUCTIONS
NOTE:
Before using the tool, read the instruction book carefully.
INTENDED USE:
The blower is intended for residential use only. Use the blower outdoors to move yard debris as needed.
ASSEMBLY AND OPERATION
| ACTION | FIGURE |
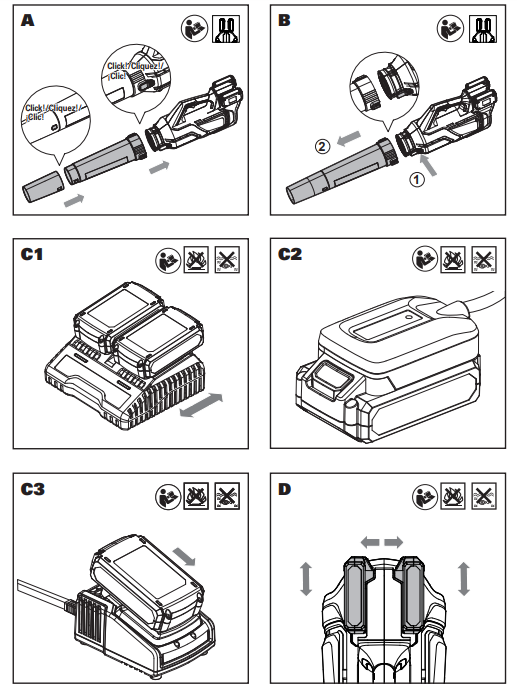
| Assembling & disassembling the blower tube | See Fig. A & B |
| Charging the battery pack NOTE: • The batteries are shipped uncharged. Each battery must be fully charged before the first use. • Always fully charge the two batteries at same time. WARNING! The charger and battery pack are specially designed to work together, so do not attempt to use any other devices. Never insert or allow metallic objects into your charger or battery pack connections because of an electrical failure and hazard will occur. |
See Fig. C1, C2, C3 |
| Installing & Removing the battery pack NOTE: This machine will only run when 2 batteries are installed. It is recommended to use the same two batteries and charge the two batteries at the same time. When you use two batteries with different power, the machine will only run to the lower common denominator. |
See Fig. D |
| OPERATION | |
| Starting & Stopping WARNING! The tool runs for a few seconds after it has been switched off. Let the motor come to a complete standstill before setting the tool down. | See Fig. E |
| Blowing USER TIPS – Hold the blow tube approximately 8” above the ground when operating the tool. – Use a sweeping motion from side to side. Advance slowly keeping the accumulated debris/ leaves in front of you. – After blowing the debris/leaves into a pile, it is easy to dispose of the pile.
Caution! – Do not blow hard objects such as nails, bolts, or rocks. – Do not operate the blower near bystanders or pets. – Use extra care when cleaning debris from stairs or other tight areas. – Wear safety goggles or other suitable eye protection, long pants, and shoes. |
See Fig. F |
For charger ACG218W2U
IMPORTANT NOTES FOR CHARGING BATTERY
The battery in your new tool is not charged when it leaves the plant. Therefore it must be fully charged before using the first time.
NOTE:
If the battery pack is very hot you must remove your battery pack from the charger and allow your battery pack to cool first to ambient temperature and then recharging can be started. To prevent damage to the Battery Pack, when the charge runs out, please charge the battery to reach full or no less than half charge before storage. If the tool will not be used for long periods, charge the battery every 3-6 months.
CHARGING PROCEDURE (SEE FIG. C1)
- Plug the charger into an appropriate outlet. The light will be green.
- Slide the battery pack into the charger, the light will turn to red to indicate the charging process has started.
- When charging is completed, the light will turn green. The pack is now fully charged, unplug the charger and remove the battery pack.
CHARGING INDICATOR
| Light | Status |
| Read on | Charging |
| Green on | Fully Charged |
For charger ACG318W1U
CHARGING PROCEDURES (SEE FIG. C2)
Connect the battery charger to the power supply and the indicator light should turn to green. Then, slide the charger base on the battery pack to make connections and the indicator light will turn red to show that the charging has started. It will remain red until the battery is fully charged. When charging is completed, unplug the charger and remove the battery pack.
Charging indicator
| Light | Status |
| Red on | Charging |
| Green on | Fully Charged |
For charger ACG18W3U
IMPORTANT NOTES FOR CHARGING BATTERY
The battery charger supplied is matched to the Li-ion battery installed in the machine. Do not use another battery charger. The Li-ion battery is protected against deep discharging. When the battery is empty, the machine is switched off employing a protective circuit: The tool holder no longer rotates.
In a warm environment or after heavy use, the battery pack may become too hot to permit charging. Allow time for the battery to cool down before recharging. When the battery pack is charged for the first time and after prolonged storage, the battery pack will accept a 100% charge after several charge and discharge cycles.
CHARGING PROCEDURE (SEE FIG. C3)
- Plug the charger into an appropriate outlet. The light will be green.
- Slide the battery pack into the charger, the light will turn to red to indicate the charging process has started.
- When charging is completed, the light will turn green. The pack is now fully charged, unplug the charger and remove the battery pack. WARNING: When battery charge runs out after continuous use or exposure to direct sunlight or heat, allow time for the tool to cool down before re-charging to achieve the full charge.
CHARGING INDICATOR
| Light | ON/OFF flash | Status |
| Red on | ‘ | Charging |
| Green on | Fully Charged |
NOTE:
The accessories of the battery charger (ACG18W3U / ACG318W1U) and battery pack (ABP118T7 / ABP118T25) illustrated or described are not included in the CBV36WT delivery.
FOR BATTERY TOOLS
The ambient temperature range for the use and storage of tools and batteries is 0°C-45°C. The recommended ambient temperature range for the charging system during charging is 0°C-40°C
CLEANING THE TOOL
Clean the tool regularly.
WARNING!
Keep your product dry. Under no circumstances spray with water. – To clean the tool, use only mild soap and a damp cloth. – Do not use any type of detergent, cleaner, or solvent that may contain chemicals that could seriously damage the plastic. – Self-lubricating bearings are used in your product, therefore lubrication is not required.
 Afrikaans
 Albanian
 Amharic
 Arabic
 Armenian
 Azerbaijani
 Basque
 Belarusian
 Bengali
 Bosnian
 Bulgarian
 Catalan
 Cebuano
 Chichewa
 Chinese (Simplified)
 Chinese (Traditional)
 Corsican
 Croatian
 Czech
Czech Danish
 Dutch
Dutch English
 Esperanto
 Estonian
 Filipino
 Finnish
 French
 Frisian
 Galician
 Georgian
 German
 Greek
Greek Gujarati
 Haitian Creole
 Hausa
Hausa Hawaiian
 Hebrew
 Hindi
Hindi Hmong
Hmong Hungarian
 Icelandic
 Igbo
Igbo Indonesian
 Irish
Irish Italian
 Japanese
 Javanese
 Kannada
 Kazakh
 Khmer
Khmer Korean
 Kurdish (Kurmanji)
 Kyrgyz
 Lao
Lao Latin
Latin Latvian
 Lithuanian
 Luxembourgish
 Macedonian
 Malagasy
 Malay
Malay Malayalam
 Maltese
 Maori
Maori Marathi
 Mongolian
 Myanmar (Burmese)
 Nepali
 Norwegian
 Pashto
 Persian
 Polish
 Portuguese
 Punjabi
 Romanian
 Russian
 Samoan
 Scottish Gaelic
 Serbian
 Sesotho
 Shona
Shona Sindhi
 Sinhala
 Slovak
 Slovenian
 Somali
 Spanish
 Sundanese
 Swahili
 Swedish
 Tajik
Tajik Tamil
Tamil Telugu
 Thai
Thai Turkish
 Ukrainian
 Urdu
Urdu Uzbek
Uzbek Vietnamese
 Welsh
Welsh Xhosa
Xhosa Yiddish
 Yoruba
 Zulu
Zulu