Hypertough AQ75034G 20 Volt Max Lithium Ion Cordless Drill Manual

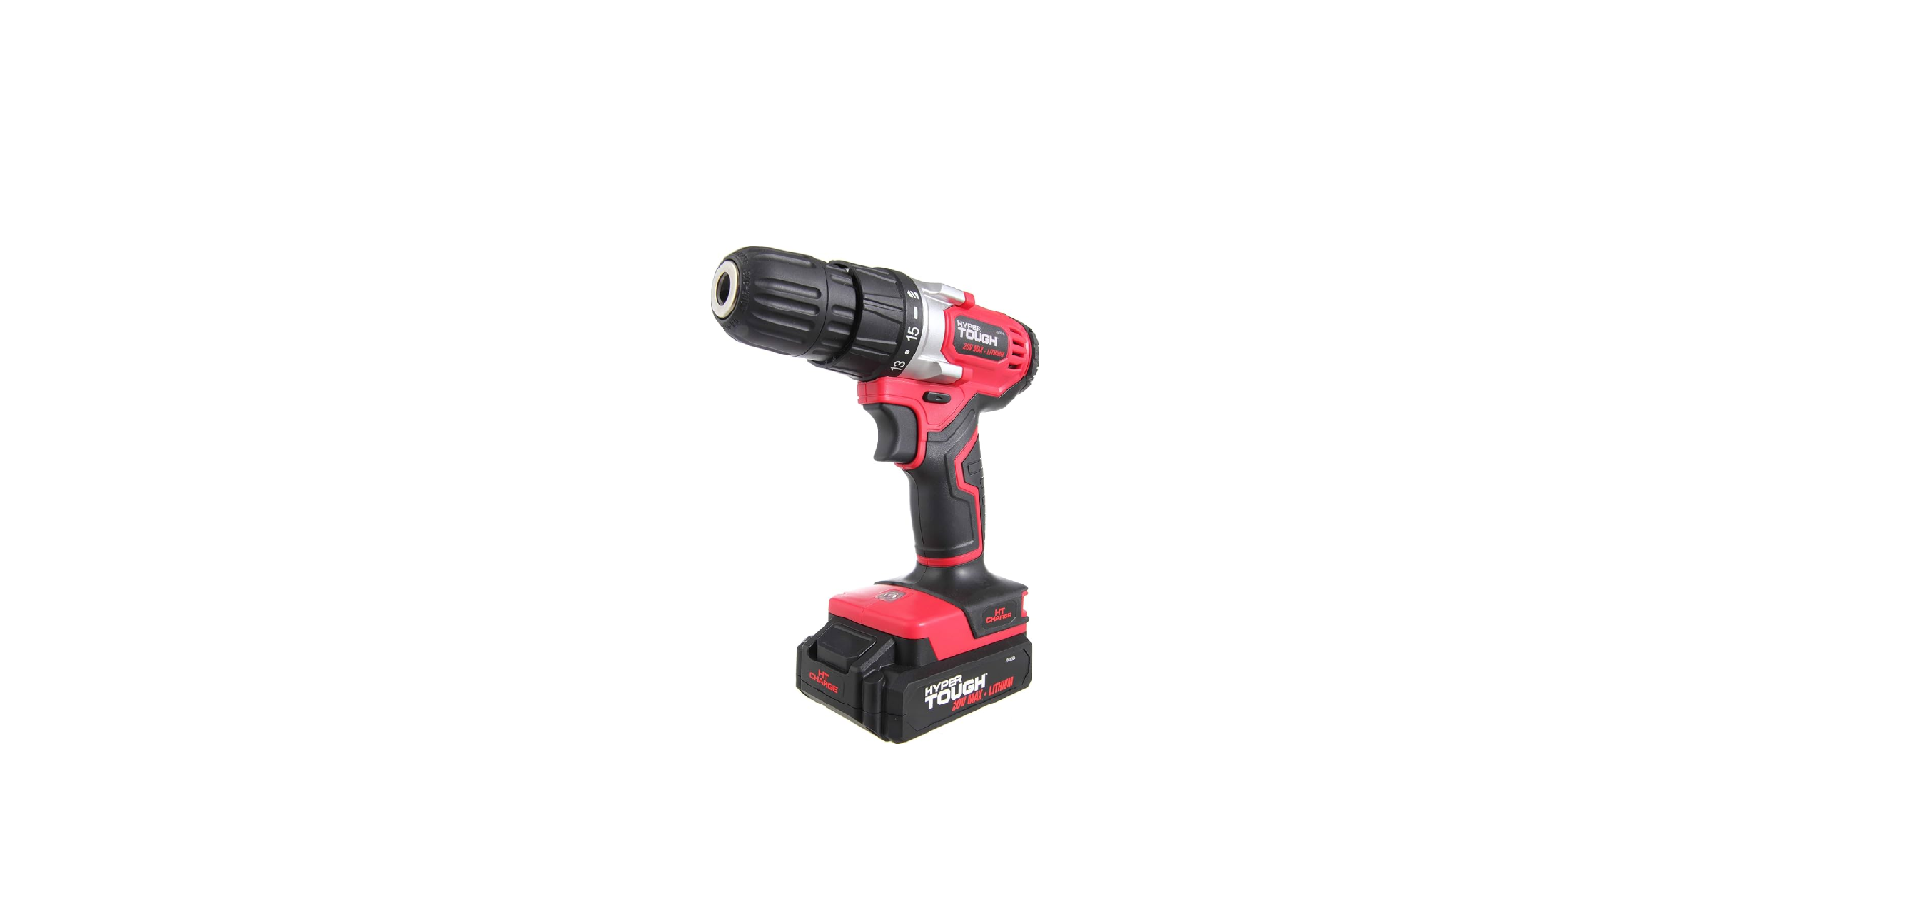
Overview

- A 3/8 In.(10mm)chuck
- B Double-end driver bit
- C Torque regulation ring
- D Torque indicator scale
- E LED work light
- F Forward / reverse switch
- G Variable speed trigger with electric brake
- H Rubber – covered handle
- I 20 Volt Max Lithium-ion rechargeable battery
- J Battery lock button
- K Charger Set
Please read before returning this product for any reason:
If you have questions or experience a problem with your Hyper Tough purchase, call 1-800-840-7856 from 8:00 a.m. to 5:00 p.m. Eastern Standard Time, Monday through Friday.
SAFETY GUIDELINES
Be sure to read and understand this manual for your safety. When using this product it is important to read and understand this information. It will protect you and help prevent any problems. Here are the guidelines to help you understand the symbols used in this guide.
DANGER: indicates a potentially hazardous situation which could result in
WARNING: indicates the situation which could result in death or serious injury
CAUTION: indicates a potentially hazardous situation which could result in mild to moderate injury
NOTICE: When used without the Safety Alert symbol, this indicates a potentially hazardous which, if not avoided, can result in property damage.
Workplace/Electrical Safety
GENERAL POWER TOOLS SAFETY WARNINGS
WARNING: Read all of the instructions and pay close attention to the safety warnings. Failure to follow the warnings and instructions can result in electric shock fire and or serious injury. SAVE THESE WARNINGS AND INSTRUCTIONS YOU MAY NEED TO REFER TO THEM LATER The term “power tool” in the warnings refers to your mains-operated (corded) power tool or battery-operated (cordless) power tool.
SAFETY WARNINGS AND INSTRUCTIONS
- This manual contains important safety and operating instructions.
- Be sure that any attachments are recommended or sold by Hyper Tough; use of attachments by other manufacturers may not meet the same requirements and can result in fire, electric shock, or injury.
- Never pull by the cord – always pull by the plug when disconnecting.
- Never open the power tool – there are no parts inside that are serviceable by the customer.
- NEVER incinerate the power tool when it is ready to be discarded. It can explode in a fire.
SAVE THESE INSTRUCTIONS
- WORK AREA SAFETY
- Keep your area well lit and clear of clutter that can invite accidents.
- Operate your tools in a safe area free of the presence of flammable liquids, gases, dust or potentially explosive atmospheres. Power tools can create sparks which can combust.
- Keep all distractions such as children away while operating the power tool. Distractions can cause accidents, or cause you to lose control.
- To reduce the risk of electrical shock power tool plugs must match the outlet. Double insulated tools are equipped with a polarized plug (one blade is wider than the other). The plug is designed to fit into a polarized outlet only one way. If the plug does not hit properly into the outht, try reversing the plug
- if it still does not fit, you need to find an outlet that is polarized, or contact a qualified electrician to install a polarized outlet.
- Don’t modify the plug and don’t use any plug adapters with earth grounded power tools. Double insulation eliminates the need for the three wire grounded power cord and grounded power supply system.
- Avoid bodily contact with grounding services such as ranges, refrig- erators, pipes, radiators ; there is a higher risk of electrical shock if you don’t expose your power tools to wet conditions or rain. Water entering a power tool will increase the risk of electrical shock.
Electrical Safety
- Do not abuse the cord. Never use the cord to carry the tools or pull the plug from an outlet. Keep cord away from heat, oil, sharp edges or moving parts. Replace damaged cords immediately. Damaged cords increase the risk of electric shock.
- Be sure to use electrical supplies that are suitable for the conditions. If working outdoors, use extension cords rated for outdoor use (marked “W-A” or “W”‘) – this reduces the risk of electrical shock.
- If you have to work in a damp location, be sure to use a ground fault circuit interrupter (GFCI) protected supply. This will help reduce the risk of electrical shock.
ELECTRICAL SAFETY (CONT.) – EXTENSION CORD USE
- Make sure the cord is clear and secure – do not step on, trip or otherwise damage or stress the cord.
- Don’t use an extension cord unless you have to – use of an improper extension cord can result in fire, shock or electrocution.
- Two-wire cords can be used with 2-wire or 3-wire extension cords. Only round jacketed U.L. (Underwriters Laboratories) listed extension cords should be used. If you are going to use an extension cord outside, make sure the cord is manufactured for outdoor use. NOTE: Most cords used for outdoor use can also be used indoors. The letters “W” or “WA” on the cord jacket mean the cord is suitable for outdoor use.
- An extension cord must be of the proper gauge (wire size) – AWG or American Wire Gauge to be used safely, prevent power loss, and prevent overheating.
NOTE: the smaller the wire gauge number, the greater the capacity of that cable; for instance, 16 gauge has more capacity than 18 gauge. If you must use more than one extension cord, be sure each extension has at least the minimum required gauge size.
Recommended Minimum Wire Gauge for Extension Cords
Amps from Tool Nameplate | 25’length
50’length
75′ length
100′ length
150’length
0-5 amps
5.1-8 amps
8.1-12 amps
12.1-15 amps
15.1-20 amps
16 ga.
16 ga.
14 ga.
12 ga.
10 ga.
16 ga.
16 ga.
14 ga.
12 ga.
10 ga.
16 ga.
14 ga.
12 ga.
10 ga.
10 ga.
14 ga.
12 ga.
10 ga.
10 ga.
Do Not Use
200′ length
12 ga.
12 ga.
10 ga.
Do Not Use
Do Not Use
Do Not Use
Do Not Use
Do Not Use
Do Not Use Do Not Use
- PERSONAL SAFETY
- Stay alert when operating this machinery to avoid the possibility of personal injury. Do not use these tools if you are under the influence of drugs, alcohol, or medication. Do not operate this machinery if you are tired.
- Use adequate personal protection – always wear eye protection. Suggested protective equipment include nonskid safety shoes, dust mask, hearing protection and/or a hard hat.
- Prevent unintentional starting – ensure that the power switch is off before plugging into a power source or connecting the battery. Don’t carry the tool by the trigger.
- Remove adjusting keys or switches before turning the tools on. A wrench or a key that is left attached to a rotating part of the tools may result in personal injury.
- Do not overreach. Keep proper footing and balance at all times. Proper footing and balance enables better control of the tools in unexpected situation.
- Dress properly. Loose clothing or long hair can become entangled in the moving parts of this machine – keep your clothes, gloves, hair or jewelry away from any moving machinery.
- Be sure to properly connect and use any devices that extract and collect dust. When used properly, dust collection can reduce situations related to dust and debris hazards.
- Do not run the cordless drill while carrying it at your side. A spinning socket or bit could become entangled with clothing and injury may result.
- Disconnect the plug or remove the battery pack from tool and place the switch in the locked or “OFF” position before making any assembly adjustments, changing accessories, performing any inspection, maintenance or cleaning procedures. Such preventive safety measures reduce the risk of starting the tool accidentally.
- Do not use the cordless drill if it has been damaged, left outdoors in the rain, snow, wet or damp environments, or immersed in liquid.
- POWER TOOL USE AND CARE
- Use clamps or other practical way to secure and support the workpiece to a stable platform. Holding the work by hand or against your body is unstable and may lead to loss of control.
- Do not force tool. Use the correct tools for your application. The correct tools will do the job better and safer at the rate for which it is designed.
- Do not use tools if switch does not turn it on or off. Any tool that cannot be controlled with the switch is dangerous and must be repaired.
- Disconnect the plug from the power source before making any adjustments, changing accessories or storing the tool. Such preventive safety measures reduce the risk of starting the tools accidentally.
- Store idle tools out of reach of children and other untrained persons. Tools are dangerous in the hands of untrained users.
- Maintain tools with care. Keep cutting tools sharp and clean. Properly maintained tools with sharp cutting edges are less likely to bind and are easier to control.
- Checy for er condition thor may infect me vind oper abrea. da of gets, have the tools serviced before using. Many accidents are caused by poorly maintained tools.
- Use only accessories that are recommended by the manufacturer for your model. Accessories that may be suitable for one tool, may become hazardous when used on another tool.
SPECIFIC SAFETY RULES
- Exposure to loud noise can cause hearing damage. Always wear ear protection when using power equipment.
WARNING: ALWAYS use safety glasses. Everyday eye glasses are NOT safety glasses.
- Use face or dust mask if operation is dusty. ALWAYS WEAR CERTIFIED SAFETY EQUIPMENT:
- ANSI Z87.1 eye protection (CAN/CSA Z94.3)
- ANSI S12.6 (S3.19) hearing protection
- NIOSH/OSHA respiratory protection
- For optimum control of your power tool, always use the auxiliary handles if that come with the tool.
- Your tool has insulated gripping surfaces – be sure to hold the power tool by these surfaces to avoid electrical shock if the cutting part of the tool should make contact with a “live” wire.
- For best safety measures, lay the tool on it’s side when not in use, particularly if you’re working on a ladder or scaffold, high off the ground. If tools with large battery packs can stand upright, but they’re easily tipped over, which could cause result in an injury.
- Power tools exert extreme force – be sure the item you’re working on is firmly secured with clamps or other reliable means. Do not try to hold the item by hand or against your body – you might lose control and be injured.
- Keep hair, clothing or gloves away from air vents, as they may become entangled in the moving mechanism around these areas.
- Hold the tool firmly with both hands. Use the auxiliary handle if avail- able; if there is no auxiliary handle, grip the handle at the bottom. Losing control of the device can result in personal injury.
Symbols & Charging & Operation
STAY ALERT
Watch what you are doing and use common sense. Don’t operate any tool when you are tired.
WARNING: Some dust created when using power tools to sand, grind, drill or saw and/or other construction activities contains chemicals known to the State of California to cause cancer, birth defects or other reproductive harm. Some examples of these types of chemicals:
- lead from lead-based paint
- rystalline silica from bricks and cement and other masonry products
- arsenic and chromium from chemically treated lumber Your risk from these exposures varies depending on how often you do work that involves these materials.
- To reduce exposure risk, work in a well ventilated area with approved safety equipment like dust masks that are designed to filter out microscopic particles.
- Avoid prolonged contact with dust from construction activities like power sanding, sawing, grinding, and drilling. Always wear protective clothing and immediately wash any exposed areas with soap and water.
- If you allow dust to get into your eyes or mouth, or stay on your skin, you risk absorption of these harmful chemicals.
WARNING: Dust from use of this tool on construction material may cause serious and/or permanent respiratory (or other) injury. Direct the particles away from your face, and be sure to use NIOSH/OSHA approved respiratory protection against dust exposure.
Charging & Operation
ALWAYS FOLLOW THE SAFETY RULES FOR USE OF THIS PRODUCT. You can get seriously hurt by using this tool unsafely or incorrectly.
- Always use caution, particularly if operating the power tool around electrical wiring. Your tool has insulated gripping surfaces – be sure to hold the power tool by these surfaces to avoid electrical shock if the cutting part of the tool should make contact with a “live” wire.
- Only operate the tool when you are securely holding it with both hands; do not leave the tool running.
- Don’t use water on your work surface – this tool is not waterproofed.
- Always ventilate your working area adequately.
- Make sure to use appropriate respiratory protection. Use of this tool on some paints, wood and particular products may produce dust containing hazardous substances
WARNING:
- Do not allow the terminals of the battery to contact metal objects when carrying or storing the battery.
- If the battery terminals come in contact with conductive materials, it can cause fires – so use caution when transporting the battery. NOTE: the US Department of Transportation Hazardous Material Regulations (HMR) prohibit transporting batteries in commerce or on airplanes (i.e. packed in suitcases and carryon luggage) UNLESS they are properly protected from short circuits.
- Take special precaution when transporting individual batteries to make sure the terminals are well insulated and protected from anything that could contact them and cause a short circuit.
SAFETY WARNINGS AND INSTRUCTIONS: CHARGING THE BATTERY PACK
- This manual contains important safety and operating instructions.
- Before using the battery charger, read and become familiar with all of the use instructions and caution markings on the battery charger, battery pack, and product using battery pack.
- CAUTION: Always use Hyper Tough battery packs to reduce the possibil- ity of injury; other battery types may burst, causing potentially harmful results.
- Keep the charger out of bad elements, such as rain and snow.
- Be sure that any attachments are recommended or sold by Hyper Tough; use of attachments by other manufacturers may not meet the same requirements and can result in fire, electric shock, or injury.
- Never pull by the cord – always pull by the plug when disconnecting the charger.
7) Make sure the cord is clear and secure – do not step on, trip or otherwise
damage or stress the cord.
8) Extension cords – refer to ELECTRICAL SAFETY (CONT.) – EXTENSION
CORD USE in this manual.
i trencharger can bedcharcour or damage in dour drill Using a
CHARGING THE BATTERY PACK
Chargers are designed to use standard 120 volt AC, 60 Hz power. Do not use DC or any other voltage. BEFORE ATTEMPTING TO CHARGE YOUR BATTERY PACK, THOROUGHLY READ ALL THE SAFETY INSTRUCTIONS.
- The battery is not fully charged. Before first use, the battery pack requires 5-7 hours charge time to be fully charged. Subsequent recharging needs 3-4 hours for the battery to be fully charged.
- Longest life and best performance of the battery pack is obtained when charging between air temperatures of 41ºF and 95ºF( 5°C – 35°C). DO NOT charge the battery pack in air temperatures below 41°F (5°C) or above 95°F (35°C). This is important and will prevent serious damage to the battery pack.
- Always switch to a fresh battery when tool performance begins to diminish. Severe heat is most destructive to a battery; the more heat generated, the faster the battery loses power. A battery that gets too hot can have a shortened life.
- Never over-discharge a battery by using the tool even after tool performance has decreased. Do not attempt to discharge a tool’s battery by continuing to pull on the tool trigger. When tool performance begins to diminish, stop the tool and recharge the battery for optimal performance.
- Allow the battery pack to cool down after use; Avoid placing the charger and battery pack in a warm environment.
- The charger and battery pack may become warm to touch while charging. This is normal and does not indicate problem.
- Batteries will reach full performance after about five charge/discharge cycles.
- Always have drill rotation switch in neutral/lock position when removing or inserting battery to avoid unintentional starting.
- To remove battery pack from the tool, press the lock spring buttons (J in the functional description) and pull out.
- To insert, simply push pack in until lock spring clicks.
- To charge, connect the switching adapter/plug low-voltage lead to the charging stand
- Insert the switching adapter/plug into a 120V household current recep- tacle.
- The step of the battery pack has positive and negative terminal markings on it. Align these with the identical markings on the top of the charging stand and insert pack into base. (Pack will not insert properly if reversed)
- The green light is the charge indicator. When the charger is connected to AC household current, the green light is on.
- The red light is the power indicator. When the battery is properly inserted into the charger and charging, the red light is on.
- Normal charging time is 3 to 4 hours. The charger will charge the battery at the normal rate until charging is complete. The red charging indicator light will turn off once charging is complete. After the battery is fully charged according to the charging time provided in the instructions, remove the battery pack from the charging stand. Battery temperature will cool to normal.
- When charging more than one battery pack, allow 15 minutes between charges.
- After many charge/discharge cycles, your battery will lose its ability to hold a charge. It should then be replaced. Dispose of batteries at an appropriate waste disposal facility. Do not throw batteries away in common trash receptacles.
Caution:
- Place and charge the Battery Pack on a dry fireproof location in a room where the temperature is from +41°F(5°C)-95°F(35°C).
- During charging the battery, the Battery Pack, Charger base, and Adapter may become warm when you touch it. This is a normal condition, and does not indicate a problem.
- If recharging a newly spent Battery pack, make sure it is undamaged and cool completely.
- Always unplug the Charger when charging completed.
- Be sure the battery is cool before using it.
Troubleshooting/Maintenance
Problem
• Unit will not start
Possible cause
- Battery not installed properly
- Battery not charged
- Battery will not charge
- Battery not installed into charger
- Charger not plugged in
- Surrounding air temperature too hot or cold
Possible solution
- Check battery installation
- Check battery charging requirements
- Insert battery into charger until red LED appears
- Plug charger into working outlet. Refer to “Important Charging Notes” for details
- Move charger and tool to a surrounding air temperature of above 41°F (5°C) or below 95°F (35°C)
MAINTENANCE
Keep the tool clean using a soft damp (not wet) cloth. Do not use solvents on the plastic parts. Lubrication is not necessary. After long use, have an authorized service center maintain and lubricate the tool. Should the chuck require replacement,
- Remove the battery pack
- Open the chuck jaws as widely as possible so you can get at the chuck retaining screw.
- Unscrew the chuck retaining screw with a Phillips screwdriver. Note that this is a left hand threaded screw and you remove it by turning it clockwise.
- Clamp the shorter arm of a large Allen wrench in the chuck, aligning it with the jaws so they grip three of its six flat sides.
- Place the drill on a flat surface, and support the chuck with a piece of wood about 3/8″ (10 mm) above that surface. Or press the drill body on the working table and make the chuck hanging in the air. (Be careful with your hand!)
- Strike the long arm of the wrench with a hammer so that the chuck turns counter-clockwise and unscrews from the spindle. This may require a fairly sharp blow.
- Repeat the process in reverse to install a new chuck.
- To maintain the best performance of your rechargeable Li-ion battery, protect it from overheating, both from overcharging and during storage. Occasionally charge the battery for 7 hours. The battery may also benefit from a full discharge from time to time.
IMPORTANT: to assure product SAFETY and RELIABILITY, all mainte- nance, repairs or adjustments (other than those mentioned in this manual) should be performed by authorized repair centers using identi- cal replacement parts.
ACCESSORIES
If you need accessories for use with your tool, most recommended accessories are available from your local dealer or authorized service center. If you need accessory information, please call: 1-800-840-7856
Instruction manual shall include :
Warning: Changes or modification to this unit not expressly approved by the party responsible for compliance could void the user’s authority to operate the equipment.
NOTE: This equipment has been tested and found to comply with the limits for a Class B digital device, pursuant to part 15 of the FCC Rules .This limits are designed to provide reasonable protection against harmful interference in a residential installation . This equipment generates, uses and radiate radio frequency energy and, if not installed and used in accordance with the instruction ,may cause harmful interference to radio communication. However ,there is no guarantee that interference will not occur in a particular installation. If this equipment does cause harmful interference to radio or television reception, which can be determined by turning the equipment off and on, the user in encouraged to try to correct the interference by one or more of the following measures:
- Reorient or relocate the receiving antenna.
- Increase the separation between the equipment and receiver.
- Connect the equipment into an outlet on a circuit different from that to which the receiver is connected .
- Consult the dealer or an experienced radio /TV technician for help.
SPECIFICATIONS
- 20V Max Li-ion battery
- 3/8 (10mm) keyless chuck
- No Load Speed: 0-600 RPM
- 15+1 position adjustable torque clutch
- Variable speed reversible trigger with electric brake
- Comfortable rubberized grip
- Build-in double-ended driver bit
- Bright LED work light
- 3 – 4 hours charging time
Includes:
- 20V Max Drill/Driver
- Double-end driver bit
- 20V Max Li-ion battery pack
- Charger
- Instruction manuall
REFRENCE LINK