
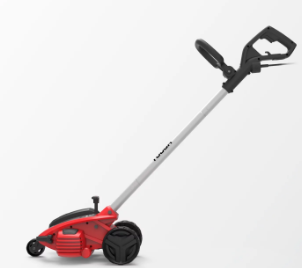
HYPERTOUGH HT19 12-Amp Corded 3-Setting Lawn Edger User Guide
Important Safety Instructions
- Avoid Dangerous Environment: Don’t use appliances in damp or wet locations.
- Don’t Use In Rain.
- Keep Children Away: All visitors should be kept at a distance from work area.
- Dress Properly: Do not wear loose clothing or jewelry. They can be caught in moving parts. Use of rubber gloves and substantial footwear is recommended when working outdoors. Wear protective hair covering
to contain long hair. - Use Safety Glasses: Always use face or dust mask if operation is dusty.
- Use Right Appliance: Do not use appliance for any job except that for which it is intended.
- Ground Fault Circuit Interrupter (GFCI) protection should be provided on the circuit(s) or outlet(s) to be used for the gardening appliance. Receptacles are available having built-in GFCI protection and may be used for this measure of safety.
- Store Idle Appliances Indoors: When not in use, appliances should be stored indoors in dry, and high or locked-up place – out of reach of children.
COMPONENT LIST

- Auxiliary handle
- On/off switch
- Extension cord retainer
- Handle adjustment knob
- Locking knob
- Upper shaft
- Lower shaft
- Rear wheel
- Blade guard
- Blade
- Front wheel
- Edge guide knob
- Cut depth knob
TECHNICAL DATA
| Rated Voltage | 120V~60Hz |
| Rated Power | 12 A |
| Rated No-load speed | 4700/min |
| Protection class | /ll |
| Blade diameter | 7-1/2″ |
| Blade cutting depth | 1″, 1-1/4″, 1-1/2″ |
| Machine weight | 14.2 lbs |
We recommend that you purchase your accessories from the same store that sold you the tool. Refer to the accessory packaging for further details. Store personnel can assist you and offer advice
ASSEMBLY & OPERATION
| ACTION | FIGURE |
| Assembly | |
| Assembling the Shaft | See Fig. A |
| Assembling the Auxiliary Handle | See Fig. B |
| Attaching the Extension Cord | See Fig. C1&C2 |
| Operation | |
| Setting to the edging position | See Fig. D1 |
| Edging | See Fig. D2&D3 |
| Adjusting Cut Depth | See Fig. E1&E2 |
| Setting to the trenching/landscaping position | See Fig. F |
| Trenching and landscaping operation | |
| Removing and attaching the blade | See Fig. G1&G2 |
REMOVING AND ATTACHING THE BLADE
The blade, two spacers and hex head nut with conical washer should be attached to your Edger in the order shown. Check that the blade has been properly mounted before using your Edger. The Edger Blade has two wear indicators that show when the original blade needs to be replaced. When the blade wears to the small holes, it should be replaced.(See Fig. G1&G2)
EDGING
- Before starting the edger, line up the tool so the edge guide rests against the edge of the paved surface. Both rear wheels should be on the paved surface when edging. (See Fig D2)
- To avoid kickback of edger, tilt the handle down so the blade is above the ground (See Fig D3).
- Turn switch ON and allow blade to spin without moving tool.
- Slowly lift the handle to lower the blade, finding the edge of the paved surface and start edging. Then move tool forward slowly along edge of paved surface, keeping the edge guide pressed lightly against the pavement edge. For the first edging each season, it is best to move forward slowly because grass is thickest then.


STORAGE
Remove and clean any debris from the outside of the edger and inside of guard before storage. See MAINTENANCE section. If necessary, the edger may be stored by hanging on a hook by its handle.
CAUTION: DO NOT HANG EDGER ON THE SWITCH TRIGGER OR POWER CORD!
Note: Do not store the tool on or adjacent to fertilizers or chemicals. Such storage can cause rapid corrosion.
MAINTENANCE
Use only mild soap and damp cloth to clean the tool. Never let any liquid get inside the tool; never immerse any part of the tool into a liquid.
IMPORTANT: To assure product SAFETY and RELIABILITY, repairs, maintenance and adjustment should be performed by authorized service centers or other qualified service organizations. Use only identical replacement parts. Inspect and thoroughly clean your edger at the beginning of each edging season for longer life and better performance.


 Afrikaans
 Albanian
 Amharic
 Arabic
 Armenian
 Azerbaijani
 Basque
 Belarusian
 Bengali
 Bosnian
 Bulgarian
 Catalan
 Cebuano
 Chichewa
 Chinese (Simplified)
 Chinese (Traditional)
 Corsican
 Croatian
 Czech
Czech Danish
 Dutch
Dutch English
 Esperanto
 Estonian
 Filipino
 Finnish
 French
 Frisian
 Galician
 Georgian
 German
 Greek
Greek Gujarati
 Haitian Creole
 Hausa
Hausa Hawaiian
 Hebrew
 Hindi
Hindi Hmong
Hmong Hungarian
 Icelandic
 Igbo
Igbo Indonesian
 Irish
Irish Italian
 Japanese
 Javanese
 Kannada
 Kazakh
 Khmer
Khmer Korean
 Kurdish (Kurmanji)
 Kyrgyz
 Lao
Lao Latin
Latin Latvian
 Lithuanian
 Luxembourgish
 Macedonian
 Malagasy
 Malay
Malay Malayalam
 Maltese
 Maori
Maori Marathi
 Mongolian
 Myanmar (Burmese)
 Nepali
 Norwegian
 Pashto
 Persian
 Polish
 Portuguese
 Punjabi
 Romanian
 Russian
 Samoan
 Scottish Gaelic
 Serbian
 Sesotho
 Shona
Shona Sindhi
 Sinhala
 Slovak
 Slovenian
 Somali
 Spanish
 Sundanese
 Swahili
 Swedish
 Tajik
Tajik Tamil
Tamil Telugu
 Thai
Thai Turkish
 Ukrainian
 Urdu
Urdu Uzbek
Uzbek Vietnamese
 Welsh
Welsh Xhosa
Xhosa Yiddish
 Yoruba
 Zulu
Zulu