iHome iD38 System for Your iPad, iPhone and iPod User Guide
Maintenance
- Place the unit on a level surface away from sources of direct sunlight or excessive heat.
- Clean your unit with a soft cloth moistened only with mild soap and water. Stronger cleaning agents, such as Benzene, thinner or similar materials can damage the surface of the unit.
Getting Started
Thank you for purchasing the iHome iD38, the home system for your iPad, iPhone and iPod. This device works with iHome apps available on the App Store enabling additional alarm features, settings, firmware updates, and other enhancements. Device compatibility with our apps and features are subject to change. This instruction booklet explains the basic operation and care of the unit and does not cover our apps. Visit iHomeaudio.com/apps <http://iHomeaudio.com/apps> for our latest app offerings, device compatibility and support.
NOTE: iHome apps are for iPad, iPhone and iPod touch only.
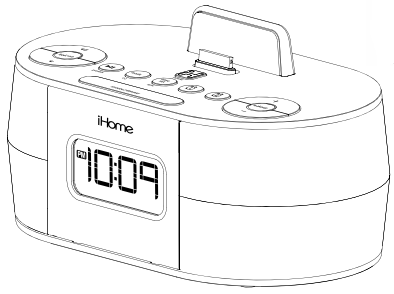
Controls and Indicators
Top Panel

Rear Panel  Backup battery compartment (on bottom of unit)
Clock display 
Using the iD38
Connecting the Unit to Power Source
The unit does not operate on battery
Updating your iD38 firmware
For best performance, make sure to update the iD38 firmware. .
Turning the Unit ON or OFF
Press the Power/App Button on the unit at any time to turn the unit On or Off.
Setting the Clock Time Using Auto Sync
The Auto Sync feature automatically syncs the time, month/date, and year on the unit to the same settings on your iPad, iPhone, or recent model iPod.
AUTO SYNC SETTING
“SYNC ON” flashes on the display and a beep sounds.
Using the Alarms
Tip: Download the free iHome Set app for advanced alarm, snooze and sleep functions
Setting the Alarms
- Press and hold the or Button until the alarm time flashes on the lower part of the display. Press and release
the + or – Button to set the alarm time (press and hold for faster setting). Remember to set the correct AM or PM time. - Press and release the Alarm Button again to confirm the set alarm time, then press and release the + or – Button to set the alarm schedule (‘7 DAYS’ = the whole week, ‘5 DAYS’ = Monday through Friday, ‘2 DAYS’ = Saturday and Sunday only).
- Press and release the Alarm Button again, then press and release the + or – Button to select an alarm source to
wake to: (iPod, Radio, or Playlist).
Listening to iPad, iPhone or iPod
- Dock an already playing iPad, iPhone or iPod. The unit will automatically turn on and in a moment you will hear the audio playing from your iPad/iPhone/iPod.
- If your iPad, iPhone or iPod touch is in video mode, you may see the “locked” slider on the iPad/iPhone/iPod display.
- Press the Button on the unit to pause play; press again to resume play.
- Press the + or – Button on the unit to go to the next or previous track.
IMPORTANT SAFETY INSTRUCTIONS
improper use can result in potential electrical shock or fire hazards. Please read all safety and operating instructions
carefully before installation and use, and keep these instructions handy for future reference.
- Servicing – The user should not attempt to service the unit beyond those methods described in the user’s operating instructions.
Troubleshooting
| Symptom | Possible Problem | Solution |
| Unit does not turn on | AC adaptor isn’t plugged into a working wall socket or not plugged into the power supply jack on back of the unit | Plug the AC adaptor into a working wall socket and plug the connector into the power supply jack on the unit |
| Unit doesn’t respond | Unit requires a reset | If unit is plugged in and doesn’t respond, try resetting the unit by following these steps: a) remove iPhone/iPod/iPad from dock b) unplug unit from power source c) remove back up battery d) wait a few minutes, then restore battery and resume use |
| iPhone/iPod/iPad is not docked properly | Remove your iPhone/iPod/iPad from the dock and check for obstruction on the connectors in the dock and on your iPhone/iPod/iPad. Then reseat it in the dock. | |
| Battery Low icon always flashing | Battery is weak | Replace with new battery |
| Battery was not installed properly | Check to make sure the + side is facing outwards | |
| iPhone/iPod/iPad does not respond to the unit/iPod is playing but no sound comes out | iPhone/iPod/iPad is not docked properly | Remove your iPhone/iPod/Pad from the dock and check for obstruction on the connectors in the dock and on your iPhone/iPod/iPad. |
| Your iPhone/iPod/iPad software is too old | Upgrade software on your iPhone/iPod/iPad via iTunes on your computer | |
| iPhone/iPod/iPad is locked up/plays but no sound comes out | Check the volume setting. Please refer to your iPhone/iPod/iPad manual for details. See above for software upgrade information. You may need to reset your iPhone/iPod/iPad. Refer to your iPhone/iPod/iPad user guide for details on how to perform a reset. | |
| Using 1st or 2nd generation iPod, iPod Shuffle or other devices. | Unit cannot control those iPod models or other devices. | |
| Unit/iPhone/iPod/iPad performance is erratic | The unit is reacting to external interference | Move unit away from potential sources of external interference such as computers, modems, wireless devices (routers) or fluorescent light. |
| No sound from unit | Volume is set too low on unit | Make sure volume is turned up |
| iPhone/iPod/iPad didn’t charge up | iPhone/iPod/iPad is not docked properly | Remove your iPhone/iPod/iPad from the dock and check for obstruction on the connectors in the dock and on your iPhone/iPod/iPad. |
| iPhone/iPod/iPad is locked up/ frozen | Please make sure your iPhone/iPod/iPad/iPad is working properly before docking into the unit. Please refer to your iPhone/iPod/iPad manual for details. | |
| iPhone/iPod/iPad battery has problem | ||
| Time sync didn’t work | iPod models such as iPod mini, iPod classic do not support time sync function | Make sure you are using an iPad, iPhone or recent iPod touch. If not available, set time manually (see page 5). |
Limited 1 Year Warranty Information
iHome Products, a division of SDI Technologies Inc. (hereafter referred to as SDI Technologies), warrants this product to be free from defects in workmanship and materials, under normal use and conditions, for a period of 1 Year from the date of original purchase. This decision is subject to verification of the defect or malfunction upon delivery of this product to the Factory Service Center listed below. The product must include
proof of purchase, including date of purchase.
- Remove the batteries (if applicable) and pack the unit in a well padded, heavy corrugated box. Enclose a photocopy of your sales receipt, credit card statement, or other proof of the date of purchase, if within the
warranty period. - Enclose a check or money order payable to the order of SDI Technologies, for the sum of $25.00 ($60.00 without proof of purchase).
- Send the unit prepaid and insured, to the Factory Service Center listed below.
DOWNLOAD PDF
iHome iD38 System for Your iPad, iPhone and iPod User Guide