
IHome iPL24 Docking FM clock radio for iPod or iPhone Guide
WELCOME
Thank you for choosing the IPL24 from iHome. This user guide will get you up and running quickly and provide helpful hints to maximize enjoyment. For more information about this and other iHome products, please visit www.ihome.com
GETTING STARTED
This unit ships with the following items. Please check to see that all items are present.
- iPL24 speaker system
- 100-240V Universal AC power adaptor
- FM antenna

FEATURES & FUNCTIONS
Top panel

Back panel

Display

CONNECTING AC ADAPTER AND FM ANTENNA

This unit operates on AC power using the included 100V-240V universal AC adaptor. Place the unit on a stable surface. Plug the power adaptor into the DC jack on the back of the unit and the other end into a working wall socket. The Power Button will glow red. Connect the included FM radio antenna to the FM antenna jack on the back of the unit.
BACKUP BATTERY
The IPL24 ships with a CR2450 battery installed for backup to provide continuous alarm operation and clock settings in the event of a power failure. Remove the pull tab from the battery compartment on the bottom of the unit before use. If a power failure occurs or the AC cord is accidentally disconnected, the display backlight will not remain lit, but the current time and alarm time settings will be temporarily maintained. Otherwise, you must reset the time and alarm settings.
Note:
The ![]()
- Please make sure the AC adaptor is connected. Otherwise, all settings may be lost during battery replacement.
- Use a Phillips screwdriver to open the backup battery compartment door located at the bottom of the unit.
- Remove the exhausted battery. Insert a new CR2450 battery by easing it under the tabs in the battery well and pressing it down. Make sure the side marked + is facing up.
- Close the battery compartment door and tighten the battery door screw. Note: Make sure you dispose of the battery properly (see your local regulations).
WARNING:
Lithium batteries can explode or cause burns if disassembled, shorted, recharged, or exposed to water, fire, or high temperatures. Do not place loose batteries in a pocket, purse, or other container containing metal objects, mix them with used or other battery types, or store them with hazardous or combustible materials. Store in a cool, dry, ventilated area. Follow applicable laws and regulations for transport and disposal.
SETTING THE TIME:
TIME SYNC
This unit is equipped with auto sync. By default, the unit will sync to the time on your iPhone or iPod whenever you dock it in the Lightning dock. When successful, the updated time will appear on the display. While the dock accommodates most cases, you may need to remove your case for proper docking. To manually sync at any time, press and release the Time Sync Button. If sync is unsuccessful, try to sync again using a different iPhone or iPod. If sync still doesn’t work, set the time manually (see below).
SETTING THE TIME MANUALLY
- Press and hold the Time Sync Button until “SYNC” flashes in the display and a beep sounds. Press the + or – Buttons so “MANUAL” appears in the display, indicating manual time setting mode.
- Press and release the Time Sync Button to confirm the current time setting. The YEAR will flash on the display. Press the + or – Buttons to set the correct year.
- Press and release the Time Sync Button to confirm the current year setting. The DATE will flash on the display. Press the + or – Buttons to set the correct month and day (hold for rapid adjustment).
- Press and release the Time Sync Button to confirm the current date setting. Two beeps will sound to indicate time setting mode is complete.
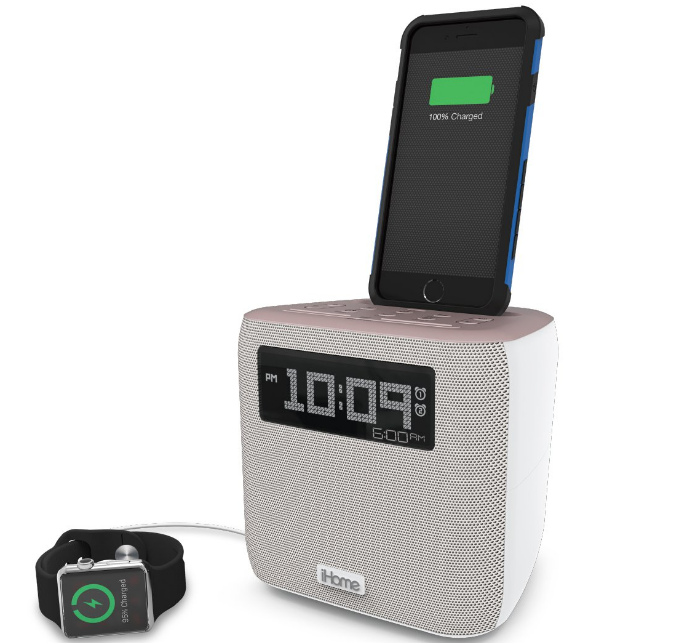
CHARGING YOUR iPhone OR iPod
While the dock accommodates most cases, you may need to remove your case for proper docking.
Gently dock your iPhone or iPod into the flexible Lightning dock located on the top of the unit. While your iPhone/iPod is docked in the unit and the unit is connected to AC power, it recharges (until fully charged). Note: Please make sure your iPhone/iPod is properly docked into the unit. Failure to do so may damage your iPhone/iPod.
Charging Devices Via the USB Port
A 1 Amp USB port is located on the back of the unit for charging devices while the unit is connected to AC power. Connect one end of a compatible USB cable (not included) to the standard USB port on the unit and the other end to the device you wish to charge. Some devices require higher amperage USB charging ports. Monitor the charging status of your device. If the device does not charge, you will need to use the charger that came with your device.
USING THE RADIO IN OTHER COUNTRIES
Different regions of the world use different FM radio frequency steps and ranges. You will need to select the one that matches the standards in your region (USA, EUROPE, JAPAN, AUSTRALIA, or CHINA). The default setting is USA; if you live in the US, you may skip this section.
- While the unit is OFF, press and hold the Mode Button for about 10 seconds until the region flashes in the display and a beep sounds.
- Press the + or – Buttons as needed to set the display to your region: USA, EU (Europe), JPN (Japan), AUS (Australia), or CHN (China).
- Press and release the Mode Button (or no button within 10 seconds) to exit the radio frequency setting mode. Two beeps will confirm the radio frequency setting.
SNOOZE/DIMMER OPERATION
- To program a custom snooze duration, during normal operation (when the alarm is not sounding) press and hold the Snooze/Dimmer Button until the display flashes, then press the + and – Buttons on the unit to adjust the snooze time to 1 – 29 minutes.
- Press the Snooze/Dimmer Button on the IPL24 after the alarm sounds. The alarm will be silenced and will come on again in about 9 minutes (default). You may repeat this cycle several times during the one-hour alarm cycle.
- During normal operation (when the alarm is not sounding), press the Snooze/Dimmer Button to control the brightness level (8 steps, high to low and off settings) of the LCD display.
MAINTENANCE
- Place the unit on a level surface away from sources of direct sunlight or excessive heat.
- Protect your furniture when placing your unit on a natural wood and lacquered finish. A cloth or other protective material should be placed between it and the furniture.
- Clean your unit with a soft cloth moistened only with mild soap and water. Stronger cleaning agents such as thinner or similar materials can damage the surface of the unit.
IMPORTANT SAFETY INSTRUCTIONS
When used in a directed manner, this unit has been designed and manufactured to ensure your personal safety. However, improper use can result in potential electrical shock or fire hazards. Please read and follow all safety and operating instructions carefully before installation and use, and keep these instructions handy for future reference. Take special note of all warnings listed in these instructions and on the unit.
- Water and Moisture – The unit should not be used near water. For example: near a bathtub, washbowl, kitchen sink, laundry tub, swimming pool, or in a wet basement.
- Ventilation – The unit should be situated so that its location or position does not interfere with its proper ventilation. For example, it should not be situated on a bed, sofa, rug or similar surface that may block ventilation openings. Also, it should not be placed in a built-in installation, such as a bookcase or cabinet, which may impede the flow of air through the ventilation openings.
- Heat – The unit should be situated away from heat sources such as radiators, heat registers, stoves, or other appliances (including amplifiers) that produce heat.
- Power Sources – The unit should be connected to a power supply only of the type described in the operating instructions or as marked on the appliance. Only use the AC adapter that came with the unit.
Continued
- Power-Cable Protection – Power supply cables should be routed so that they are not likely to be walked on or pinched by items placed upon or against them. It is always best to have a clear area from where the cable exits the unit to where it is plugged into an AC socket.
- Cleaning – Clean only with a dry cloth.
- Objects and Liquid Entry – Care should be taken so that objects do not fall and liquids are not spilled into any openings or vents located on the product.
- Attachments – Do not use attachments not recommended by the product manufacturer.
- Overloading – Do not overload wall sockets, extension cords, or integral convenience receptacles as this can result in a risk of fire or electric shock.
FCC INFORMATION
This equipment complies with FCC RF radiation exposure limits set forth for an uncontrolled environment. This device complies with Industry Canada’s license-exempt RSSs.
- Warning: Changes or modifications to this unit not expressly approved by the party responsible for compliance could void the user’s authority to operate the equipment.
- NOTE: This equipment has been tested and found to comply with the limits for a Class B digital device, pursuant to Part 15 of the FCC Rules.
IC Statement
This device contains license-exempt transmitter(s)/receiver(s) that comply with Innovation, Science and Economic Development Canada’s license-exempt RSS(s). (1) This device may not cause interference. (2) This device must accept any interference, including interference that may cause undesired operation of the device. The device meets the exemption from the routine evaluation limits in section 2.5 of RSS 102 and compliance with RSS-102 RF exposure, users can obtain Canadian information on RF exposure and compliance. This equipment should be installed and operated with a minimum distance of 20 cm between the radiator and your body.
REFERENCE LINK
https://www.ihomeaudio.com/iPL24GC/